


10 Best Pest Control Methods for Crop Protection
Every season, pests show up with the same goal, eat first and leave you with what’s left. Learning and applying the best pest control methods for crop protection is key to reducing this damage. Sometimes it’s obvious chewed leaves, bored stems, fruit scarred overnight. Other times it’s sneaky: a slow decline in vigor, a patchy stand, a yield that “should’ve been better.” However it happens, the result is the same: lost time, lost money, and a harvest that never reaches its potential.
That’s why the question comes up on every farm and in every backyard garden: what is the best pest control method for keeping crops safe? Most experienced growers will give you the same honest answer there isn’t one magic spray, one trick, or one perfect schedule that works everywhere. Weather changes. Pest pressure changes. Crops change. Even the same field can behave differently year to year. The real win comes from stacking smart moves: prevention, monitoring, natural controls, and only when it truly makes sense careful, targeted treatments.
In this practical guide, we’ll walk through the 10 Best Pest Control Methods for Crop Protection a mix of proven farm strategies and garden friendly tactics that can help you protect your plants, reduce avoidable damage, and grow with more confidence from planting to harvest.
1. Integrated Pest Management IPM
If you have ever felt like pests “come out of nowhere,” Integrated Pest Management, better known as IPM, is the system that brings things back under control. IPM is not a product and it is not a single tactic. It is a practical, science based way to make pest decisions using observation, pest biology, and a clear threshold for when action is actually worth taking. Major public guidance describes IPM as an environmentally friendly, common sense approach that relies on monitoring, correct identification, and action thresholds before choosing the lowest risk control that still works.
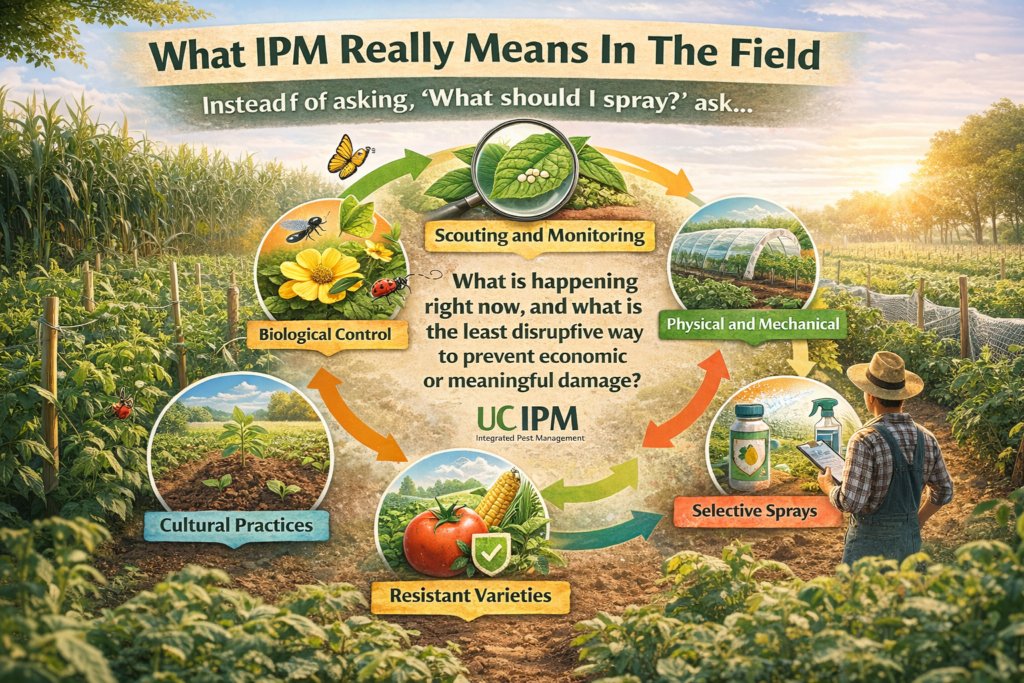
What IPM really means in the field
A lot of pest control fails because it starts with the wrong question. The usual question is, “What should I spray?” IPM flips that to, “What is happening right now, and what is the least disruptive way to prevent economic or meaningful damage?” That matters because not every insect is a pest, and not every pest sighting becomes a problem. UC IPM describes IPM as an ecosystem based strategy focused on long term prevention through a combination of techniques such as biological control, habitat manipulation, cultural practice changes, and resistant varieties.

In other words, IPM is about building a crop system that is harder to damage, while keeping a realistic toolkit ready for the moments when pressure spikes.
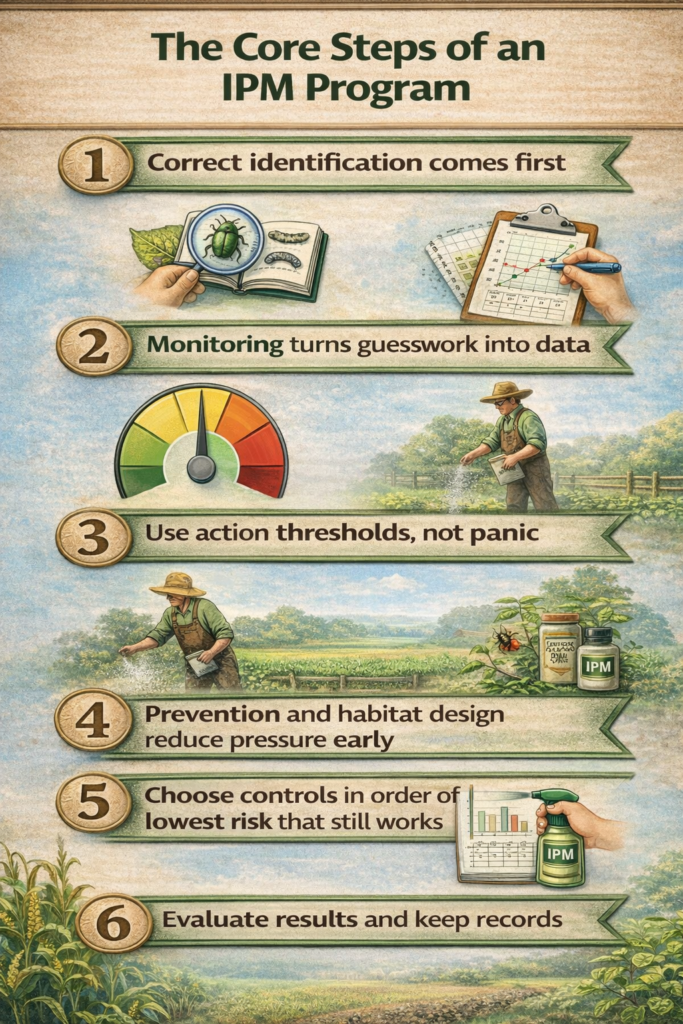
The core steps of an IPM program
A strong IPM program is usually built around a repeatable loop. Multiple extension and agency resources describe similar steps, including identification, prevention, monitoring, thresholds, implementation, and evaluation.
Here is that loop in a farm friendly way.
Step 1: Correct identification comes first
You cannot manage what you misidentify. Aphid damage, mite damage, nutrient issues, herbicide injury, and some viral symptoms can look similar at a glance. IPM starts with confirming what you are dealing with and understanding the pest’s life cycle and weak points. University based IPM programs emphasize narrowing down likely causes and verifying the problem before choosing a solution.
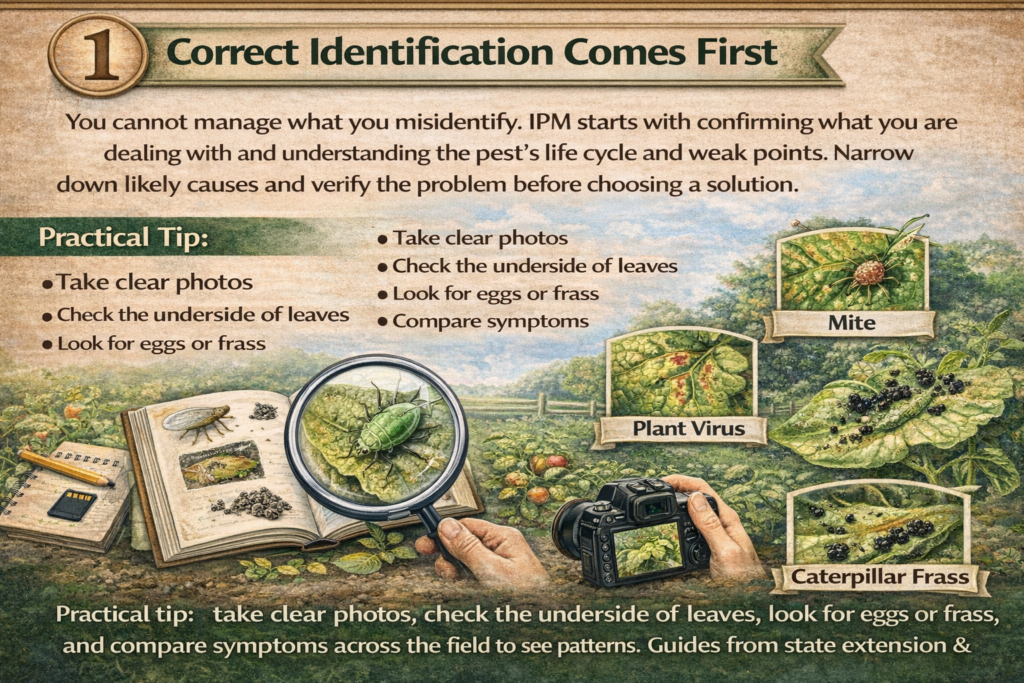
Practical tip: take clear photos, check the underside of leaves, look for eggs or frass, and if you can, compare symptoms across the field to see patterns. Many state extension sites and IPM programs publish pest identification guides that make this step much faster.
Step 2: Monitoring turns guesswork into data
Monitoring is the engine of IPM. It means regular scouting so you know whether pest pressure is rising, stable, or fading. The Northeastern IPM Center describes monitoring as the crux of IPM because it helps determine need for action, evaluate results, and build site history that improves future decisions.
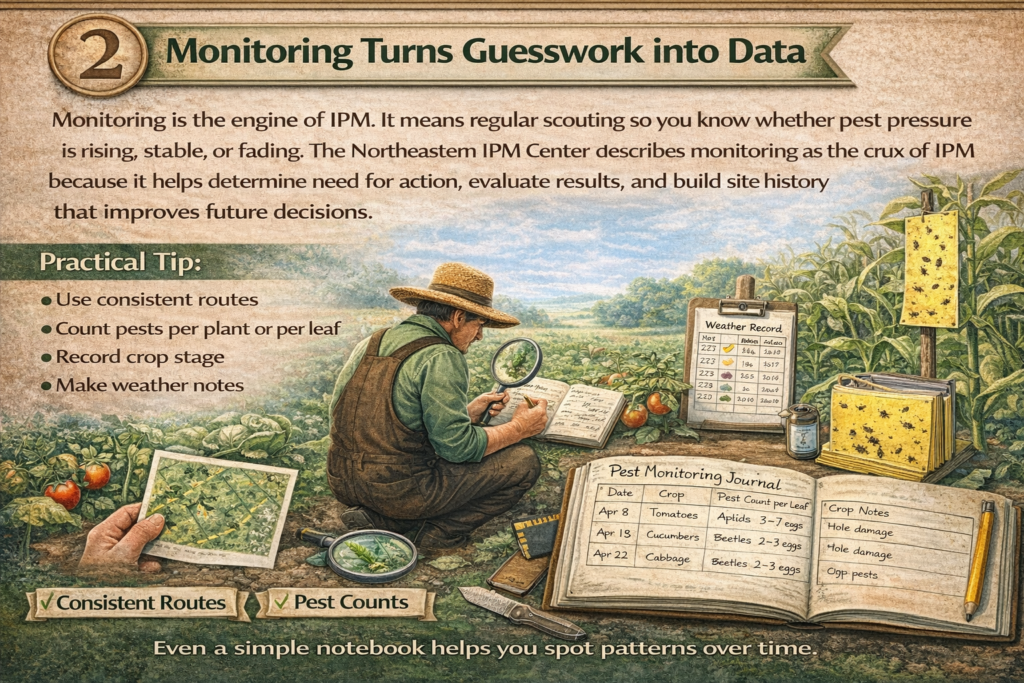
Practical tip: use consistent routes, count pests per plant or per leaf, and record crop stage and weather notes. Even a simple notebook helps you spot patterns over time.
Step 3: Use action thresholds, not panic
One of the biggest differences between IPM and routine spraying is the idea of an action threshold. The EPA highlights action thresholds as a key principle, meaning you decide ahead of time what level of pest presence triggers a response.
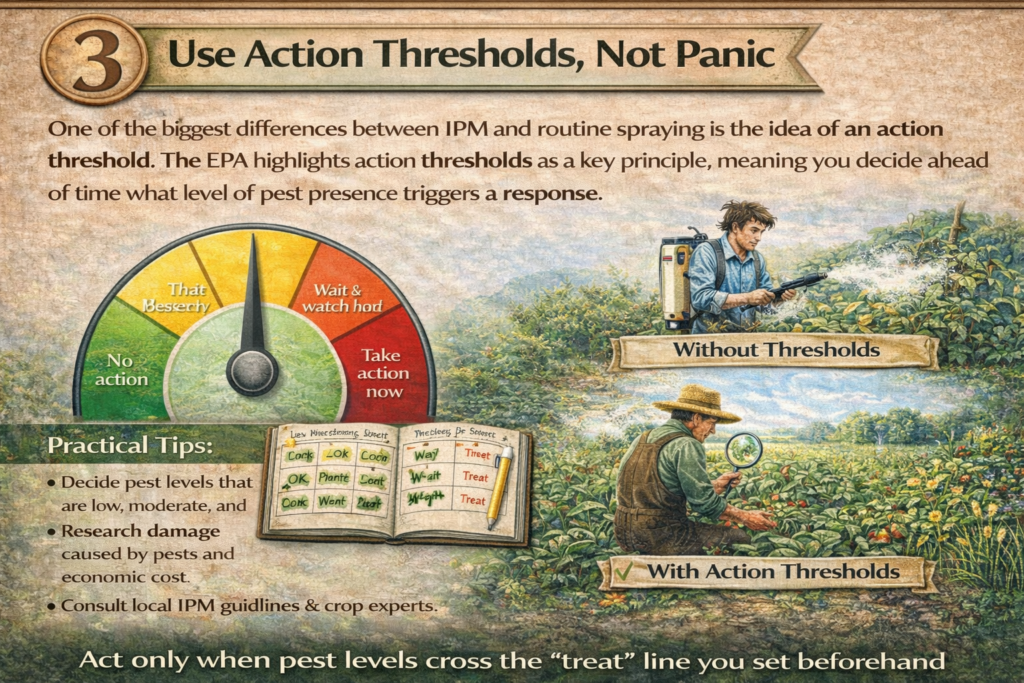
This is where IPM protects your budget and your beneficial insects. If the pest population is below the threshold, you might keep watching instead of treating. If it crosses the threshold, you act quickly and intentionally.
Practical tip: thresholds differ by crop, pest, region, and crop stage. University decision tools and crop guides often publish thresholds and scouting methods to help growers time interventions correctly.
Step 4: Prevention and habitat design reduce pressure early
IPM is not only reactive. It is heavily preventive. This includes crop rotation, sanitation, planting dates, resistant varieties, balanced fertility, irrigation management, and field edge planning. UC IPM highlights long term prevention as a central goal, using a mix of cultural practices and resistant varieties as part of the overall strategy.

Practical tip: if a field always has the same pest, ask what conditions keep favoring it. Sometimes a small change, like removing volunteer plants that host the pest, can drop pressure dramatically.
Step 5: Choose controls in order of lowest risk that still works
When monitoring and thresholds tell you it is time to act, IPM does not jump straight to the harshest option. The EPA guidance emphasizes choosing control methods based on effectiveness and risk after prevention is no longer enough.
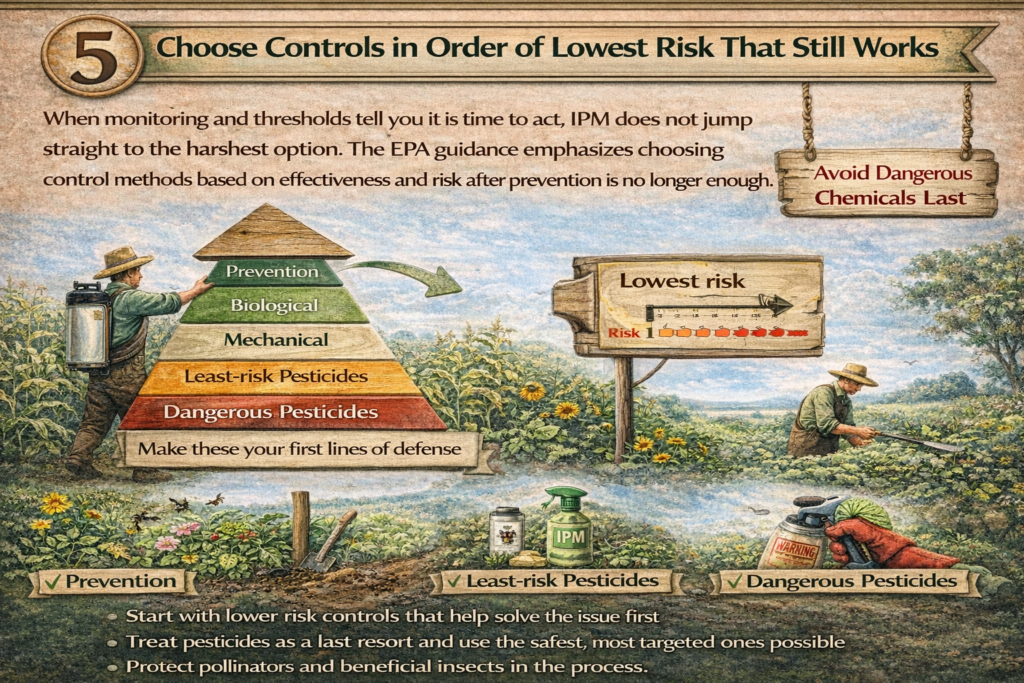
Common control options within IPM include:
• Physical and mechanical tools such as traps, row covers, removal of infested plant parts, and barrier techniques
• Biological control such as conserving predators and parasitoids, or using approved biopesticides
• Targeted chemical control when needed, selected for the pest and timing, and applied correctly to reduce off target impacts
This “least risk first” mindset is also reflected in agricultural sustainability resources that frame IPM as a way to reduce chemical inputs and protect non target organisms.
Practical tip: if you do use a pesticide, aim for precision. Apply at the life stage when the pest is most vulnerable, follow label directions, and rotate modes of action when appropriate to reduce resistance pressure.
Step 6: Evaluate results and keep records
IPM is a learning system. After treatment, you scout again and compare results with your baseline. Did the pest decline below threshold. Did beneficial insects rebound. Did you need a follow up. The Florida IFAS IPM safety publication outlines evaluation as a standard step and ties it to safer, more informed decision making.
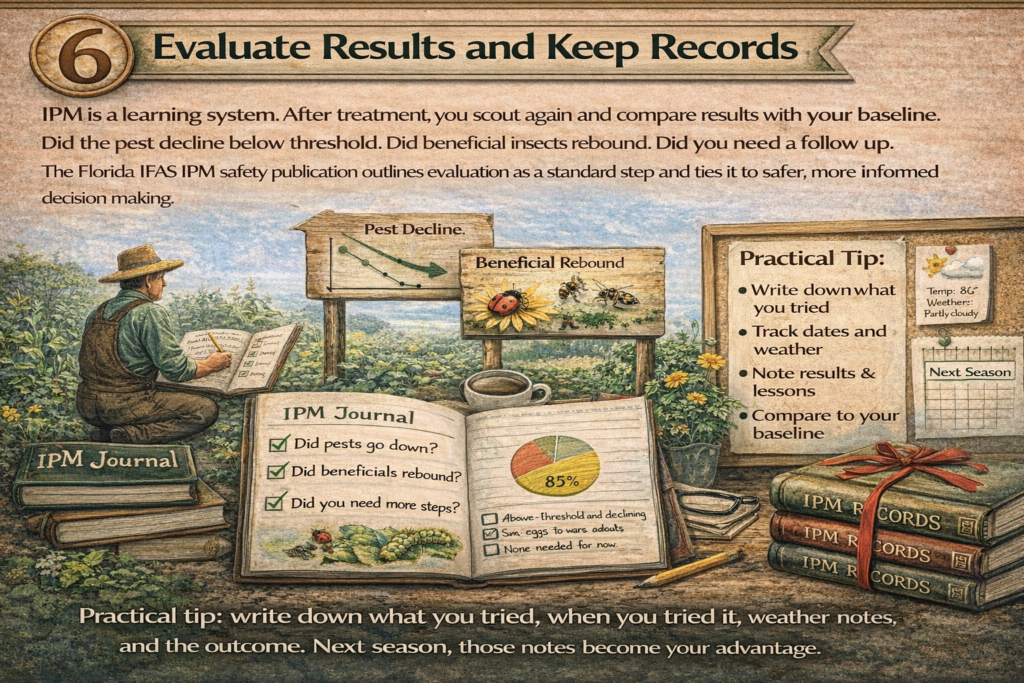
Practical tip: write down what you tried, when you tried it, weather notes, and the outcome. Next season, those notes become your advantage.
A simple example of IPM in real life
Imagine you spot aphids in a vegetable crop. A spray might knock them down fast, but it can also wipe out natural enemies that would have helped you all season. With IPM, you would:
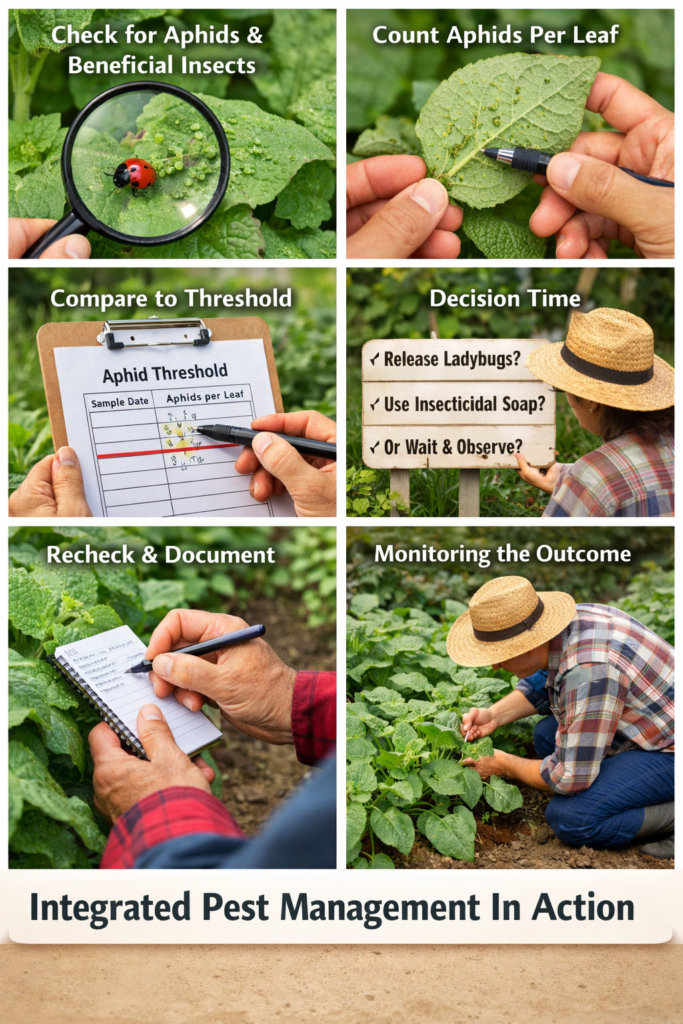
- Confirm the pest species and check for beneficial insects
- Count aphids per leaf on a consistent scouting route
- Compare counts to a threshold or a practical damage standard
- Decide whether to wait, release beneficials, use a low impact soap or oil, or apply a targeted product if the threshold is exceeded
- Recheck in a few days and document the outcome
That is IPM in action. It is calmer, more cost aware, and usually better for the crop ecosystem.
References
- University of Florida IFAS Extension, IPM steps including identification, prevention, monitoring with action thresholds, implementation, and evaluation.
- United States Environmental Protection Agency, IPM principles including monitoring, correct identification, action thresholds, and choosing appropriate control methods based on effectiveness and risk.
- UC Statewide IPM Program, IPM definition as an ecosystem based strategy focused on long term prevention using multiple techniques and minimizing risks.
- Northeastern IPM Center, monitoring as the crux of IPM and a way to evaluate tactics and build site history.
- USDA Office of Pest Management Policy, IPM as a framework to reduce economic, environmental, and public health risks.
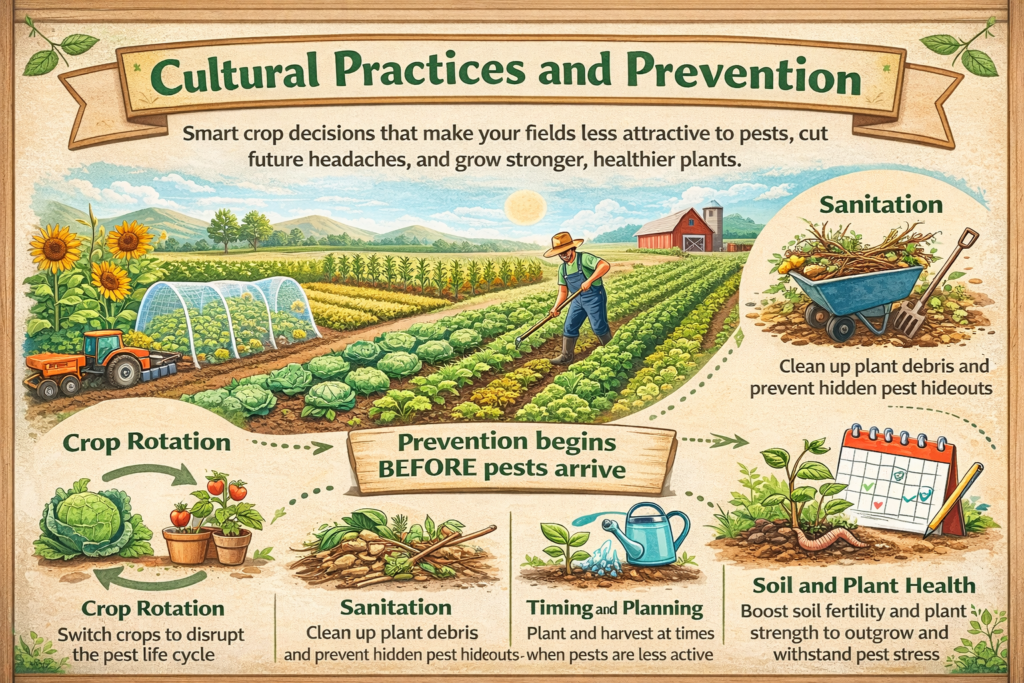
2. Cultural Practices and Prevention
If you want fewer pest headaches later, start before the pests arrive. Cultural practices are the everyday crop decisions that quietly make your field or garden a difficult place for pests to survive. The goal is simple: build a crop environment that is less attractive to pests, less supportive of their reproduction, and more resilient when pressure shows up. University and extension based IPM programs describe cultural control as a preventive strategy that works by anticipating insect problems and reducing the chance they become damaging.
What makes this approach powerful is that it does not depend on perfect timing with a spray. Instead, it depends on good planning and consistent habits. Once those habits are in place, you often see fewer outbreaks, and when pests appear, they spread more slowly and do less harm.
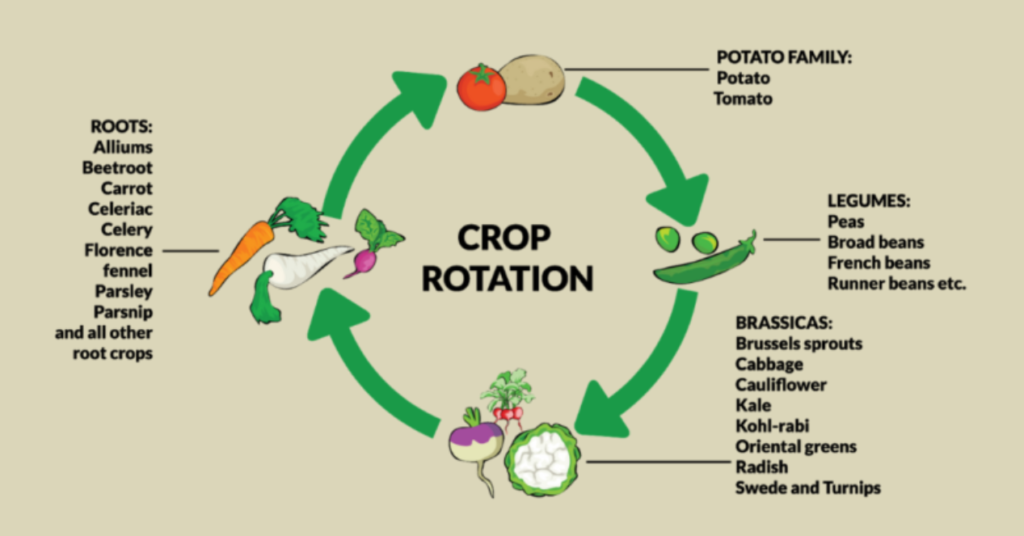
Crop rotation breaks the pest cycle
Crop rotation is one of the oldest and most reliable cultural tools. The idea is to avoid giving a pest the same preferred host crop year after year in the same field. Many insects and disease organisms build up when the host stays constant. Rotating to a different crop family can disrupt that buildup and reduce the number of pests that successfully overwinter or reproduce. Entomology teaching resources describe rotation as an effective cultural strategy because repeated planting of one crop in the same location allows pest populations to become established and reach damaging levels.
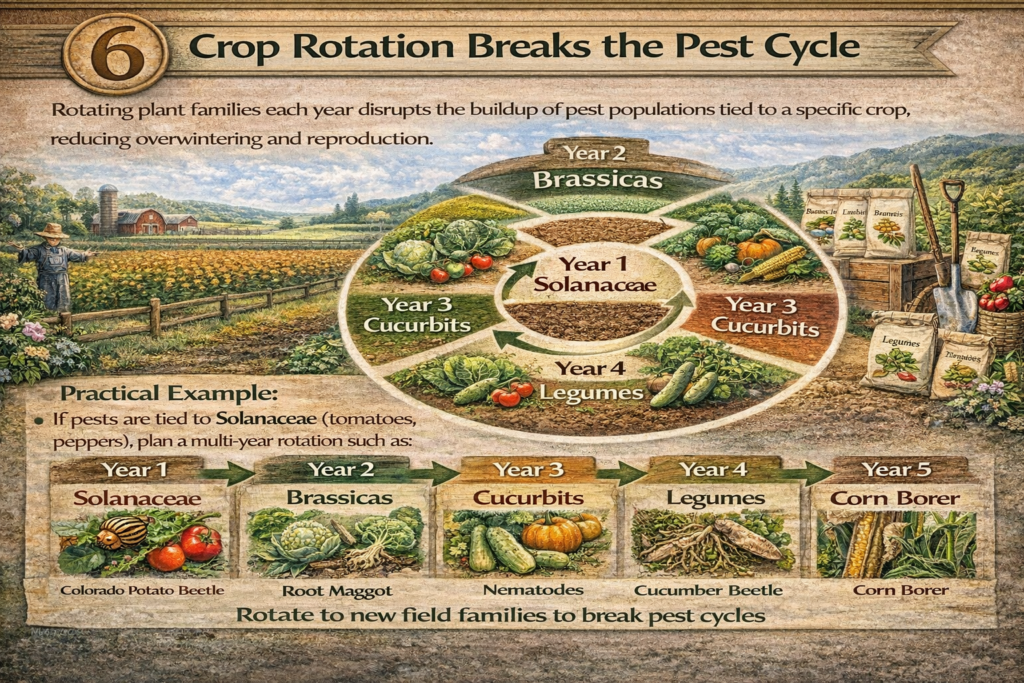
Practical example: If a field has repeated issues with pests tied to a specific crop family, a planned multi year rotation that shifts families can reduce pressure without extra inputs. USDA NRCS IPM planning guidance lists crop rotation as an avoidance activity that helps manage pest risks as part of a broader prevention framework.
Sanitation removes hiding places and future infestations
Sanitation sounds basic, but it is one of the easiest ways to stop problems from carrying over. Many pests and pathogens survive in crop debris, volunteer plants, and unmanaged weeds around field edges. By removing heavily infested residues, destroying cull piles properly, cleaning equipment between fields, and keeping seedbeds and greenhouse areas tidy, you reduce the number of pests that get a head start. USDA NRCS prevention activities for planned IPM include cleaning equipment and starting with pest free seed and transplants.
A useful mindset is this: every neglected corner can become a nursery for next month’s outbreak. A few minutes of cleanup now often saves hours of control work later.
Timing and planting decisions can dodge peak pressure
Pests are not random. Many follow predictable seasonal patterns tied to temperature and crop stage. Cultural prevention uses that predictability. Adjusting planting dates, harvest timing, and even irrigation timing can reduce exposure during the period when pests are most aggressive or when crops are most vulnerable. Oklahoma State University Extension lists selecting the best planting and harvest times as part of cultural control practices designed to make a site unattractive to pests.
In practice, this can look like planting slightly earlier or later to avoid a known pest window, or choosing shorter season varieties in high pressure areas. The best timing choices are local, so regional extension crop calendars and pest forecasts are worth using as your reference point.
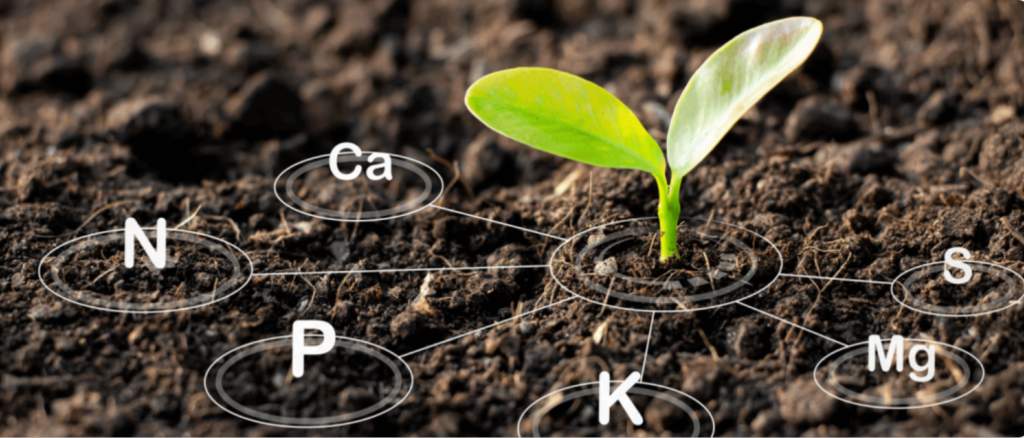
Soil and plant health reduces the damage pests can cause
Healthy crops tolerate stress better. While soil health does not “kill” pests, it supports stronger plants that recover faster and are less likely to suffer economic damage. Balanced fertility, proper watering, and good drainage also help reduce disease pressure, which often travels alongside insect issues. FAO guidance on IPM encourages practices that grow healthy crops while reducing reliance on pesticides, integrating crop specific cultural strategies into the overall plan.
A simple rule that experienced growers follow is this: stressed plants invite trouble. If you fix the underlying stress, pest outbreaks often become smaller and easier to manage.
Choose resistant varieties and clean planting material
Resistant cultivars do not eliminate pests, but they can reduce damage enough that you avoid emergency treatments. FAO IPM guidance specifically includes resistant cultivars and crop sequences as part of good practice to minimize pest and disease pressure. If you grow vegetables, Cornell notes that resistant varieties are an important cultural disease management practice, with practical considerations on how to use resistance correctly.
Also, start clean. Certified seed, healthy transplants, and clean tools keep you from importing pests into an otherwise good system.
Why cultural prevention earns its spot among the best methods
Cultural practices work because they reduce pest pressure at the source. They lower the odds of a big outbreak, protect beneficial organisms by reducing the need for broad treatments, and improve consistency across seasons. Wisconsin vegetable IPM resources summarize cultural control as making the crop environment less suitable for pests and using it mainly as a preventive measure.
If you want pest control that feels calmer and more predictable, this is where it starts: rotate smart, clean up consistently, time plantings with intent, and build crop health from the soil up.
References
- Cornell Vegetable Program, guidance on using resistant varieties as part of disease management.
- University of Wisconsin Vegetable Entomology, Cultural control as preventive pest management and making the crop environment less suitable for pests.
- Oklahoma State University Extension, Cultural control practices including rotation, sanitation, planting and harvest timing, and resistant varieties.
- USDA NRCS, Planned IPM framework including prevention activities such as cleaning equipment and pest free planting materials, and avoidance activities including crop rotation and resistant varieties.
- North Carolina State University Entomology teaching resource, crop rotation as a long standing effective cultural strategy to prevent pest buildup.
- FAO, IPM integrating cultural strategies to grow healthy crops and minimize pesticide risks, plus emphasis on resistant cultivars and crop sequences.
3. Biological Control – Beneficial Organisms
Biological control is the pest control method that feels the most natural once you see it working. Instead of trying to wipe out every insect in a field, you support the living organisms that already keep pests in check. In trusted IPM guidance, biological control is defined as the helpful action of natural enemies such as predators, parasitoids, and pathogens that reduce pests and the damage they cause.

Here is the big idea. Most crop pests do not live alone in nature. They have enemies that hunt them, infect them, or reproduce inside them. When you protect those allies, pest populations often stay below damaging levels for longer, sometimes the whole season. USDA describes biological control as the use of predators, parasitoids, and pathogens to manage pests, and it places this approach as a core part of an integrated pest management strategy.
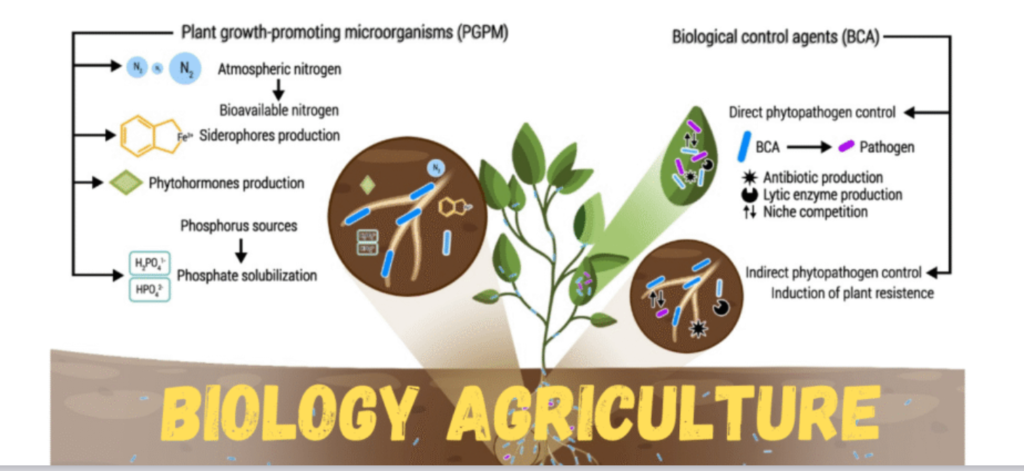
What counts as a beneficial organism
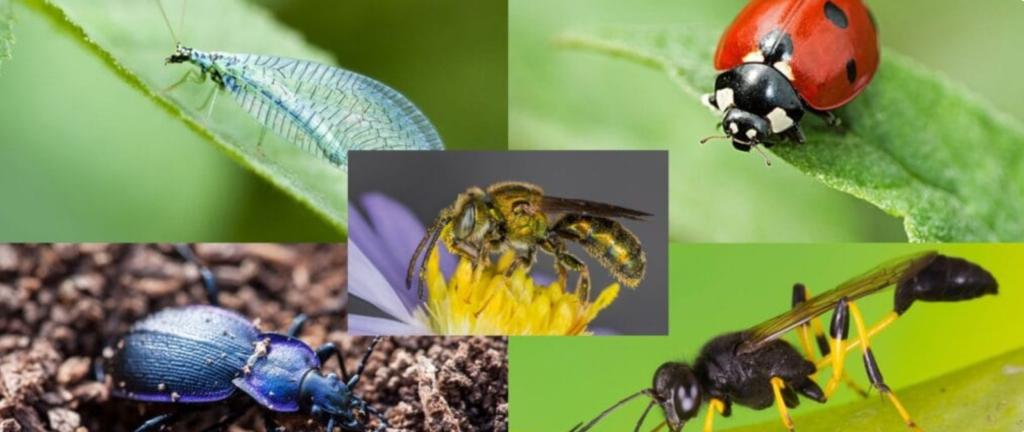
Beneficial organisms are not just “good bugs.” They can be insects, mites, nematodes, birds, and even bats. The key is that they reduce pest pressure without harming the crop.
Some of the most reliable beneficial insects are predators. Cornell’s biocontrol program notes that lady beetles, in both adult and larval stages, feed mainly on aphids, and they also eat mites, small insects, and eggs. That matters because aphids are not only direct sap feeders, they can also spread plant viruses. When lady beetles are present early, they often slow aphid buildup before it turns into a serious problem.
Green lacewings are another classic example. Extension resources commonly recommend lacewings and lady beetles for aphid control, especially when growers want to avoid broad pesticide use.
Then there are parasitoids, usually tiny wasps and flies. They do not “hunt” the way a predator does. Instead, they lay eggs in or on a pest insect, and the developing young eventually kills the host. USDA includes parasitoids as a major biological control group and highlights that they are part of the natural enemy community that can be conserved in gardens and farms.
Pathogens also play a role. These include naturally occurring bacteria, fungi, and viruses that infect pests. Some are used as biopesticides, but even without purchased products, natural disease outbreaks can reduce pest populations when conditions favor them. UC IPM includes pathogens and competitors in its description of biological control, showing that beneficial action can come from more than predators alone.
How to make biological control work on purpose
Biological control works best when you treat it like farm management, not wishful thinking. You are basically creating a field that feeds and shelters the helpers so they stay long enough to do the job.
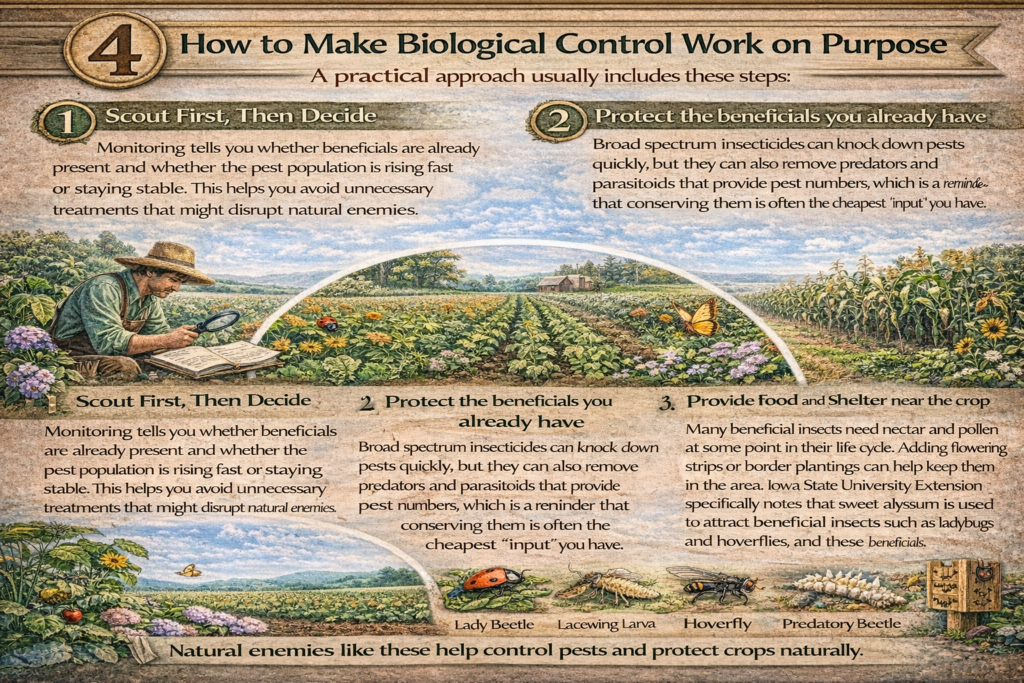
A practical approach usually includes these steps:
- Scout first, then decide
Monitoring tells you whether beneficials are already present and whether the pest population is rising fast or staying stable. This helps you avoid unnecessary treatments that might disrupt natural enemies. - Protect the beneficials you already have
Broad spectrum insecticides can knock down pests quickly, but they can also remove predators and parasitoids that provide long term control. UC IPM emphasizes the role of natural enemies in reducing pest numbers, which is a reminder that conserving them is often the cheapest “input” you have. - Provide food and shelter near the crop
Many beneficial insects need nectar and pollen at some point in their life cycle. Adding flowering strips or border plantings can help keep them in the area. Iowa State University Extension specifically notes that sweet alyssum is used to attract beneficial insects such as ladybugs and hoverflies, and these beneficials feed on pests. - Consider habitat tools where appropriate
USDA NRCS biological pest management guidance mentions habitat and support structures, including the possible use of bird and bat houses as part of a broader biological control plan.
Birds and bats as pest managers
Beneficial organisms are not limited to insects. In many agricultural landscapes, insect eating bats are important because they target night active insects that farmers rarely see. University of Nebraska resources describe bats as providing pest control services in agriculture through predation of night flying insects.
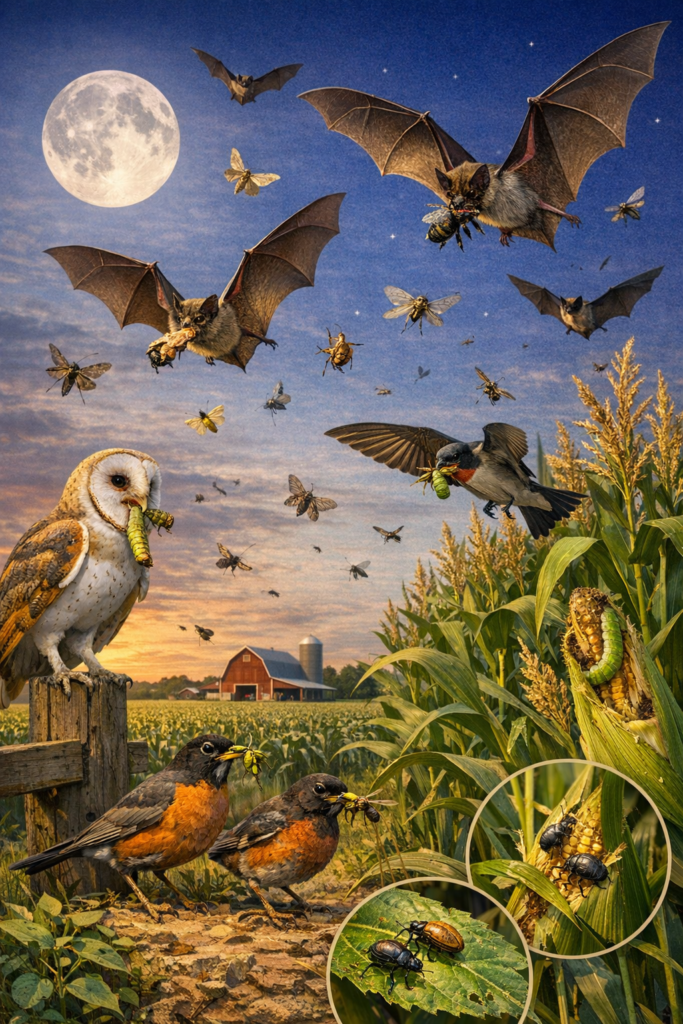
This does not mean bats replace all other controls, but it supports the same principle: the more you protect and rebuild the ecosystem services around your crop, the less you depend on emergency interventions.
Why biological control fits the best methods list
Biological control earns its spot among the top crop protection methods because it can be effective, scalable, and compatible with other strategies. It also supports long term sustainability. When beneficial populations build over time, some farms see fewer repeated outbreaks, fewer pesticide applications, and a healthier balance between pests and predators.
The most important takeaway is this: biological control is not only about releasing insects. It is about creating conditions where your allies can survive, reproduce, and keep working while you focus on growing the crop.
References
- University of Nebraska, Bats in agriculture and pest control services through predation of night flying insects.
- UC Statewide Integrated Pest Management Program, Biological Control overview and definition of natural enemies including predators, parasites, and pathogens.
- USDA, Practice Integrated Pest Management, Biological control section describing predators, parasitoids, and pathogens as control agents.
- Cornell University Biological Control, What is Biological Control, definition and natural enemies.
4. Physical Barriers and Mechanical Methods
If you want pest control that feels straightforward and low risk, physical barriers and mechanical methods are hard to beat. These tools do not depend on killing insects with chemicals. Instead, they work by blocking pests from reaching the crop, or by removing them before they multiply. That simple idea is also why they fit so well inside Integrated Pest Management programs. Oregon State University Extension describes mechanical and physical controls as an important part of IPM, including barriers, nets, traps, and hands on removal.
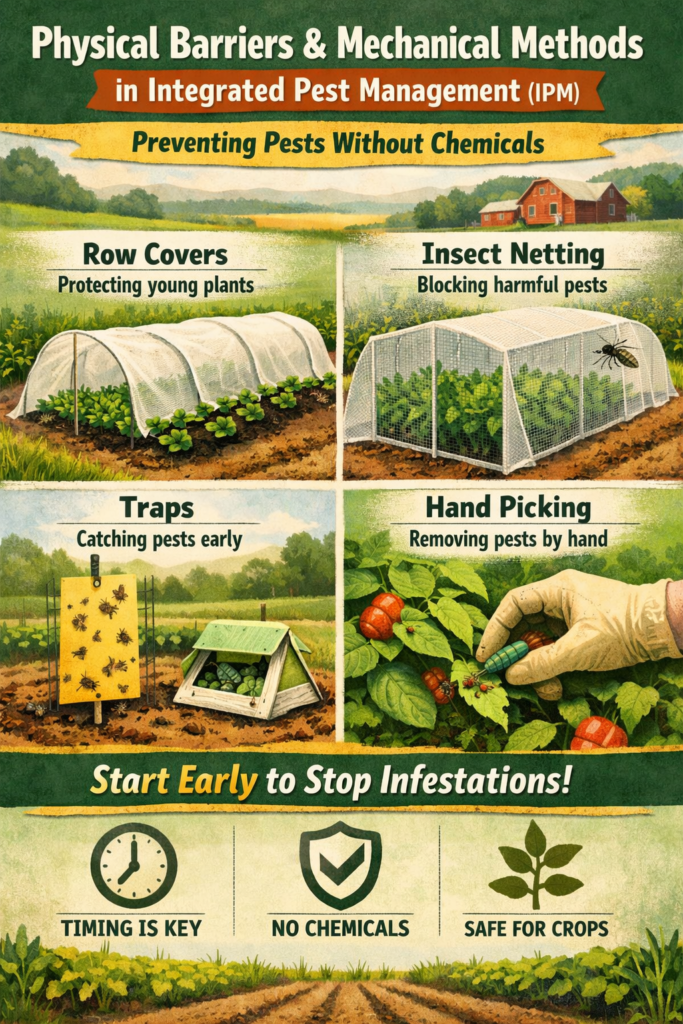
What makes this approach powerful is timing. Physical exclusion and direct removal work best when you start early, before a pest population gets established. Once an infestation is heavy, barriers alone cannot fix the problem. But when used from planting or early growth stages, these methods can prevent many issues from ever starting.
Row covers that keep insects out
Floating row covers are one of the most practical tools for vegetable growers and small farms. They are lightweight fabrics placed directly over plants, creating a physical shield that keeps many insects from landing and laying eggs. University extension resources explain that row covers can delay or prevent insects from colonizing high value plants, and they are commonly used in organic and small acreage production.
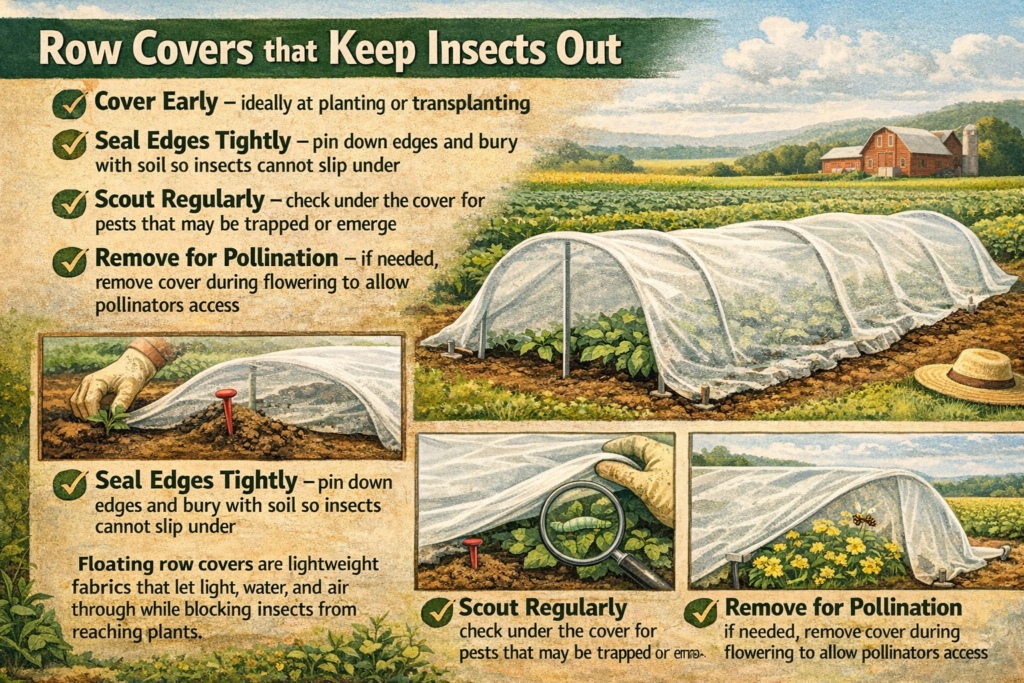
A key detail is that row covers are not only about insect control. They can also provide weather protection and season extension. Wisconsin Horticulture notes that floating row covers are permeable to light, water, and air while still helping exclude pests.
How to use row covers effectively
- Cover early, ideally at planting or transplanting
- Seal edges tightly with soil, pins, or weighted materials so insects cannot slip in
- Scout under the cover regularly because some pests can get trapped inside
- Remove covers when the crop needs pollination, unless the crop is self pollinating
That scouting point matters. University of Maryland Extension warns that pest insects can become trapped under row covers, and some pests can emerge from the soil under the cover, so checking is essential.
Insect netting for longer term exclusion
Insect netting is similar to row cover in purpose, but it is usually mesh based and designed primarily for pest management rather than temperature protection. Cornell Cooperative Extension explains that insect netting is lightweight mesh, permeable to light, water, and air, and used specifically for pest management.
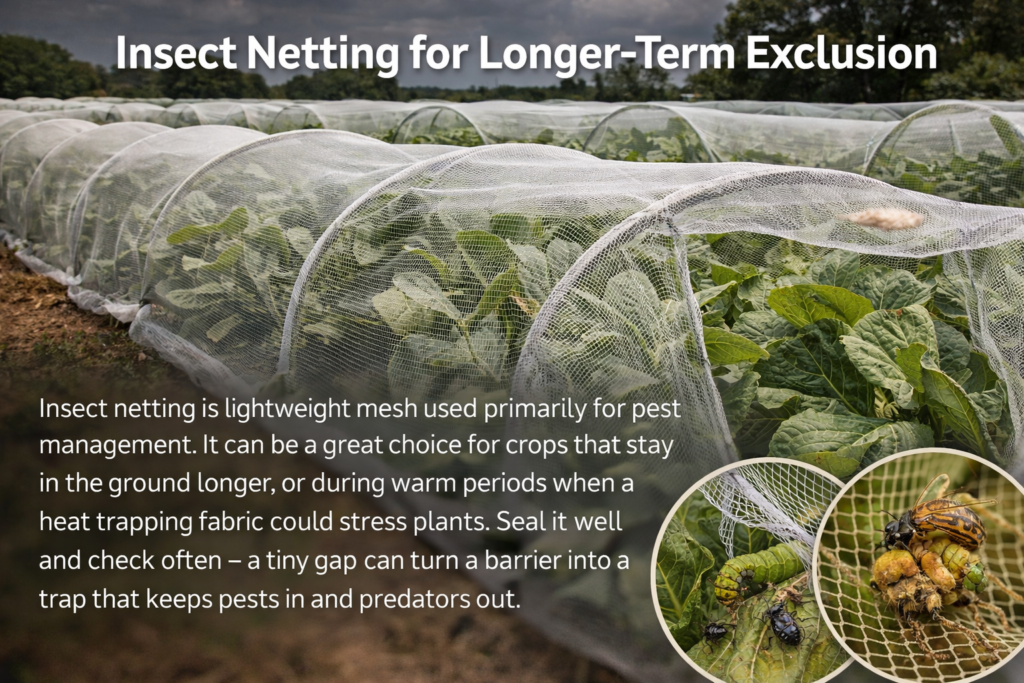
Netting can be a great choice for crops that stay in the ground longer, or during warmer periods when a heat trapping fabric cover could stress plants. The main rule is still the same. Seal it well and check often. A tiny gap can turn a barrier into a trap that keeps pests in and predators out.
Fencing and cages for larger pests
Not all crop damage comes from insects. Rabbits, deer, and other animals can destroy young plants in a night. Physical barriers like fences, cages, and guards work because they remove access. This is basic, but effective. Once larger animals find a food source, they often return, so exclusion is usually the fastest path to fewer losses.
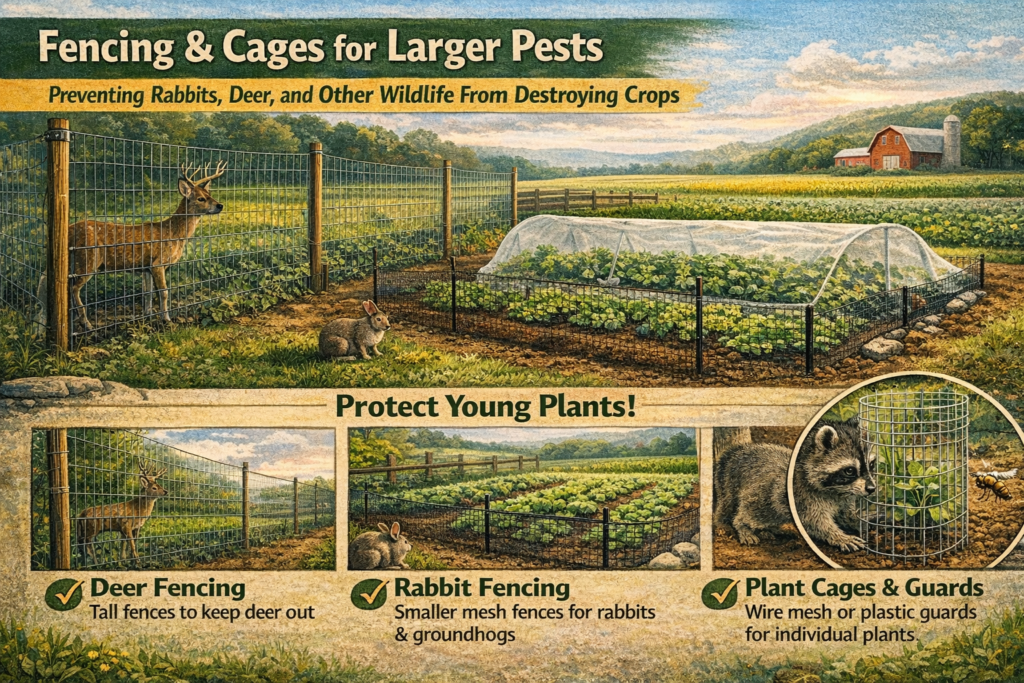
A practical tip is to protect the most vulnerable stage. Young transplants and early growth are when animals do the most damage relative to plant size. Even temporary fencing or individual plant cages can reduce losses dramatically.
Traps for monitoring and control
Traps are another core mechanical method. Some traps are mainly for monitoring, helping you confirm which pest is present and when the population is rising. Others can help reduce numbers when deployed at scale.
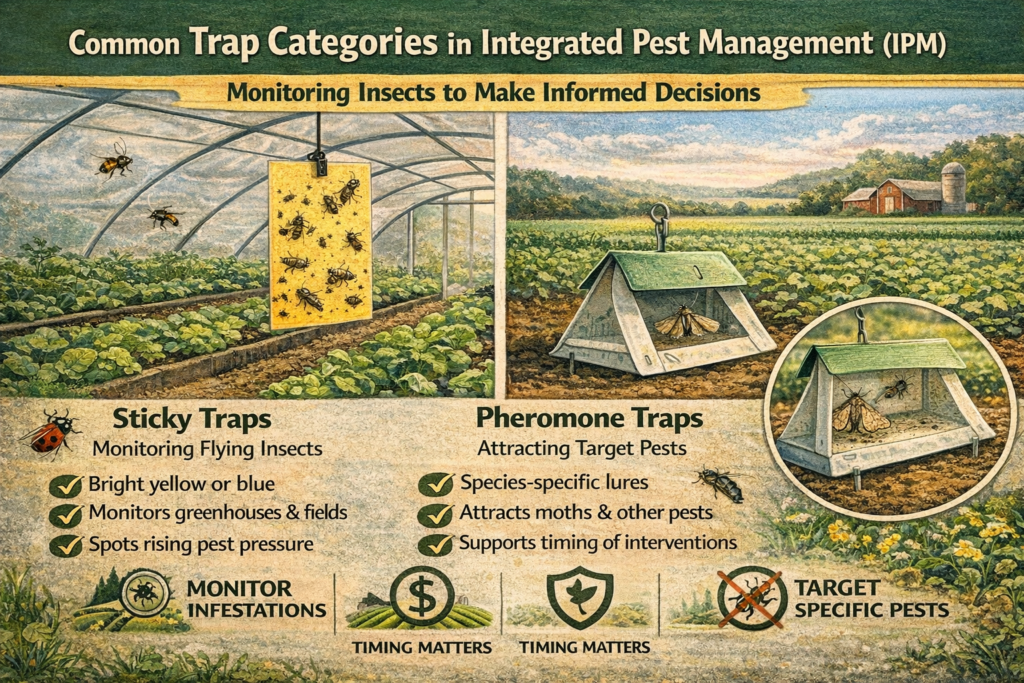
Common trap categories include:
Sticky traps
These are often used to monitor flying insects in greenhouses and fields. They help you spot early pressure and evaluate whether populations are increasing.
Pheromone traps
These use species specific lures to attract certain insects, often moth pests. They are widely used for monitoring and timing interventions. Traps support better decisions because you can act when risk is real, not guessed.
Texas A and M Landscape IPM notes that mechanical practices include using traps and other activities that disrupt insect feeding and breeding, including hand picking and similar actions. Oregon State University Extension also highlights traps as part of the mechanical and physical toolbox within IPM.
Hands on removal still works
Hand picking caterpillars, removing egg masses, pruning infested leaves, and knocking pests off plants with water are old school methods, but they remain useful, especially for small plots and high value crops. Texas A and M’s guidance explicitly includes hand picking and even spraying plants with water to knock off aphids and mites as mechanical practices.
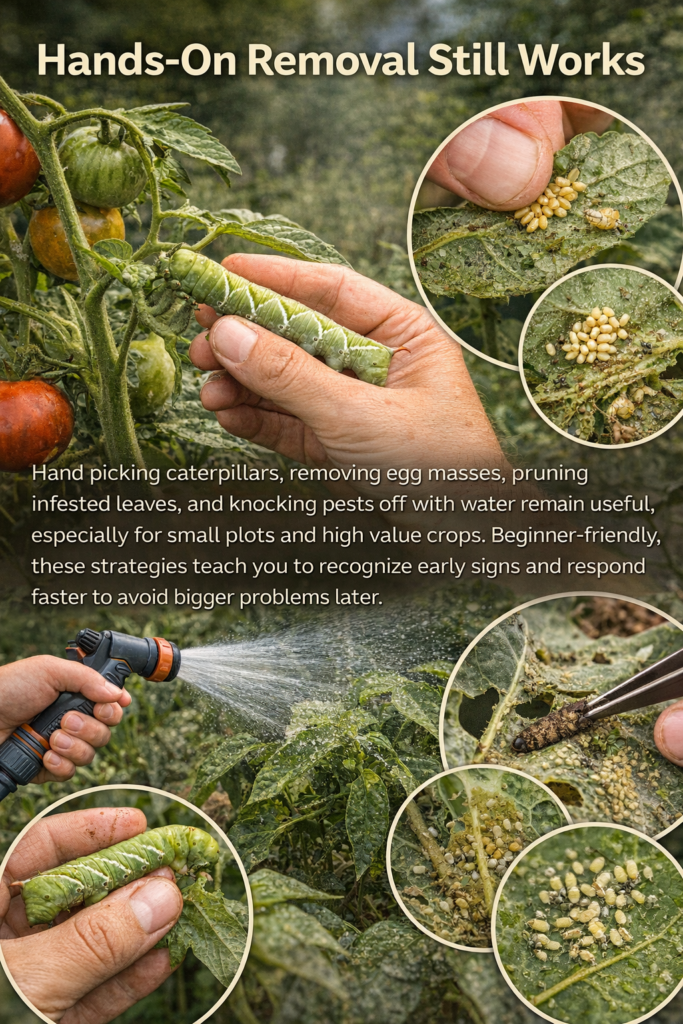
This is also one of the most beginner friendly strategies because it teaches you what to look for. Once you can recognize early signs, you can respond faster and avoid bigger problems later.
Why these methods belong among the best
Physical barriers and mechanical methods reduce pest pressure without leaving chemical residues, and they fit well with pollinator protection and resistance management goals. They also give you control at the point of contact, which is valuable when you want predictable results. Use them early, seal them properly, and combine them with monitoring. That combination is why this approach ranks among the 10 Best Pest Control Methods for Crop Protection.
References
- Texas A and M Landscape IPM, mechanical practices including barriers, traps, and hand picking, plus water spray for aphids and mites.
- Oregon State University Extension, Using IPM five thoughts on mechanical and physical controls, barriers, nets, traps, and physical removal within IPM.
- University of Kentucky Entomology, Row covers for insect management, row covers can delay or prevent insect colonization.
- Wisconsin Horticulture Extension, Floating row cover description and pest exclusion benefits while remaining permeable to light, water, and air.
5. Chemical Control – Selective Pesticide Use
Chemical control can absolutely protect crops, but it works best when you treat it like a precision tool, not a habit. Selective pesticide use means choosing the right product for the right pest at the right time, then applying it in a way that solves the problem without creating a bigger one later. In an IPM program, pesticides are used only after monitoring and action thresholds show that lower risk options are not enough. The US Environmental Protection Agency describes IPM as starting with less risky controls first and using targeted pesticide applications when needed, while broadcast use of non specific pesticides is treated as a last resort.
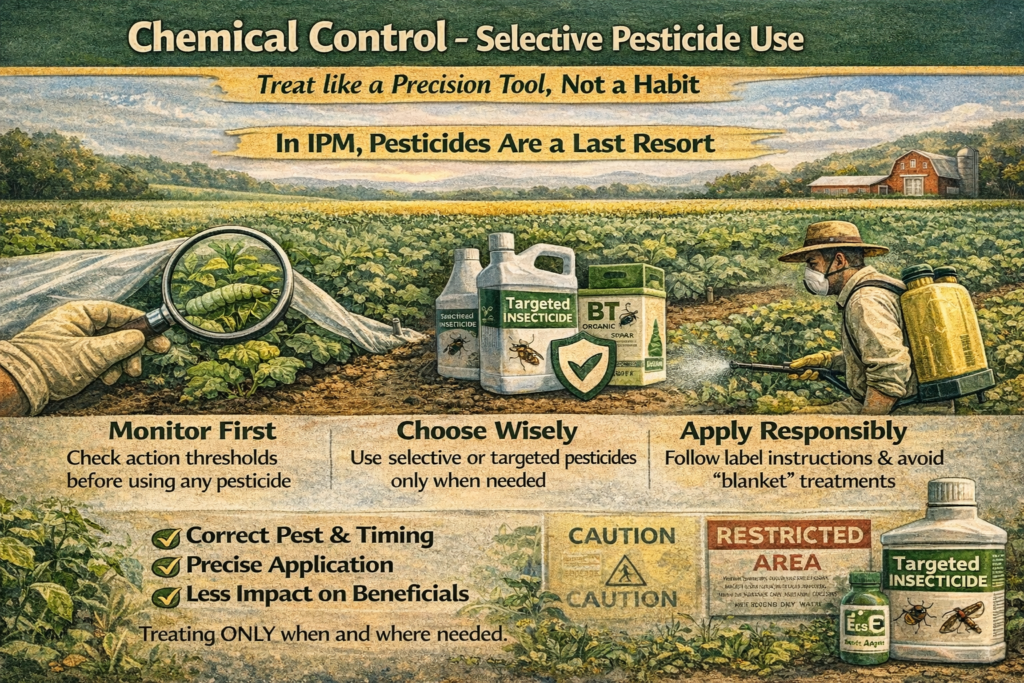
Start with the decision, not the bottle
A common mistake is reaching for a pesticide before confirming what you are fighting. Selective use begins with correct identification and a realistic damage threshold. If the pest is below threshold, you may not need treatment. If it is above threshold, your next question becomes: which option controls the pest while protecting pollinators, predators, and the crop system around it.
This decision first mindset matters because pesticides can disrupt beneficial insects that naturally suppress pests. When those beneficials are removed, secondary pests can surge, and you end up spraying more often than you wanted.
Choose targeted products and targeted timing
Selectivity comes from two places: what you choose and when you use it.
What you choose
Whenever possible, select products that are labeled for the specific pest and crop, and that have a narrower impact on non target organisms. Many modern programs also include non conventional tools like mating disruption, which the EPA lists as an example of more targeted chemical control within IPM.
When you use it
Timing can be the difference between one effective application and repeated failures. Many insects are easiest to control at early life stages. Spraying late, after pests are protected inside curled leaves or bored into stems, usually increases cost and reduces results.
Practical checks before application
- Confirm pest ID and crop stage
- Read the label for allowed crops, target pests, and application timing
- Consider weather, especially wind and temperature, to reduce drift and crop stress
- Think about pollinator activity and apply with pollinator safety in mind
The label is not optional
One of the strongest trust signals in pesticide guidance is simple: follow the label. The EPA is very clear that “the label is the law,” meaning label directions are enforceable and designed to manage risk to people and the environment.
The label tells you key safety and performance details such as:
- Where the product can be used
- Which pests it targets
- How much to apply and how often
- Required protective equipment
- Re entry intervals and pre harvest intervals
- Storage and disposal rules
If you want your pesticide use to be both effective and defensible, label compliance is the foundation.
Resistance is the long game you cannot ignore
Pesticide resistance is not a theory. It is a predictable outcome when the same mode of action is used repeatedly. Resistance management is about preserving what still works. University extension materials describe resistance management as a strategy to sustain pesticide effectiveness and emphasize rotating modes of action as part of a sound plan.
A simple resistance prevention plan often includes:
- Rotate modes of action across applications and seasons
- Avoid repeated low dose applications that select for survivors
- Use full labeled rates and proper coverage when treatment is warranted
- Combine chemical control with non chemical tactics so you reduce selection pressure
The Insecticide Resistance Action Committee also teaches that resistance management works best as an integrated approach, not a single trick.
Local regulations matter
Selective pesticide use also means legal use. Rules vary by country, state, and province. Toronto and Ontario are often mentioned because of strong restrictions on certain pesticide uses for cosmetic purposes. Ontario’s Cosmetic Pesticides Ban Act amended the Pesticides Act to prohibit the use and sale of certain pesticides used for cosmetic purposes.
If you are farming, managing landscapes, or advising clients, do not assume a product that is legal in one place is legal in another. Always verify local requirements, permitted products, and licensing rules.
Why selective pesticide use belongs on the list
Chemical control remains one of the 10 Best Pest Control Methods for Crop Protection because it can prevent severe losses when used correctly. Selective use keeps it sustainable. You protect yield without flattening beneficial populations, you reduce resistance risk, and you build a program that still works next season.
If you want a simple rule to remember, it is this: treat pesticides as a targeted intervention inside a monitored plan, not a routine habit.
References
- Government of Ontario, Cosmetic Pesticides Ban Act, 2008.
- United States Environmental Protection Agency, IPM principles and guidance on targeted pesticide use and last resort non specific applications.
- United States Environmental Protection Agency, Introduction to pesticide labels including statement that the label is the law.
- United States Environmental Protection Agency, Pesticide labels overview and their role in defining conditions and precautions for use.
- Kansas State University Research and Extension, resistance management, mode of action, and pesticide rotation.
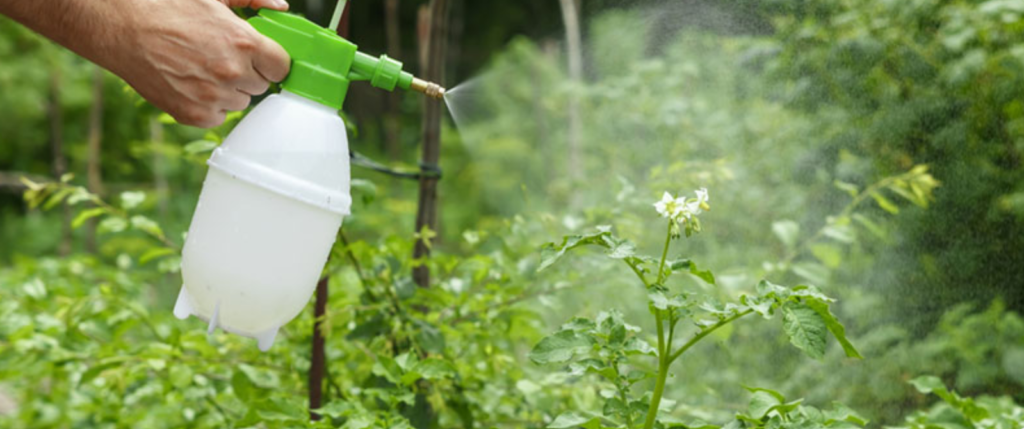
6. Organic and Natural Methods
Organic and natural pest control sounds simple on paper. Use something plant based, avoid harsh chemicals, and let the crop grow in peace. In real life, it is more practical than magical. Natural tools can work very well, but they work best when you treat them like true crop protection products with clear strengths, clear limits, and careful timing.
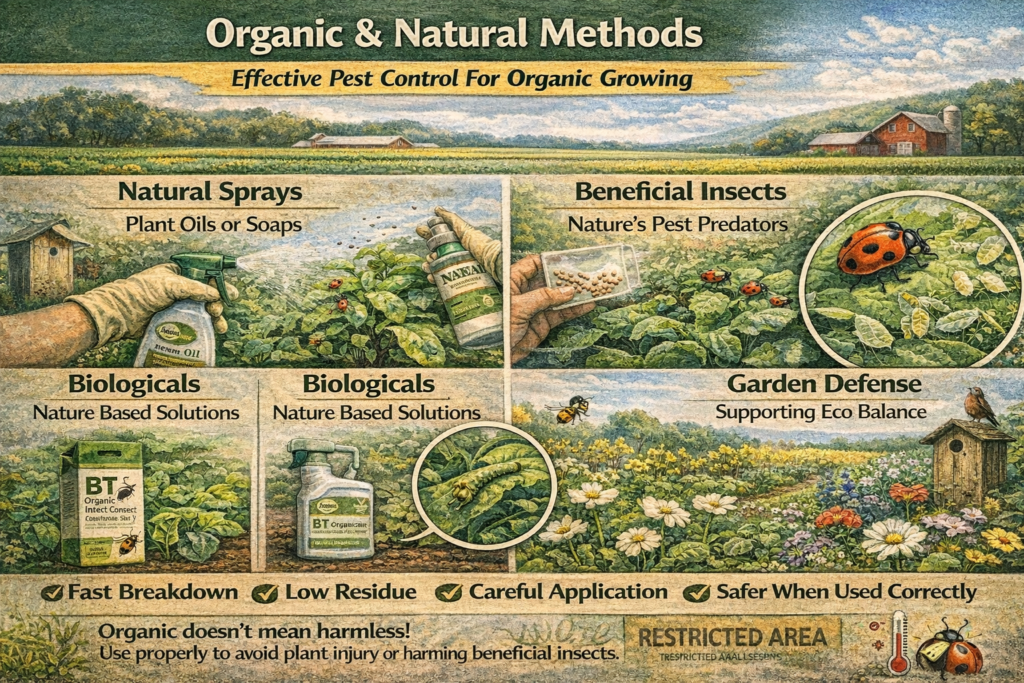
A good way to think about this category is that it focuses on options that break down faster, leave fewer concerning residues, and often fit organic production rules when used correctly. The key phrase is “when used correctly.” Even natural products can harm beneficial insects if they are misused, and some can injure plants if applied in heat or strong sun.
Neem oil and azadirachtin for growth disruption
Neem based products are popular because they do more than one thing. The National Pesticide Information Center explains that neem oil contains many components, and azadirachtin is one of the most active. It can reduce insect feeding, act as a repellent, and interfere with insect hormone systems, making it harder for insects to grow and lay eggs.
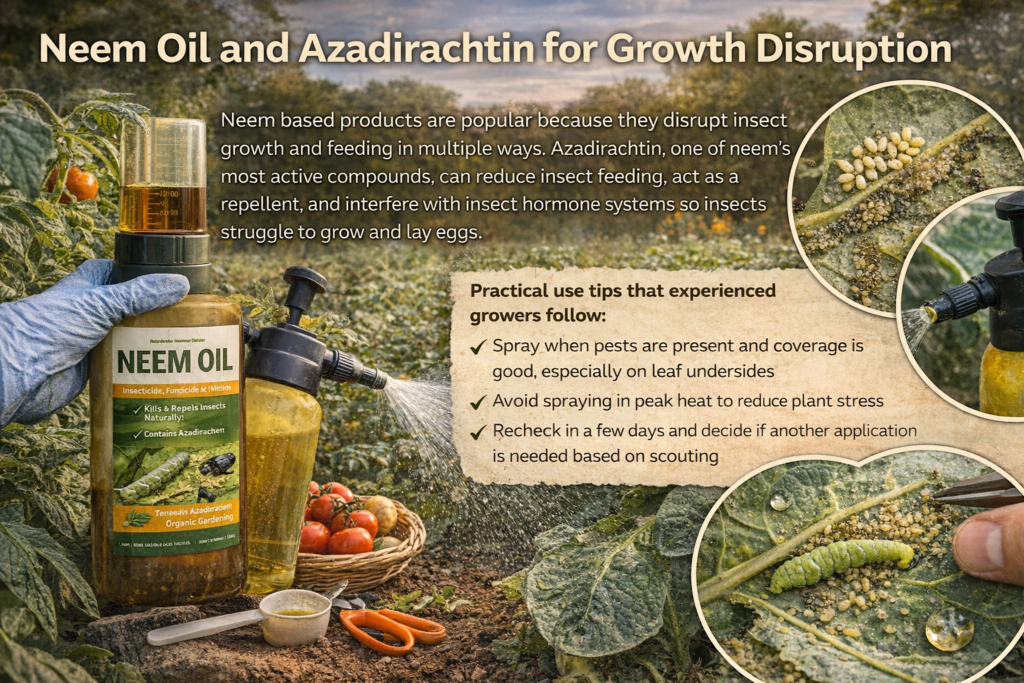
That means neem tends to perform best when you apply it early, when pest populations are still building, and when you can hit vulnerable life stages. It is not usually the fastest knockdown option, so it pairs well with monitoring and repeat applications based on label guidance.
Practical use tips that experienced growers follow:
• Spray when pests are present and coverage is good, especially on leaf undersides
• Avoid spraying in peak heat to reduce plant stress
• Recheck in a few days and decide if another application is needed based on scouting
Insecticidal soap for soft bodied pests
Insecticidal soap is one of the most dependable natural style tools for common sap sucking pests. Colorado State University Extension notes that insecticidal soaps are most effective against small, soft bodied arthropods like aphids, mealybugs, psyllids, and spider mites. It also highlights a major limitation: you need to wet the insect during application and there is no residual control.
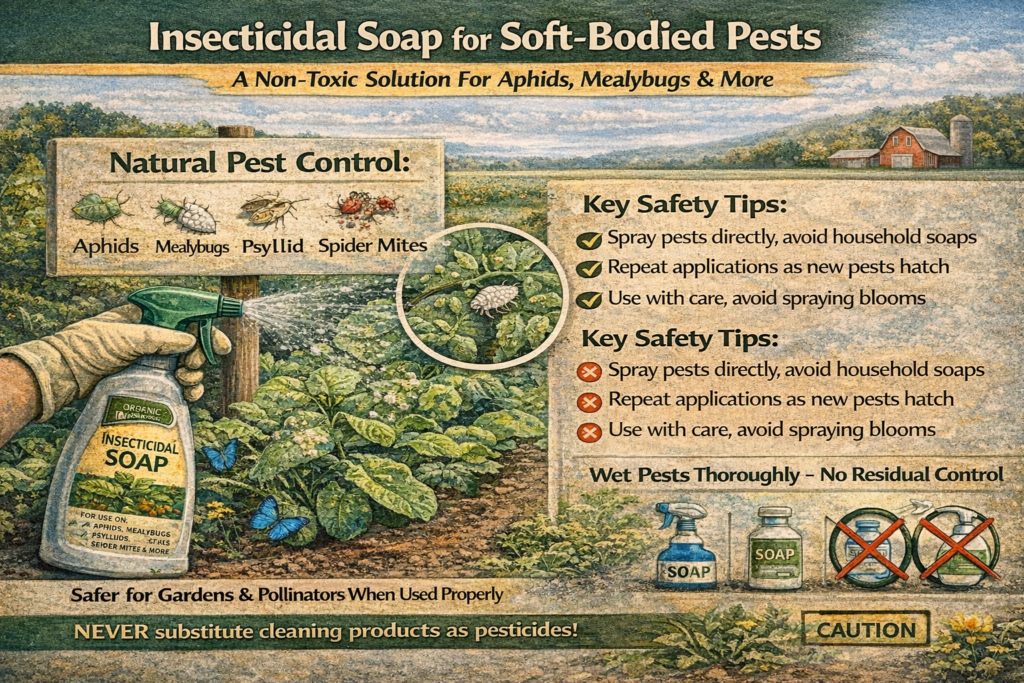
That contact only behavior is the reason soap feels so “clean.” It does not keep killing for days after application, which is often a benefit for beneficial insects and for residue concerns. But it also means you must spray thoroughly, and you may need to repeat applications as new pests hatch.
One more important trust point from extension guidance: do not assume household soaps are safe substitutes. The Colorado State resource warns that home remedies made from household liquid soaps or cleaning products should not be used as pesticides.
Diatomaceous earth for dry, contact control
Diatomaceous earth, often called DE, is a naturally occurring material made from fossilized diatoms. Its pest control effect is physical, not chemical. NPIC explains that diatomaceous earth is abrasive to an insect’s exoskeleton, which causes the insect to dry out and die. UC IPM describes a similar mechanism, noting that it scratches the insect’s exoskeleton and absorbs moisture, leading to dehydration.
DE works best in dry conditions. Rain and irrigation wash it off, so outdoor use usually requires reapplication. It is also not selective. If beneficial insects crawl through it, they can be harmed too. That is why many growers reserve it for targeted applications around stems, entry points, or specific pest hotspots rather than broad coverage.
Organic standards and what “allowed” really means
Many growers choose natural tools because they want to meet organic rules. In the United States, the USDA Agricultural Marketing Service maintains the National List of Allowed and Prohibited Substances. This list identifies what may and may not be used in organic crop and livestock production, with specific conditions for certain materials.
This is where experience matters. A product being “natural” does not automatically mean it is allowed in organic production. You still need to confirm its status, formulation, and use conditions with your certifier or with the National List guidance.
Why natural methods deserve a spot in the best methods list
Organic and natural methods are valuable because they give growers options that can reduce reliance on broad spectrum pesticides, support eco friendly management goals, and often fit organic programs when used properly. The best results usually come when these tools are used inside a full plan: good scouting, good crop health, and smart application timing.
If you treat natural products with the same seriousness you give any crop protection tool, you will get more consistent results and fewer surprises.
References
- USDA Agricultural Marketing Service, National List of Allowed and Prohibited Substances for organic production.
- National Pesticide Information Center, Neem Oil Fact Sheet, azadirachtin effects on feeding and insect growth and reproduction.
- Colorado State University Extension, Insecticidal Soap, target pests, contact requirement, no residual, warning against household soap remedies.
- National Pesticide Information Center, Diatomaceous Earth Fact Sheet, abrasive effect on exoskeleton causing dehydration.
- UC IPM, Diatomaceous earth mode of action as scratching exoskeleton and absorbing moisture.
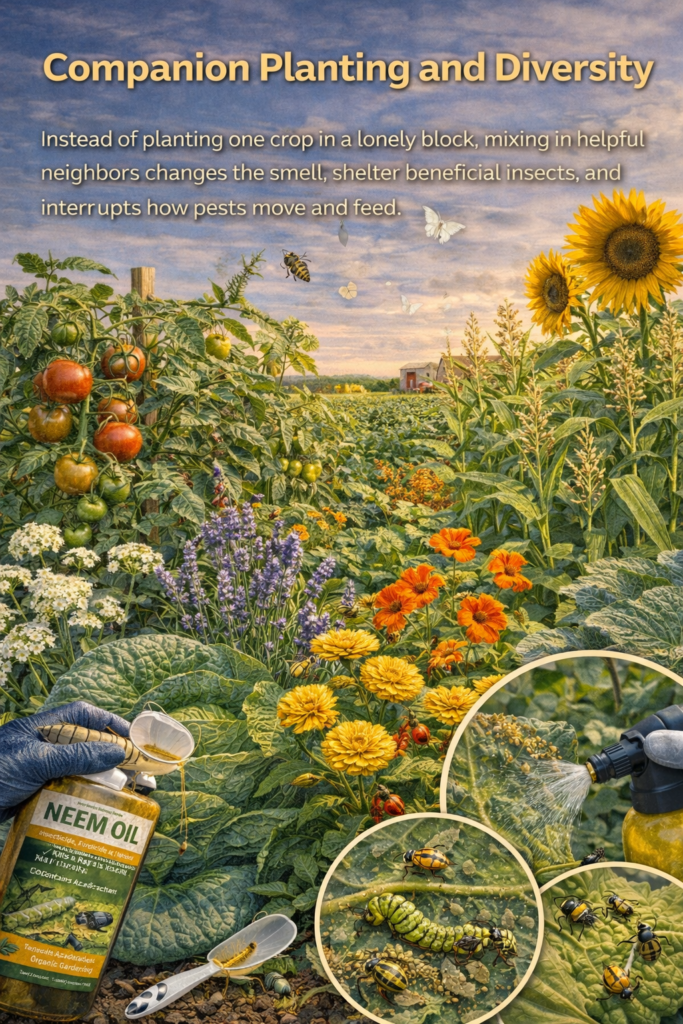
7. Companion Planting and Diversity
Companion planting is the kind of pest control that starts with a simple question: what if the crop did not have to face pests alone? Instead of planting one crop in a lonely block, you mix in helpful neighbors that change the smell, shelter beneficial insects, and interrupt how pests move and feed. When it works, it feels almost unfair to the pests because they cannot locate the target plant as easily, and the field becomes a tougher place for outbreaks to spread.
Why diversity can reduce pest pressure
Many pests thrive when they find large, uniform areas of the same host crop. Crop diversification methods such as intercropping can disrupt pest movement and make it harder for insects and diseases to build quickly. A review in the Journal of Economic Entomology summarizing evidence from multiple meta analyses reports that intercropping often provides clear benefits for insect pest control, along with other resilience advantages. A University of Florida Extension publication also explains intercropping and crop diversity as strategies used to influence pest populations and support pest management.
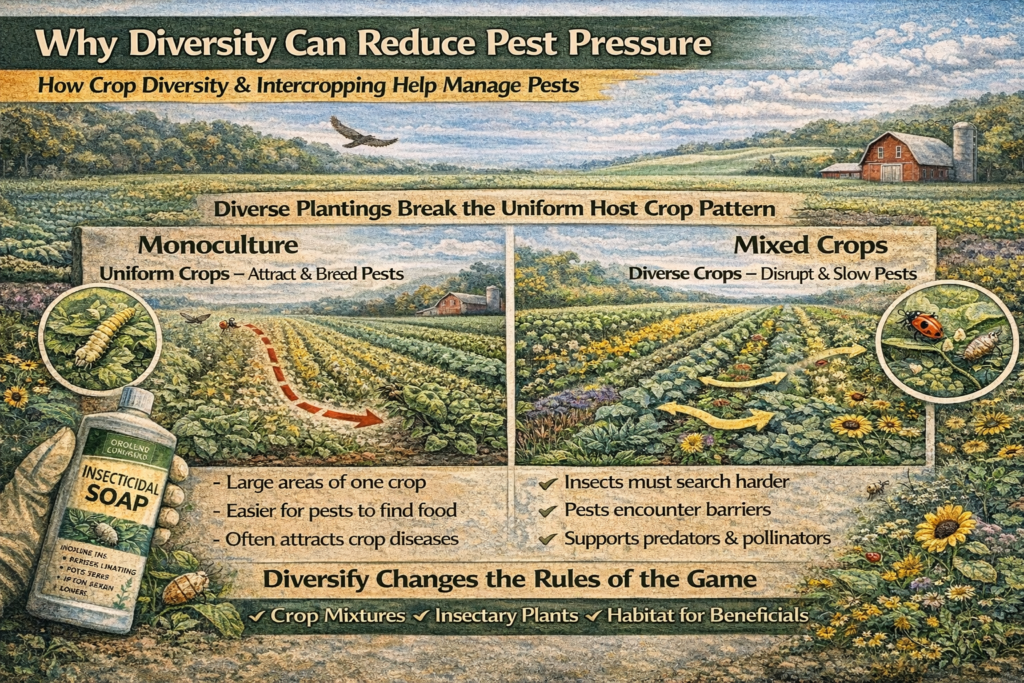
In plain terms, diversity works because it changes the rules of the game. Pests must search longer, they encounter more obstacles, and natural enemies often have more food and habitat available.
Marigolds and nematodes, a classic example with real research behind it
Marigolds are often recommended for soil pest problems, especially plant parasitic nematodes. This is not just garden folklore. University of Florida Extension notes that marigolds are best known for suppressing plant parasitic nematodes and can suppress multiple nematode genera, including root knot nematodes. A University of Hawaiʻi publication also describes research showing marigolds can be toxic to plant parasitic nematodes and discusses how results can vary by marigold species and cultivar.

The EEAT takeaway is important here: marigolds are not a guaranteed cure in every field. They are a tool that works best when you choose the right type, grow enough biomass, and manage timing so the nematode population is actually pressured.
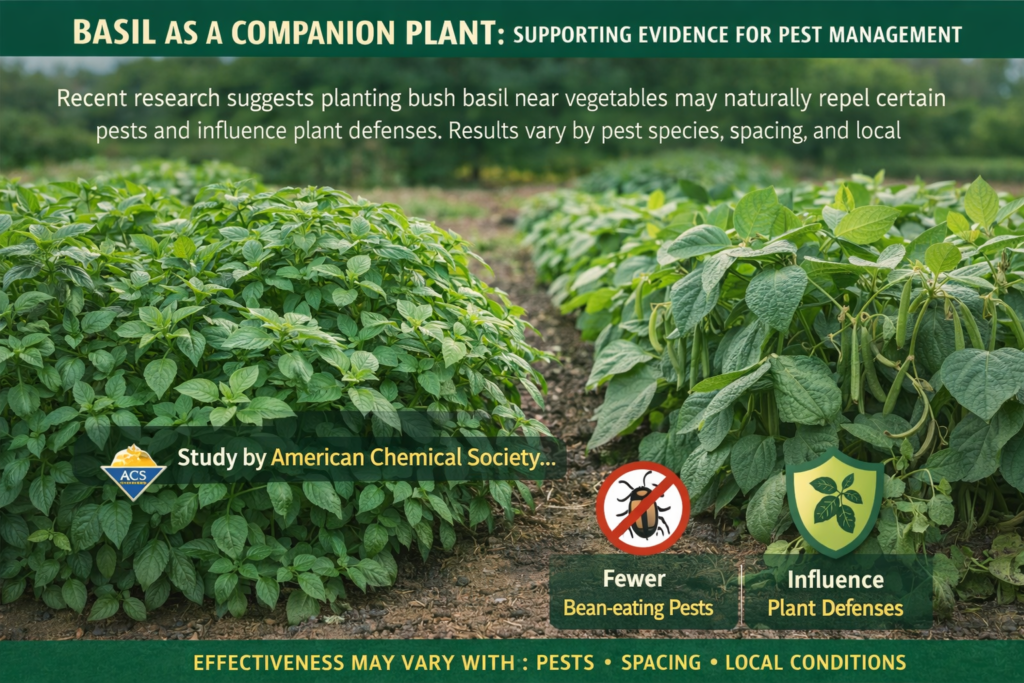
Basil as a companion plant, what we can say with confidence
Basil is commonly used near vegetables because its strong aroma can affect pest behavior. Recent research highlighted by the American Chemical Society describes a study suggesting that planting bush basil near green beans can naturally repel certain pests and influence plant defenses. This supports a realistic view of companion planting: some combinations may reduce pest activity, but results depend on pest species, spacing, and local conditions.
Practical ways to use companion planting without guessing
To keep it simple and evidence aligned, focus on goals rather than myths.
- Use flowers to support beneficial insects, so predators and parasitoids stay near the crop.
- Use trap style companions only if you are willing to monitor them and remove or treat them when pests concentrate.
- Mix crops or add border plantings to slow pest spread, especially where monoculture blocks get hit hard.
Research also suggests broader diversification can reduce pesticide reliance across production conditions, which is a strong signal that variety often supports more stable pest management systems.
References
- American Chemical Society press release on research suggesting bush basil near beans repels certain pests.
- University of Florida Extension, Marigolds for nematode management and suppression of plant parasitic nematodes.
- University of Hawaiʻi CTAHR, guidance on marigold use against nematode pests and variability by species and cultivar.
- Journal of Economic Entomology, review of evidence from meta analyses on intercropping benefits for pest control.
- University of Florida Extension EDIS, intercropping, crop diversity, and pest management overview.
- Agriculture and Food Security, evidence that increasing crop diversity can reduce pesticide reliance.
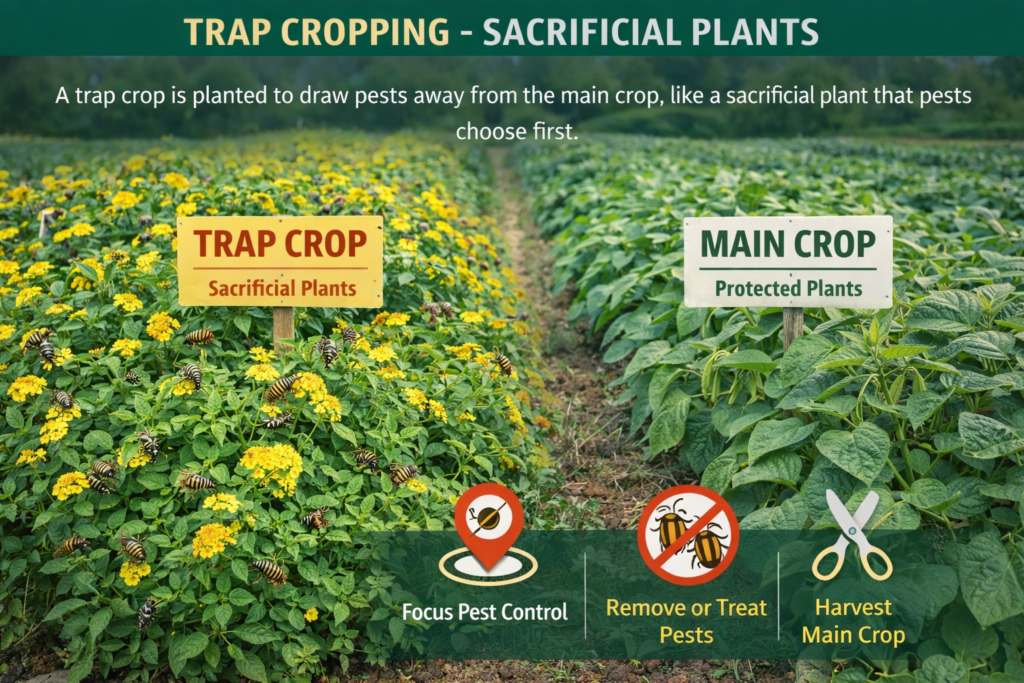
8. Trap Cropping – Sacrificial Plants
Trap cropping is one of those techniques that sounds almost too simple, plant something pests love so they ignore what you actually want to harvest. But when it is planned well, it can be surprisingly effective. In extension guidance, a trap crop is defined as a sacrificial plant that draws damaging insects away from the main crop, basically a preferred option that pests choose first. This approach does not magically eliminate pests. Instead, it moves the problem to a place you control, so you can remove pests or treat a smaller area before they spill into the crop that pays the bills.
Why trap cropping works
Most insect pests have strong preferences. They are pulled by plant scent, leaf texture, and especially by plants entering flowering, fruiting, or seed formation stages. UF IFAS notes that trap plants are often most attractive when they produce seed, fruit, or flowers, and recommends planting trap crops before the main crop so the first mature host draws pests in first. University of Georgia Extension explains the same principle, saying insects are highly attracted to plants in reproductive stages and that trap crops that mature quickly and produce seed, fruit, or flowers can be particularly attractive.
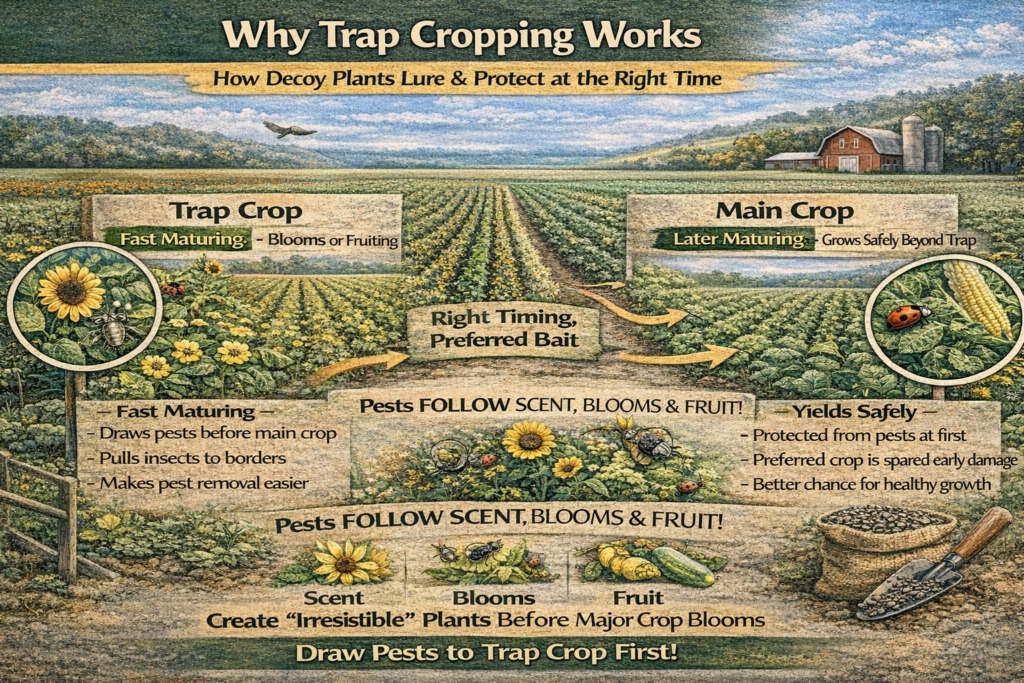
So the strategy is not “plant a decoy somewhere and hope.” The strategy is to make the decoy the most tempting option at exactly the moment pests arrive.
A practical example: mustard as a trap crop for flea beetles
Flea beetles are a classic early season headache in brassicas. If you have ever seen tiny shot holes in young leaves, you know the damage can escalate fast. Utah State University Extension lists several successful trap crops for flea beetles, including Chinese southern giant mustard and other brassicas like radish, daikon, and pac choi, and it recommends planting the trap crop about two to four weeks before the cash crop so the trap crop is larger and more attractive.
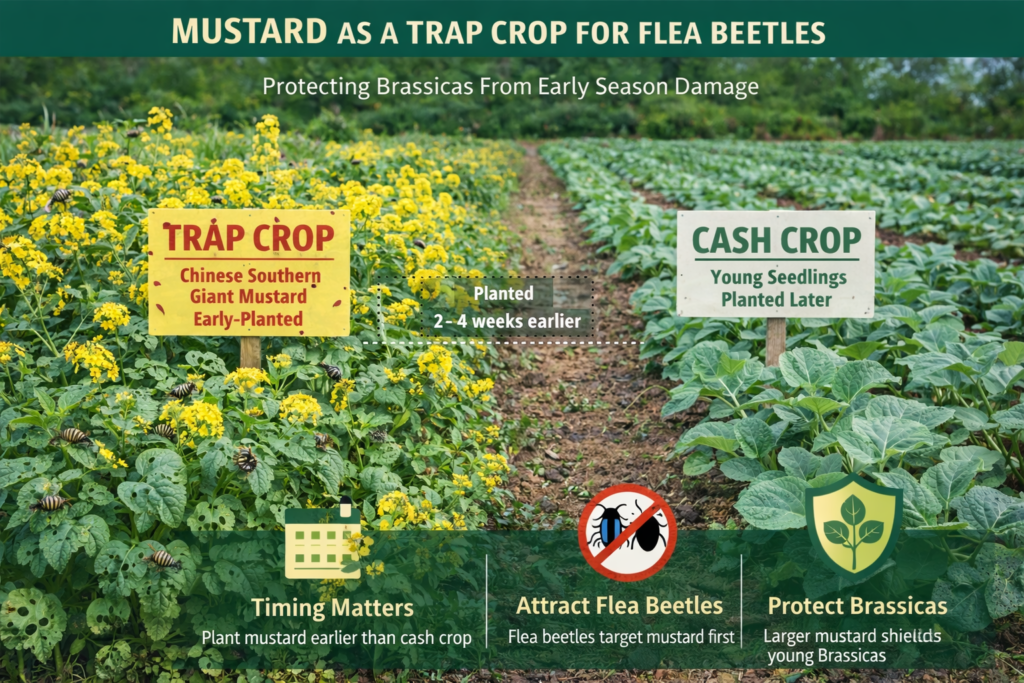
That timing detail is important. If the trap crop is small or planted late, it will not outcompete the main crop as an attractant. You end up feeding pests instead of diverting them.
Two common layouts: border and scattered trap plants
There are two common ways growers design trap cropping, and both are supported in extension materials.
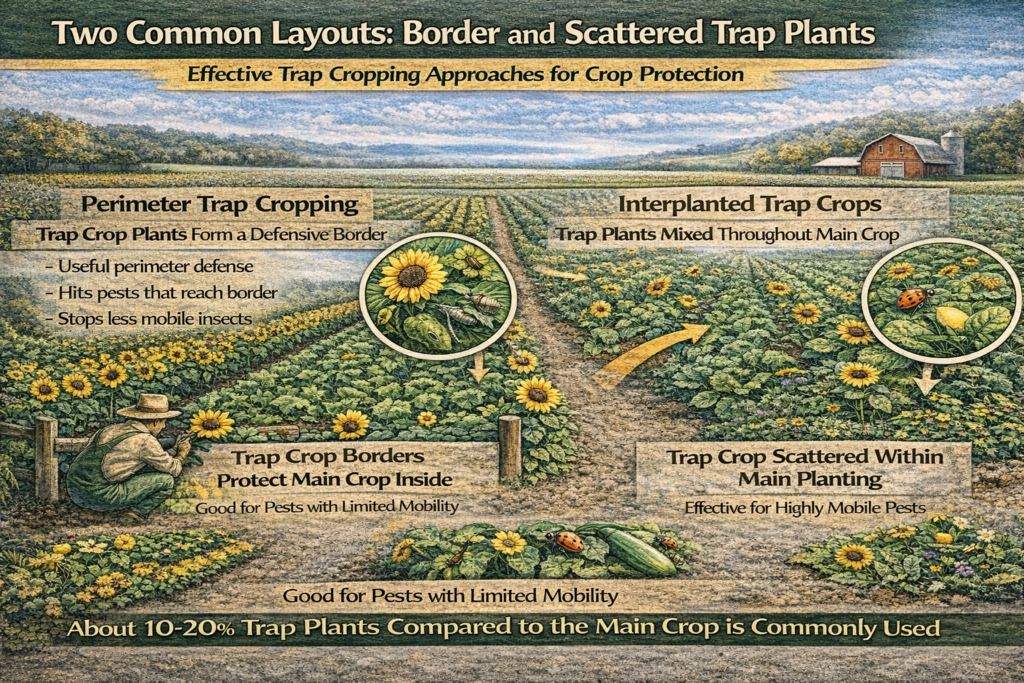
Perimeter trap cropping
This is the border approach. You plant the trap crop around the outside of the main planting so pests hit the border first. UF IFAS describes perimeter trap cropping as creating a defense border that stops pests before they reach the main crop and notes it can work well for pests with limited mobility. The University of Vermont also describes perimeter trap cropping as a specific tool that uses pest preferences to protect vegetables.
Interplanted or scattered trap crops
This approach places trap plants within the main crop area, which can be better for highly mobile pests. UF IFAS notes that scattering trap crops throughout the patch can work for insects that move freely between plants.
A useful planning guideline from UF IFAS is to use roughly ten to twenty percent trap plants compared to the main crop, though exact needs depend on pest pressure and crop value.
The part people forget: you must manage the trap crop
Trap cropping only works if you treat the trap crop like a pest collection point, not a permanent buffet. Both UF IFAS and UGA Extension stress that once pests establish on the trap crop, you need to eradicate or remove them, otherwise they can migrate into the main crop. That management can be mechanical removal, targeted spraying on the trap crop only, or even destroying the trap planting when pest loads spike.
This is also where trap cropping can reduce pesticide use. If you treat only the trap block at the right time, your main crop may not need treatment at all, which UF IFAS specifically highlights as a benefit.
A simple, field ready checklist
- Identify the target pest and confirm it has a strong host preference.
- Choose a trap crop that pests prefer over your main crop.
- Plant the trap crop early so it reaches an attractive stage first.
- Place trap crops as a perimeter border or as scattered plantings depending on pest mobility.
- Scout often, then remove pests or treat the trap crop promptly so it does not become a pest factory.
References
- University of Vermont Extension, Perimeter Trap Cropping overview as a tool that uses pest preferences to protect crops.
- UF IFAS Gardening Solutions, Trap Cropping definition, timing, design options, and management guidance.
- University of Georgia Cooperative Extension, Trap Cropping for Small Market Vegetable Growers, definition, timing, spacing, and how to manage infested trap crops.
- Utah State University Extension, Flea Beetles on Vegetables, examples of successful trap crops and early planting timing for flea beetle management.
9. Monitoring and Early Intervention
The fastest way to lose control of pests is to discover them late. The fastest way to keep control is to look for them early, on purpose, and on a schedule. Monitoring, often called scouting, is the habit that turns pest control from guesswork into decision making. It is also one of the cheapest tools you can use because it mostly costs time and attention, not products.
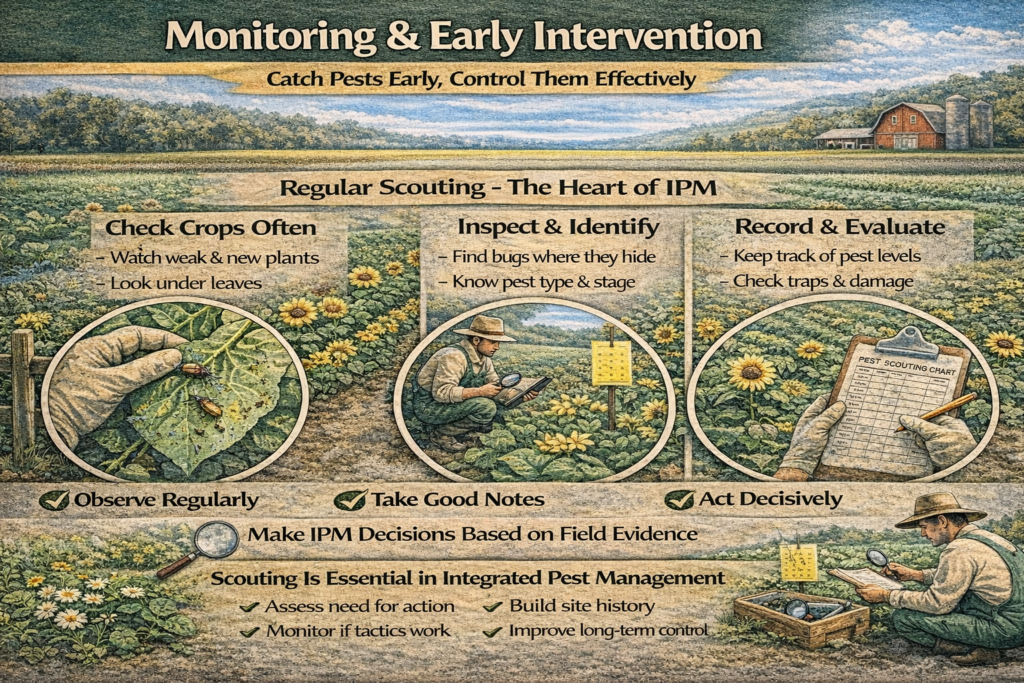
Several major IPM resources describe monitoring as the core step that separates modern pest management from routine spraying. The Northeastern IPM Center explains that monitoring helps a trained person assess whether action is needed, evaluate how well tactics worked, and build site history that helps anticipate future problems. It even calls monitoring the crux of IPM. UConn Extension makes the same point, noting that a regular monitoring program is the basis of IPM decision making, regardless of which control strategies you use.
What you are actually looking for when you scout
Scouting is not only about spotting bugs. It is about spotting risk. That risk can show up in a few different ways.
You might notice early pest signs such as eggs on the underside of leaves, fresh feeding marks, sticky honeydew, or a cluster of insects on tender new growth. You might also notice plant symptoms that suggest a pest problem, like curling leaves, uneven growth, distorted buds, or a sudden decline in vigor.
The University of Minnesota Extension encourages gardeners to adopt a simple scouting routine and emphasizes that just a few minutes every few days can help catch problems early before they take hold. University of Missouri Extension also stresses scouting early and often, noting that weekly scouting during the growing season supports early intervention, with more frequent monitoring when risk is higher.
Why early intervention saves crops
Pest populations rarely stay flat. Many insects multiply quickly, and the damage curve is not linear. A small number of pests can become a big number in a short time, especially in warm weather or in protected environments like tunnels and greenhouses.
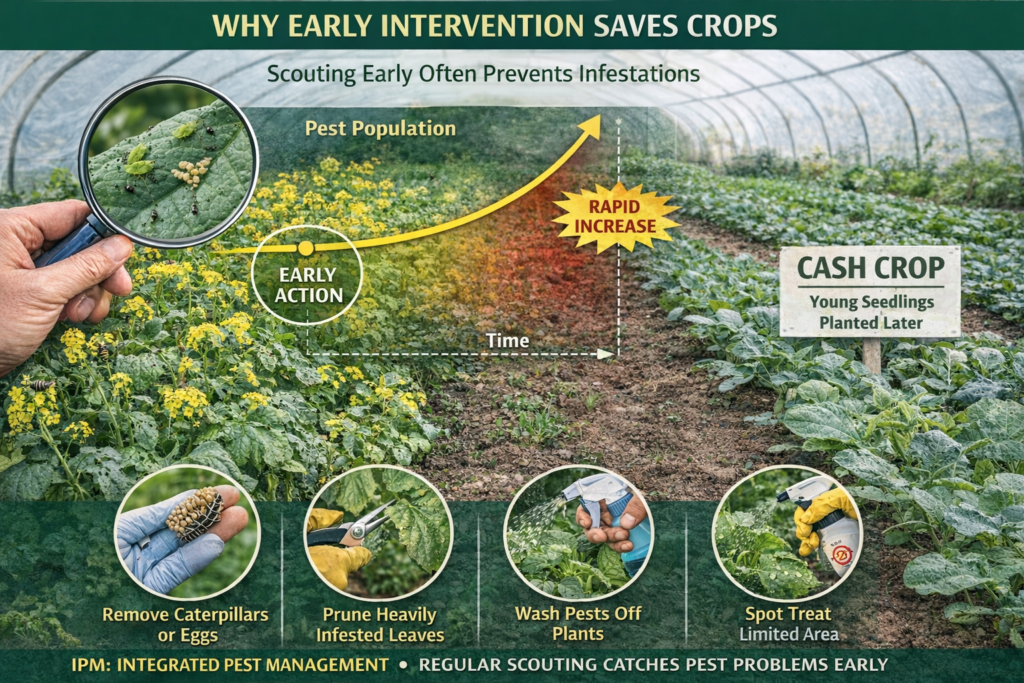
Early intervention works because you can respond while the problem is still small. That response can be simple and very targeted.
Common early actions include:
- Hand removal of caterpillars or egg masses
- Pruning a heavily infested leaf or stem
- Washing pests off plants with water when appropriate
- Spot treating a limited area instead of treating the whole field
When you act early, you often avoid the need for broad treatments later. Iowa State University Extension notes that scouting is a key component of IPM and that finding and dealing with pest issues early requires regular scouting.
Scouting plus thresholds keeps you from overreacting
A mature scouting program does not treat every pest sighting as an emergency. It uses thresholds.
The EPA explains that once monitoring, identification, and action thresholds indicate control is required, IPM programs then evaluate the proper control method for effectiveness and risk. UC IPM describes action thresholds as the number of pests or level of damage beyond which management action should be taken and calls it a fundamental concept in IPM.
This matters for two reasons.
First, it prevents unnecessary treatments that waste money and can harm beneficial organisms. Second, it helps you time interventions when they will actually protect yield or plant health.
How to build a scouting routine that you will actually follow
The best scouting plan is not the most complicated one. It is the one you can repeat.
Here is a simple structure that is supported by extension guidance on scouting programs:
Choose a schedule
Weekly is a common baseline during the growing season, with increased frequency when pest pressure rises or when crops are at a sensitive stage.
Use a consistent pattern
Walk the same routes so you can compare week to week. Look at field edges, low spots, and stressed zones where problems often start.
Record what you see
Write down pest counts, crop stage, and any damage notes. UMass Extension explains that regular monitoring helps gather current information on the identity and location of pest problems and evaluate treatment effectiveness.
Check life stage, not just presence
Michigan State University Extension notes that scouting helps determine the present life stage of the insect or disease, which can be critical for selecting and timing management actions.
A quick example of early intervention in action
Imagine you are growing vegetables and you spot a few egg clusters under leaves. If you remove them now, you may prevent a wave of larvae that would require a larger response later. If you wait until you see widespread chewing, you may be forced into heavier interventions because the population is already established.
That is the difference between being reactive and being in control.
Why this method is so cost effective
Monitoring and early intervention protect three things at once.
They protect yield because you stop damage before it spreads.
They protect your budget because you avoid unnecessary inputs.
They protect your options because you reduce the chance you will need harsh measures later.
This is why many university and agency resources describe scouting as the backbone of pest management. The University of Wisconsin Crop Scouting Manual describes field monitoring as the backbone of all pest management programs and links good decisions to a detailed assessment of pest populations.
References
- University of Missouri Extension, scouting crops early and often and the value of weekly scouting for early intervention.
- US Environmental Protection Agency, Integrated Pest Management principles and the role of monitoring and action thresholds.
- UC IPM, action thresholds as a fundamental IPM concept.
- Northeastern IPM Center, monitoring as the crux of IPM and its role in decision making and site history.
- UConn Extension, IPM scouting and decision making, monitoring as the basis of IPM decisions.
10. Resistant Varieties and Genetics
If you want pest control that starts working the day you plant, resistant varieties are the closest thing agriculture has to built in protection. Instead of reacting after insects or diseases show up, you choose seeds or transplants that are naturally less attractive to pests, tougher for pests to feed on, or better able to tolerate damage. That is why resistant varieties are a core part of Integrated Pest Management. USDA describes IPM as long term prevention using a mix of approaches, including the use of resistant plant varieties. The EPA also explains IPM as combining knowledge of pests and control methods to manage damage safely and economically, which is exactly where host resistance fits.
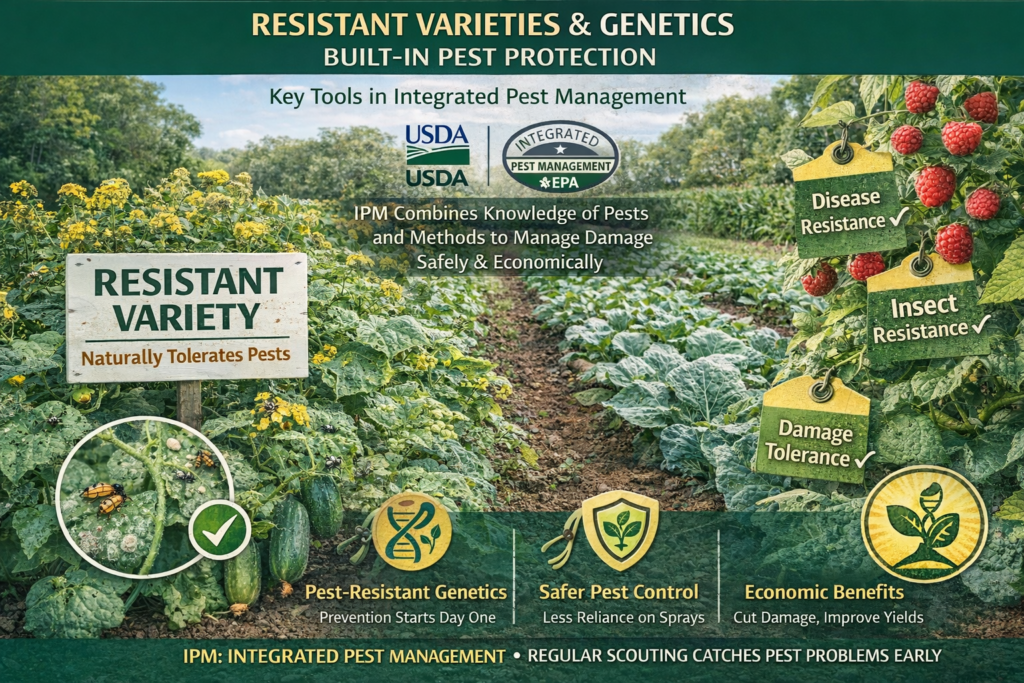
What “resistant” really means
Resistance is not always a hard shield where pests cannot survive. Often it means the plant changes the odds in your favor. University based IPM education breaks host plant resistance into three practical categories:
- Non preference
The pest does not like the plant as much, so it feeds less or lays fewer eggs. - Antibiosis
The plant affects the pest’s survival or reproduction after feeding. - Tolerance
The pest may still feed, but the plant handles the injury better, so yield loss is lower.
This matters because it sets realistic expectations. A resistant variety can still have pests present, but the outcome is usually less damage and fewer emergency treatments.
Why this method is so effective in real farms
Resistant genetics work continuously. They do not wash off in rain. They do not depend on perfect spray coverage. They also reduce how often you need to intervene, which helps protect beneficial insects and reduces labor.
There is another advantage growers sometimes overlook: resistance is predictable. If you match the right trait to the right pest, you start the season with a stronger baseline. That is especially valuable for early season pests where you have a narrow window to prevent stand loss.
Where genetically engineered traits fit, including Bt crops
Some resistance comes from traditional breeding. Some comes from biotechnology. A well known example is Bt corn, which is engineered to produce proteins from the naturally occurring soil bacterium Bacillus thuringiensis. USDA explains that Bt corn produces a protein that selectively targets certain caterpillars, including major corn pests like European corn borer. The EPA also notes that specific Bt corn traits are effective against pests such as European corn borer and other caterpillar pests of corn.
In plain terms, Bt traits can dramatically reduce damage from the pests they are designed to control. But this is not a set it and forget it tool. It comes with stewardship responsibilities.
Resistance management is part of the deal
Any time you apply pressure on a pest population, you encourage survival of the rare individuals that can tolerate that pressure. This is true for sprays and it is true for resistant genetics. With Bt crops, insect resistance management is a formal requirement in many systems. The EPA explains how it manages resistance to Bt plant incorporated protectants and includes refuge compliance as part of the program.
The logic behind refuges is simple: if you plant a portion of non Bt crop nearby, it produces susceptible insects that can mate with any resistant survivors, slowing resistance development. USDA NRCS guidance on Bt resistance management also describes refuges of non Bt crops as essential and notes that growers are required to plant refuges to mitigate resistance.
How to use resistant varieties without creating new problems
Here is a practical checklist that keeps this method effective long term:
- Match the variety to your real pest history
Use local extension guides and past scouting records to choose traits that actually matter in your fields. - Do not skip scouting
Resistance reduces risk, but it does not replace monitoring. You still need to confirm which pests are present and whether secondary pests are rising. - Rotate tactics, not just products
Rotate crop families, rotate traits when possible, and avoid repeating the same pressure year after year. - Follow refuge and stewardship requirements for Bt traits
This protects the technology so it remains useful in future seasons.
Why resistant genetics belong among the best crop protection methods
Resistant varieties and genetics earn their place because they lower pest damage at the starting line. They also support IPM by reducing the need for broad interventions and by making your whole system more resilient. Used responsibly, they help you protect yield, protect beneficial organisms, and protect future control options.
References
- USDA, Practice Integrated Pest Management, includes resistant plant varieties as a long term prevention tool.
- US EPA, Integrated Pest Management principles, IPM as safe and economic pest damage management using combined methods.
- Wisconsin Vegetable Entomology IPM, Host plant resistance categories: non preference, antibiosis, tolerance.
- USDA ARS, Bt corn commercialization and target pests such as European corn borer.
- US EPA, Are Bt crops safe, notes effectiveness of specific Bt corn traits against key corn pests.
Summary Table for 10 Best Pest Control Methods
| Method | Best for | How to start fast | Key caution |
|---|---|---|---|
| Integrated Pest Management IPM | Building a full season plan that reduces sprays | Identify pest, scout weekly, set an action threshold | Skipping records makes IPM weak over time |
| Cultural practices and prevention | Preventing repeat infestations year to year | Rotate crop families, clean debris, manage weeds | Rotation must match pest host range to work well |
| Biological control beneficial organisms | Long term suppression of aphids, caterpillars, mites | Plant flower strips, protect predators, avoid broad sprays | Some natural products can still harm beneficials |
| Physical barriers and mechanical methods | Early season protection and small farm control | Use row covers, insect netting, hand removal, traps | Covers can trap pests inside if you do not scout |
| Chemical control selective pesticide use | When pest pressure crosses a real threshold | Confirm pest ID, choose labeled product, apply at vulnerable stage | Follow label rules and local regulations every time |
| Organic and natural methods | Lower residue options for soft bodied pests | Neem or soap with full coverage, DE in dry zones | Reapply as needed, many are contact only and not selective |
| Companion planting and diversity | Reducing spread and improving field resilience | Intercrop, add herbs and flowers, increase crop diversity | Results vary by pest, spacing, and timing |
| Trap cropping sacrificial plants | Diverting pests away from a cash crop | Plant a preferred host earlier as a border or patch | You must manage the trap crop or it becomes a pest factory |
| Monitoring and early intervention | Stopping outbreaks before they explode | Scout on schedule, spot treat, remove eggs and hot spots | Inconsistent scouting leads to late discovery and bigger costs |
| Resistant varieties and genetics | Built in protection against key pests and diseases | Choose resistant seed, follow trait stewardship rules | Resistance can break if stewardship and rotation are ignored |
Final Thought
Protecting crops from pests rarely comes down to one “best” fix. Real success usually happens when you combine the 10 Best Pest Control Methods for Crop Protection and use each one where it fits: prevent problems with smart farming habits, scout often so you catch issues early, support beneficial organisms, and use physical or mechanical controls whenever they can solve the problem without disruption. This layered approach matches the core idea of integrated pest management promoted by major agricultural programs, where pesticides are used only when monitoring shows they are truly necessary.
Every farm and garden has its own conditions, so the right mix depends on your local pests, weather, and crop timing. Start simple, track what you see, and adjust based on results. With consistency and good observation, you can reduce losses, protect yield, and rely less on harsh treatments. If this helped, share it with another grower and leave a comment with what works best in your area.
FAQ for 10 Best Pest Control Methods
1) What is the best pest control method for crop protection
The best pest control method is usually a combined approach, not one tool. Integrated Pest Management IPM is widely recommended because it uses prevention, monitoring, thresholds, and targeted action to protect yield while reducing unnecessary pesticide use.
2) What are the best natural pest control methods for crops
The best natural pest control methods include protecting beneficial insects, using insecticidal soap for soft bodied pests, neem based products for growth disruption, and physical controls like netting and hand removal. Results improve when you scout and apply early with good coverage.
3) How often should I monitor my crops for pests
For most crops, weekly scouting is a strong baseline during the growing season. Increase frequency during warm periods, early crop stages, or when you first detect pests, since populations can grow fast.
4) Are resistant varieties and Bt crops safe to use in an IPM plan
They can fit well in IPM because they reduce pest damage and can lower the need for sprays. The key is stewardship, including following refuge requirements where applicable, and continuing to scout so you catch secondary pests and reduce resistance risk.
5) Does trap cropping really work, and how do I avoid failure
Yes, it can work when the trap crop is more attractive than the main crop and is planted early enough to be in the right growth stage when pests arrive. The most common failure is leaving the trap crop unmanaged, which allows pests to multiply and spill into the main crop.

Thesis Link : https://saulibrary.edu.bd/daatj/public/uploads/BAU200601_19-Pp_5.pdf
- Why Fruit Trees Die Suddenly – Common Diseases Guide - June 26, 2026
- Best Backpack for Work, Travel, College, and Everyday Use - May 24, 2026
- Best Soil Test Kits for Lawns and Gardens - May 16, 2026


[…] 10 Best Pest Control Methods for Crop Protection – Safe & Effective […]