


10 Best Soil Testing Methods for Farmers in 2026 – Improve Crop Yield
Healthy soil is where real farm profits begin but guessing what’s happening under the surface can get expensive fast. Using the Best Soil Testing Methods gives you a clear picture of nutrient levels, pH balance, and overall soil health before you invest in fertilizer, lime, seed, or irrigation changes. Whether you’re running a small family operation or managing thousands of acres across the U.S. Corn Belt, accurate soil insights usually mean better yields, fewer wasted inputs, and more predictable results at harvest.
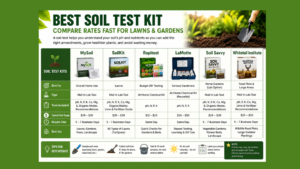
Quick checks with a soil test kit and handheld soil tester tools
This guide walks you through practical, field tested, farmer approved options used around the world from trusted lab reports to quick checks with a soil test kit and handheld soil tester tools. You’ll learn how each method works, when to use it, and how to pick the approach that matches your crops, soil type, and budget without overcomplicating the process.
Disclosure: This article contains affiliate links. If you purchase through these links, I may earn a small commission at no extra cost to you.
Why the Best Soil Testing Methods Matter for Farmers
Soil testing is not just a box to check. For most farms, it is one of the fastest ways to make better decisions with fertilizer, lime, manure, and even crop selection. When you rely on the Best Soil Testing Methods, you stop guessing and start managing your fields with real numbers.
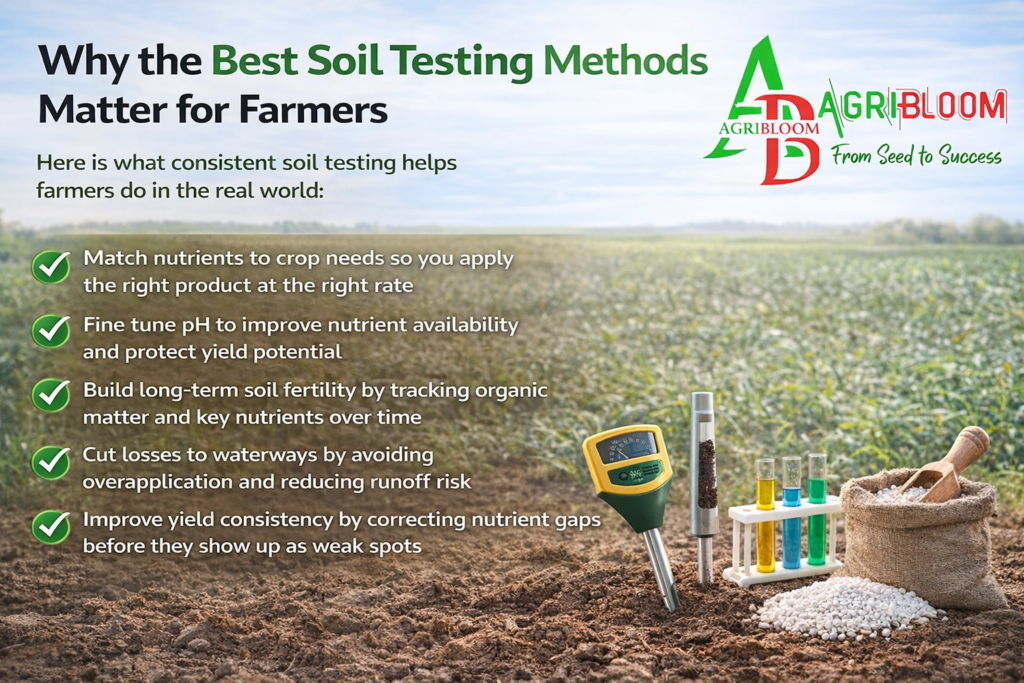
Here is what consistent soil testing helps farmers do in the real world:
- Match nutrients to crop needs so you apply the right product at the right rate
- Fine tune pH to improve nutrient availability and protect yield potential
- Build long term soil fertility by tracking organic matter and key nutrients over time
- Cut losses to waterways by avoiding overapplication and reducing runoff risk
- Improve yield consistency by correcting nutrient gaps before they show up as weak spots
This is why agronomists and land grant extension programs keep recommending soil tests as the starting point for nutrient planning. USDA lists soil testing benefits like identifying nutrient levels, pH – lime needs, and improving fertilizer efficiency to support higher yielding crops.
There is also a clear economic reason. USDA NRCS notes that producers can save an average of nearly $30 per acre on fertilizer costs with a nutrient management plan, which is typically built on current soil test results. And USDA Agricultural Research Service has reported research where improved testing tools reduced fertilizer costs by up to 39 percent while keeping production profits stable in corn and improving profits in other crops in some cases.
If you want a simple approach: run a lab test at least every couple of years, then use a soil test kit or soil tester during the season for quick checks. That combination keeps your plan accurate without making soil testing feel complicated.
10 Best Soil Testing Methods Every Farmer Should Know
Farmers everywhere test soil for the same reason: it is cheaper to prevent a problem than to fix one after the crop starts struggling. The Best Soil Testing Methods are the ones that give you dependable information you can actually use, whether you are deciding on lime, adjusting fertilizer rates, or tracking soil health over time.
Below are the Best Soil Testing Methods commonly recommended by agronomists and Cooperative Extension educators, including options that work well on both small farms and large U.S. operations.
1. Laboratory Soil Testing
If you want the clearest picture of what your soil is holding, lab testing is the benchmark. It is one of the Best Soil Testing Methods because the results are measured with standardized procedures and interpreted using research based calibrations developed by land grant universities and other agricultural institutions.

What a lab test typically reports
Most routine lab reports include several core indicators farmers use for input planning:
- Soil pH and lime requirement
- Phosphorus and potassium levels
- Calcium and magnesium levels
- Organic matter percentage when requested
- Micronutrients depending on the lab package
- In some cases, fertilizer recommendations based on yield goals and local calibration
To collect a clean, representative sample for lab testing, many farmers use a soil sampling probe to maintain consistent depth across the field.
USDA resources explain that a soil test is built on collecting a representative sample and then analyzing nutrient and chemical levels, which helps producers make informed management decisions.
Why farmers rely on lab testing
Lab reports are popular because they translate soil numbers into practical next steps. Many labs can provide rate guidance for nutrients like nitrogen, phosphorus, and potassium when requested, which supports more efficient fertilizer use.
From an EEAT perspective, this is also the most defensible method because it is tied to long running university and extension research. For example, Oregon State University Extension notes that agronomic soil testing and fertilizer recommendations in the U.S. are based on calibrated crop yield response data developed by land grant universities and USDA Agricultural Research Service work.
To keep results trustworthy, it helps to choose a lab that follows quality standards. Illinois Extension recommends using certified labs and points growers toward recognized lab certification and proficiency programs.
Practical tip from the field
Lab testing is only as good as the sample you send. USDA NRCS guidance explains that soil sampling is essential for nutrient management decisions and can help increase yields while reducing costs and pollution risks when nutrients are applied appropriately.ative Extension Services .
References
- USDA Soil Testing Fact Sheet (PDF)
- USDA NRCS: Sampling Soils for Nutrient Management (PDF)
- Oregon State University Extension EM 9423 (PDF)
- University of Illinois Extension: Soil Test Labs
- Soil Science Society of America: NAPT Program

2. At Home Soil Test Kit
For a quick snapshot of what is happening in the top layer of your field, an at home soil test kit can be a handy first step. Many kits are designed to give a simple read on soil pH and basic nutrient levels, which makes them useful when you want fast feedback before planting or when you are checking a problem spot. Montana State University Extension notes that most kits focus on the basics like nitrogen, phosphorus, potassium, and pH, while lab testing can measure a wider range of nutrients and indicators.
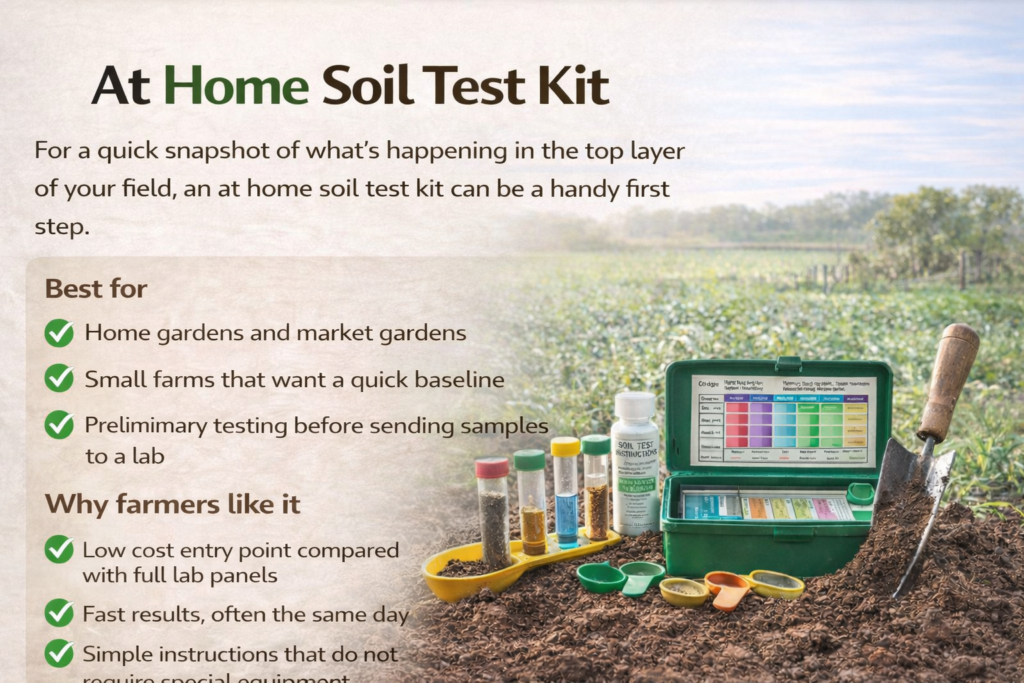
Best for
- Home gardens and market gardens
- Small farms that want a quick baseline
- Preliminary testing before sending samples to a lab
Why farmers like it
- Low cost entry point compared with full lab panels
- Fast results, often the same day
- Simple instructions that do not require special equipment
Important reality check for accuracy
A home kit is great for learning, not for precision fertilizer prescriptions. University extension guidance regularly warns that do it yourself kits are often less accurate and can vary widely by nutrient and technique. The University of Maryland Extension explains that soil testing laboratories provide more complete and accurate results than do it yourself kits. The University of New Hampshire Extension also notes that kit accuracy can vary depending on the nutrient being tested and the product used.
How to use a kit like a pro
Use a soil test kit for quick monitoring, then confirm big decisions with a lab report. This approach matches how many extension programs teach soil testing: treat rapid tools as screening, and treat lab analysis as the decision maker for lime and fertilizer rates. USDA soil testing guidance emphasizes that soil testing helps farmers understand soil properties for informed agronomic decisions, which is best supported by representative sampling and reliable analysis.
References
- Montana State University Extension, Soil test kits overview
- University of Maryland Extension, Soil testing and soil testing labs
- University of New Hampshire Extension, Are garden soil test kits a good alternative to lab testing
3. Digital Soil Tester Devices
If you like checking conditions on the spot, a digital soil tester can feel like having a quick field assistant in your pocket. These digital tools are commonly used to take instant readings for soil moisture, temperature, and sometimes pH. For many farmers, that speed is the main benefit. You can walk into a problem area, test it in minutes, and decide whether the issue looks like drought stress, poor drainage, or something that needs a deeper lab check.
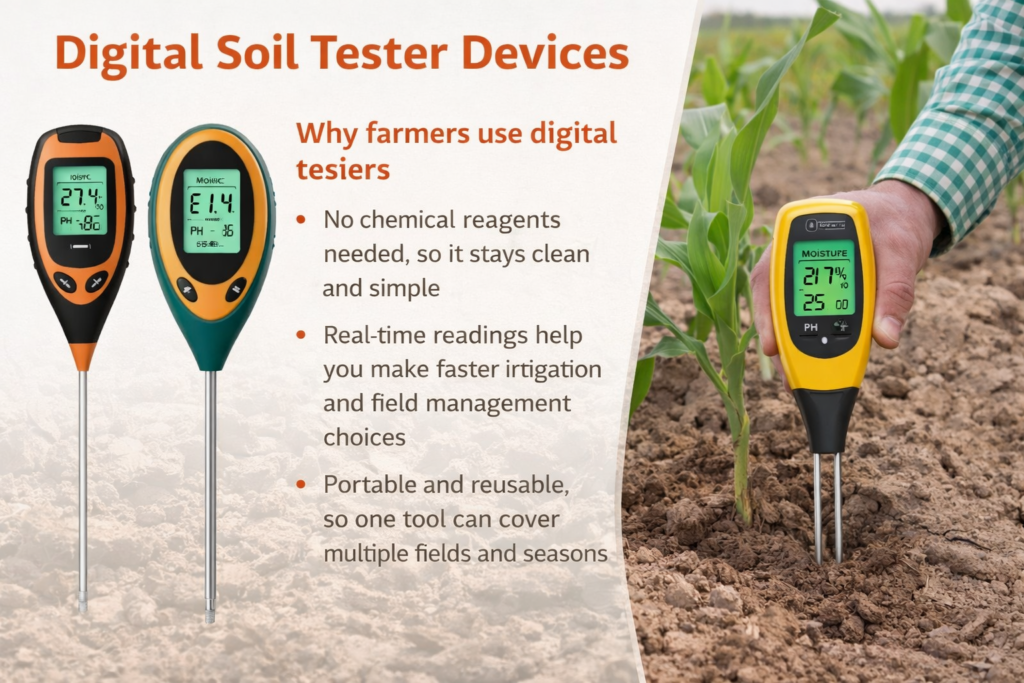
Why farmers use digital testers
- No chemical reagents needed, so it stays clean and simple
- Real time readings help you make faster irrigation and field management choices
- Portable and reusable, so one tool can cover multiple fields and seasons
What they are best at
Digital testers shine when you treat them as monitoring tools rather than final decision makers. Soil moisture sensors and measurement tools are widely used in irrigation management, and NRCS training materials include soil moisture measurement as a key part of irrigation planning and field decision making. That aligns with how many farmers use handheld meters: frequent checks during the season, especially in variable soils.
For pH, digital meters can be useful, but only if you maintain them correctly. Cornell University’s SoilNOW guidance highlights that electronic meters and probes are common store bought options and emphasizes practical care and maintenance so readings stay reliable. If you skip calibration and cleaning, results can drift and mislead you.
Practical advice that keeps results trustworthy
Many extension educators recommend using a digital soil tester for quick field checks, then confirming major lime and fertilizer decisions with a laboratory report. This pairing supports precision farming without relying on a single tool. The University of Delaware Cooperative Extension also reinforces that pH measurement and management are foundational for crop production decisions, which is why accuracy matters when you are adjusting lime or fertility plans.
So, if you want a simple rule: digital devices are one of the Best Soil Testing Methods for rapid monitoring, and lab tests are the method for final nutrient planning.
References
- NRCS Irrigation Toolbox, Chapter 6 Soil Moisture Measurement
- Cornell University SoilNOW, Using and Maintaining pH Meters with Your Soil
- University of Delaware Cooperative Extension, Measurement and Management of Soil pH for Crop Production
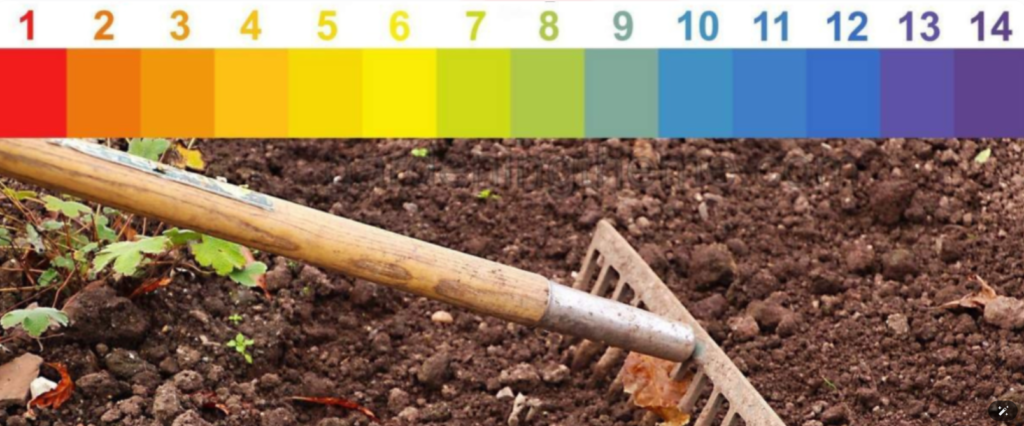
4. Soil pH Testing Using Chemical Kits or Digital Meters
Soil pH is one of those numbers that quietly controls everything. When pH drifts too acidic or too alkaline, key nutrients become harder for plants to absorb, even if you already applied fertilizer. That is why targeted pH checks are counted among the Best Soil Testing Methods for avoiding nutrient tie up and uneven growth.
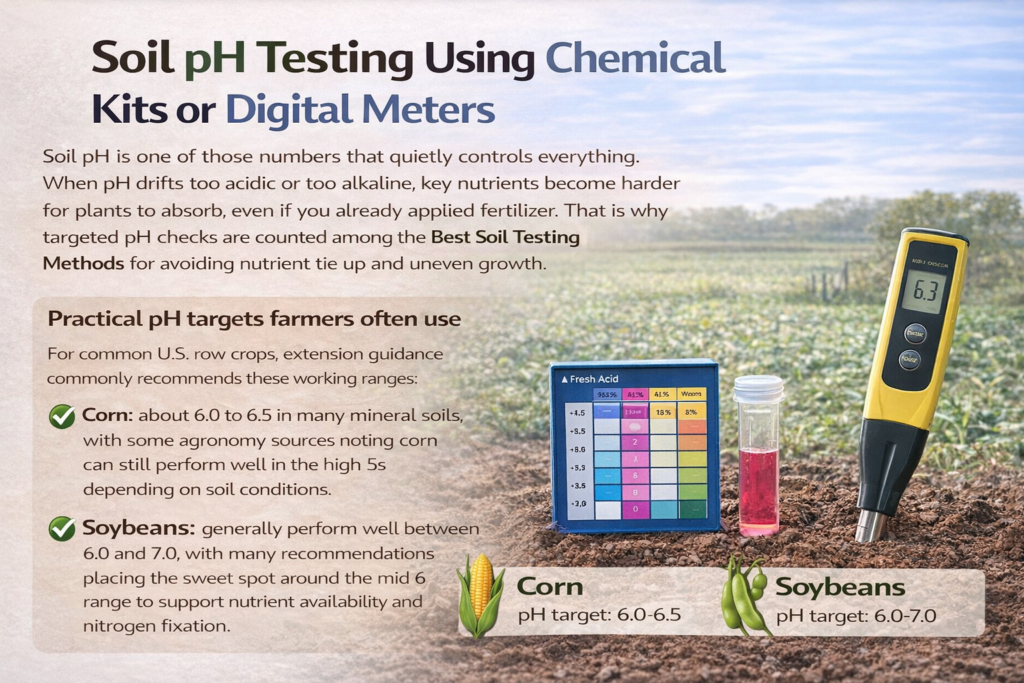
Practical pH targets farmers often use
For common U.S. row crops, extension guidance commonly recommends these working ranges:
- Corn: about 6.0 to 6.5 in many mineral soils, with some agronomy sources noting corn can still perform well in the high 5s depending on soil conditions.
- Soybeans: generally perform well between 6.0 and 7.0, with many recommendations placing the sweet spot around the mid 6 range to support nutrient availability and nitrogen fixation.
How farmers typically run pH testing
You have two reliable paths, and both can work well when used correctly.
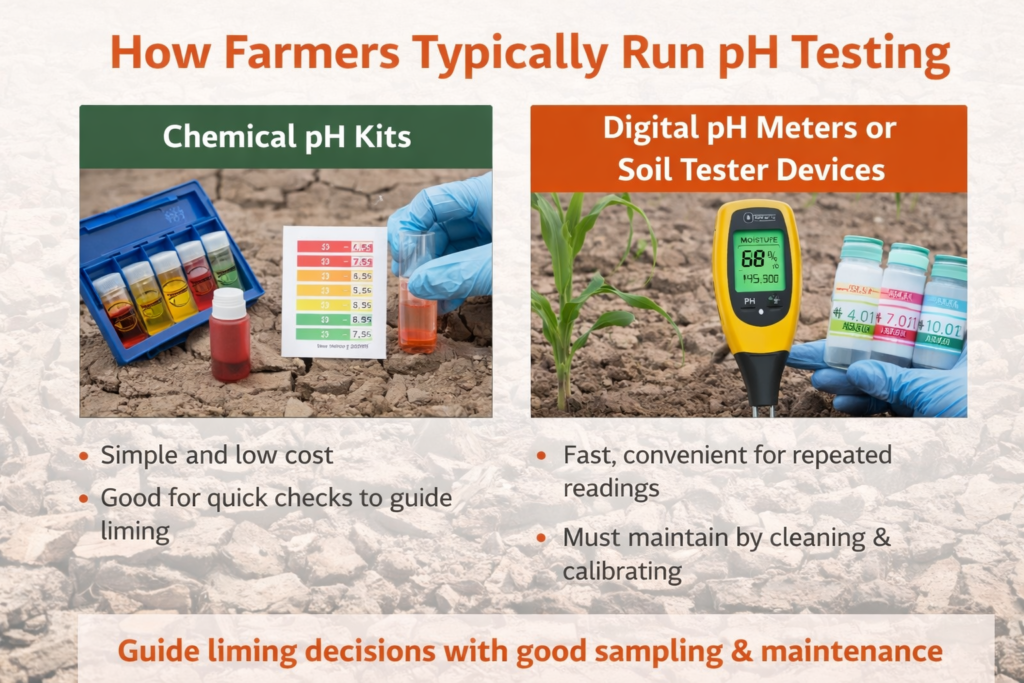
- Chemical pH kits
These are simple and low cost. They work well for quick checks and for confirming whether a field likely needs lime, especially when paired with good sampling. - Digital pH meters or soil tester devices
Digital tools like a digital soil pH meter are fast and convenient for repeated readings across a field. The key is maintenance. Cleaning and calibrating the probe keeps readings trustworthy, especially if you are using the numbers to guide liming decisions.
What to do with the result
If pH is outside the crop friendly range, that is when lime recommendations from a lab test become valuable. Raising pH with limestone is a standard correction for acidic soils and is strongly tied to yield response in corn and soy systems.
References
- University of Maryland Extension, Soil pH affects nutrient availability (PDF)
- Purdue University, Buffer pH concepts for crop production (PDF)
- Michigan State University Extension, Managing soil pH for optimal soybean production
- Iowa State University, Corn and soybean response to soil pH level and liming (PDF)
- Purdue University, Soil pH (PDF)
- Golden Harvest Agronomy, Soil pH for corn optimum range
5. Nutrient Strip Testing
Nutrient strip testing is a practical way to learn what your crop is really asking for, using your own field as the classroom. Instead of relying only on averages, you apply one or more fertilizer rates in long field length strips, then compare crop performance side by side. This method is widely used in U.S. row crop systems because it fits real equipment, real weather, and real variability.
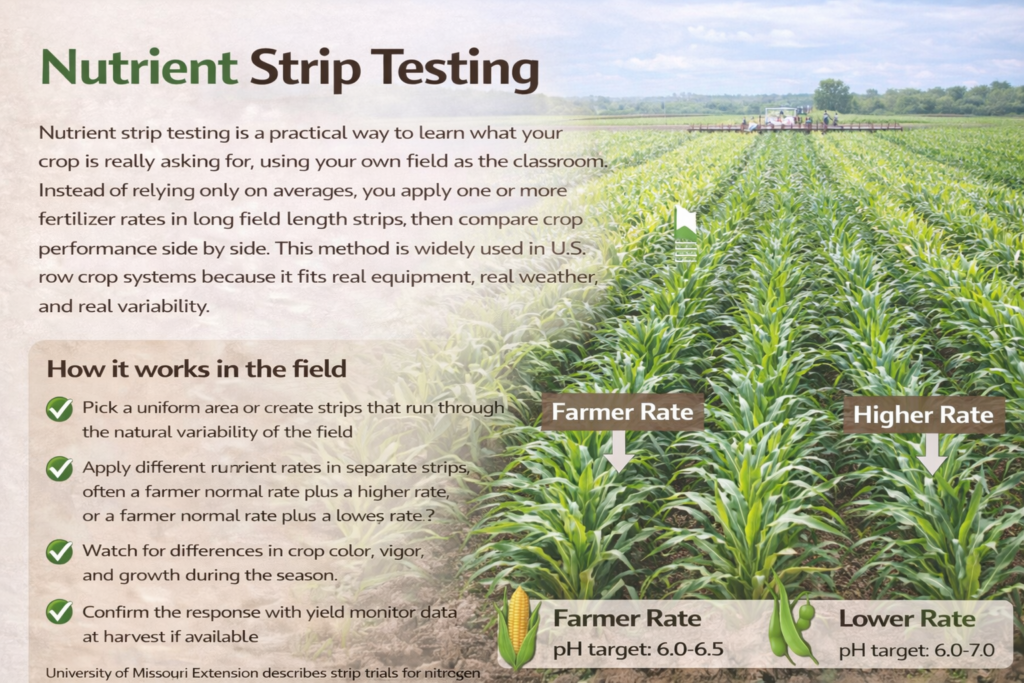
How it works in the field
- Pick a uniform area or create strips that run through the natural variability of the field
- Apply different nutrient rates in separate strips, often a farmer normal rate plus a higher rate, or a farmer normal rate plus a lower rate
- Watch for differences in crop color, vigor, and growth during the season
- Confirm the response with yield monitor data at harvest if available
University of Missouri Extension describes strip trials for nitrogen where growers compare a farmer rate with plus nitrogen and or minus nitrogen treatments, designed to improve nitrogen efficiency in corn and related crops.
What nutrient strip testing helps you see
- Whether the crop is truly responding to added nutrients
- If nitrogen losses likely occurred after heavy rain or warm wet conditions
- Where yield is limited by something other than fertility, such as compaction or drainage
MU Extension also explains that strip trials are an effective way to test nitrogen rates on cornfields, especially in seasons when weather can increase nitrogen loss risk.
A popular version: nitrogen rich reference strips
Many producers use a high nitrogen reference strip as a simple visual indicator. Oklahoma State University Extension explains that if the strip stands out, it can signal the field needs nitrogen, and if the strip is not visible, extra nitrogen may not be needed.
Why this method is trusted
This approach blends farmer experience with measurable results. It is also supported by extension guidance on on farm research. Kansas State University Extension notes that on farm trials provide practical field specific insights and offers guidance on how to set them up in real production conditions.
References
- Kansas State University Research and Extension, Establishing On Farm Demonstration and Research Plots (PDF)
- University of Missouri Extension, Strip Trial Program Nitrogen Flyer (PDF)
- Oklahoma State University Extension, Applying Nitrogen Rich Strips (Fact Sheet)
6. Soil Sampling and Composite Testing
A lab report can only be as reliable as the soil you send in. That is why careful soil sampling is still one of the Best Soil Testing Methods on any farm. When you collect a clean, representative composite sample, the numbers you get back are much more likely to match what is really happening in the field, and your lime and fertilizer recommendations become far more dependable.
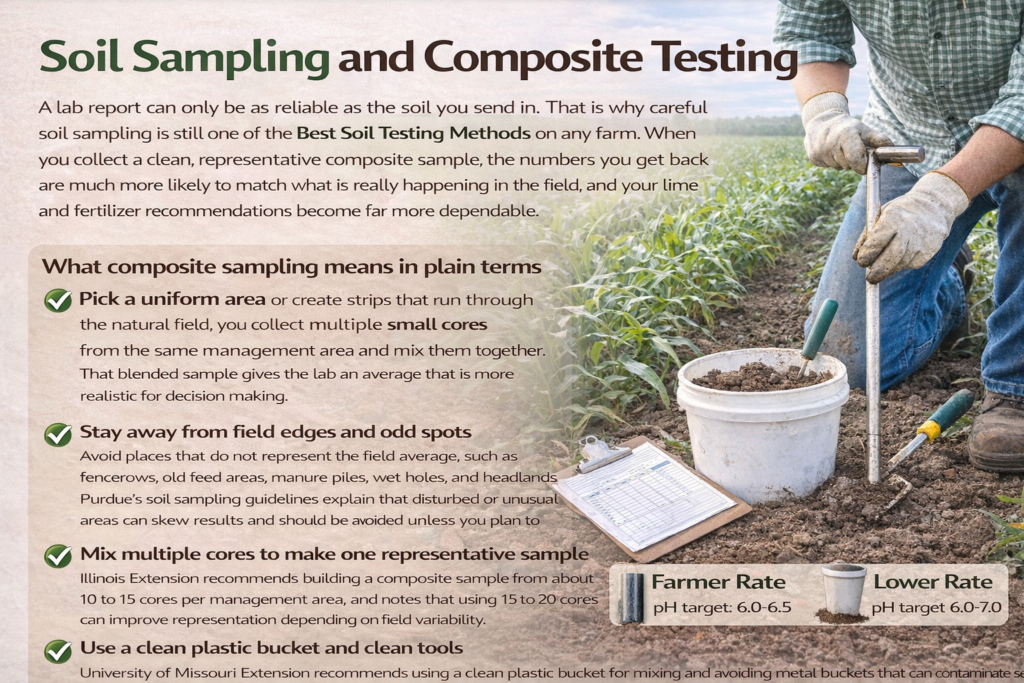
What composite sampling means in plain terms
Instead of pulling one scoop of soil and hoping it represents the whole field, you collect multiple small cores from the same management area and mix them together. That blended sample gives the lab an average that is more realistic for decision making.
Best practices farmers actually follow
- Sample at the same depth every time
Consistency matters more than perfection. Penn State Extension notes that cultivated fields are commonly sampled to about six to seven inches, while permanent pasture is typically sampled shallower, around three to four inches. - Stay away from field edges and odd spots
Avoid places that do not represent the field average, such as fencerows, old feed areas, manure piles, wet holes, and headlands. Purdue’s soil sampling guidelines explain that disturbed or unusual areas can skew results and should be avoided unless you plan to sample them separately. - Mix multiple cores to make one representative sample
Illinois Extension recommends building a composite sample from about 10 to 15 cores per management area, and notes that using 15 to 20 cores can improve representation depending on field variability. - Use a clean plastic bucket and clean tools
University of Missouri Extension recommends using a clean plastic bucket for mixing and avoiding metal buckets that can contaminate samples.
A simple field routine that works well
Many farmers use a zigzag pattern across the area, pull the right number of cores, mix thoroughly, and then bag the mixed soil for the lab. Michigan State University’s soil sampling guide summarizes composite sampling best practices and emphasizes that good sampling is essential for reliable interpretation.
If you want more accurate recommendations, the biggest improvement is usually not a fancy test. It is better sampling.
References
- Michigan State University, A Field Guide to Soil Sampling (composite sampling best practices)dations.
- Penn State Extension, Soil Sampling (depth guidance for crop fields and pastures)
- University of Illinois Extension, Soil Sampling (composite cores guidance)
- Purdue University Extension, Soil Sampling Guidelines (areas to avoid and sampling strategy)
- University of Missouri Extension, Soil Sampling Depth and Collection Techniques for Soil Fertility and more
- NC State Extension, Soil Sampling Strategies for Site Specific Field Management
7. Electrical Conductivity EC Testing
Electrical Conductivity testing, usually called EC testing, is a fast way to map how your soil changes across a field. It does not tell you exact fertilizer rates by itself. What it does extremely well is reveal patterns tied to salinity, soil texture, organic matter, moisture, and drainage. Those patterns help farmers create smarter management zones and tighten variable rate decisions.

What EC testing actually measures
Soil EC is a measure of how easily an electrical current moves through the soil. In practical terms, EC readings often rise or fall based on things like soluble salts, clay content, water content, and other field properties. USDA NRCS notes that EC is strongly influenced by soluble salts and also affected by moisture, texture, and temperature.
Why large farms use it in precision agriculture
EC mapping is popular in precision agriculture because it helps explain why one part of the field yields differently than another. Colorado State University Extension explains that field EC mapping can indicate variation related to soil composition such as sand, clay, organic matter, and water content, which is valuable for decision making across a field.
Ohio State University Extension also describes using EC to delineate field variability and guide directed sampling and management.
Where it fits best
- Precision agriculture zone building for variable rate fertilizer, seeding, or irrigation
- Identifying salinity risk areas and drainage related yield losses
- Choosing smarter soil sampling locations so lab tests represent real zones
South Dakota State University Extension describes EC as a fast, reliable, cost effective way to characterize within field variation and notes it can relate to texture, cation exchange capacity, drainage, organic matter, and salinity.
A practical farmer tip
Use EC maps to split a field into zones, then take separate composite samples from each zone for lab testing. That is where EC becomes powerful: it helps you sample and manage with more precision, instead of treating every acre like it is identical. USDA ARS publications also describe apparent EC measurements as widely used for characterizing within field variability for site specific management.
References
- USDA Agricultural Research Service, Apparent soil electrical conductivity measurements in agriculture (PDF)
- USDA NRCS, Soil Electrical Conductivity (indicator info sheet PDF)
- Colorado State University Extension, Field EC Mapping A New Tool to Make Better Decisions (PDF)
- Ohio State University Extension, Using Soil Electrical Conductivity to Delineate Field Variation (Fact Sheet)
- South Dakota State University Extension, Creating Management Zones Using Electrical Conductivity
- USDA Agricultural Research Service, Applications of apparent soil electrical conductivity in precision agriculture (PDF)
8. Biological Soil Testing
A productive field is not just dirt and minerals. It is a living system packed with bacteria, fungi, and other organisms that help cycle nutrients, build structure, and keep crops resilient. That is why biological soil testing is gaining attention in regenerative systems. It focuses on the living side of soil health, not only nutrient numbers. USDA NRCS explains that soil health is evaluated using indicators, including biological properties and processes.
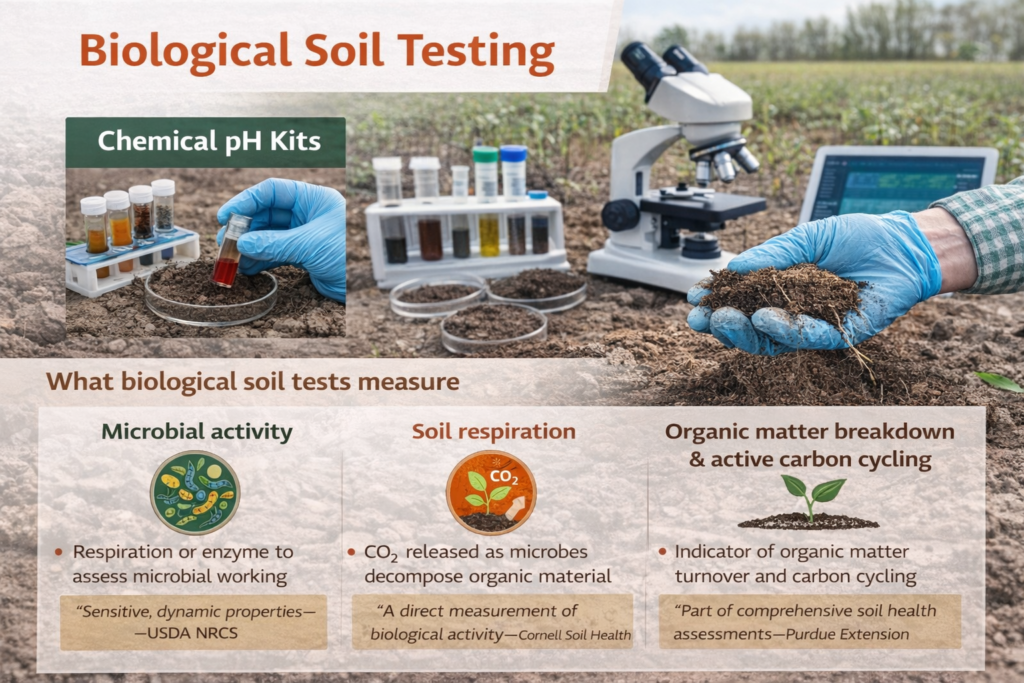
What biological soil tests measure
Most biological soil health panels focus on a few key indicators that reflect how active the soil biology is:
- Microbial activity
Often assessed using indicators such as respiration or enzyme activity, which give clues about how strongly microbes are working. USDA NRCS describes biological indicators as sensitive, dynamic properties that relate to soil functions. - Soil respiration
This measures carbon dioxide released from soil as microbes break down organic material. NRCS notes soil respiration is a measure of CO2 released and is an important indicator because it reflects microbial activity and organic matter decomposition.
Cornell Soil Health also describes respiration as a direct measurement of biological activity that integrates abundance and activity of microbial life. - Organic matter breakdown and active carbon cycling
Many soil health frameworks use a combination of organic matter and faster changing biological indicators to understand carbon and nutrient cycling. Purdue Extension describes soil respiration and other biological measurements as part of comprehensive soil health assessments, alongside organic matter related indicators.
Why farmers are using it more in regenerative farming
Biological tests help answer questions traditional fertility tests cannot, such as:
- Is residue breaking down quickly or slowly
- Is the soil biology responding to cover crops or reduced tillage
- Are amendments being mineralized and turning into plant available nutrients
NRCS also publishes guidance on soil health testing to support conservation planning, including recommended indicators that are practical for management decisions.
How to use the results in a farm practical way
Biological testing works best when you compare results over time within the same field, using the same sampling season and method. Think of it as trend tracking, not a one time score. Many farmers pair it with lab nutrient testing so they can manage both soil fertility and soil function together.
References
- USDA NRCS, Soil Health Testing to Support Conservation Planning Technical Note 470 16 (PDF)
- USDA NRCS, Soil Health Assessment
- USDA NRCS, Biological Indicators and Soil Functions (PDF)
- Cornell Soil Health Manual Series, Soil Respiration (PDF)
- Purdue University Extension, How to Understand and Interpret Soil Health Tests (PDF)
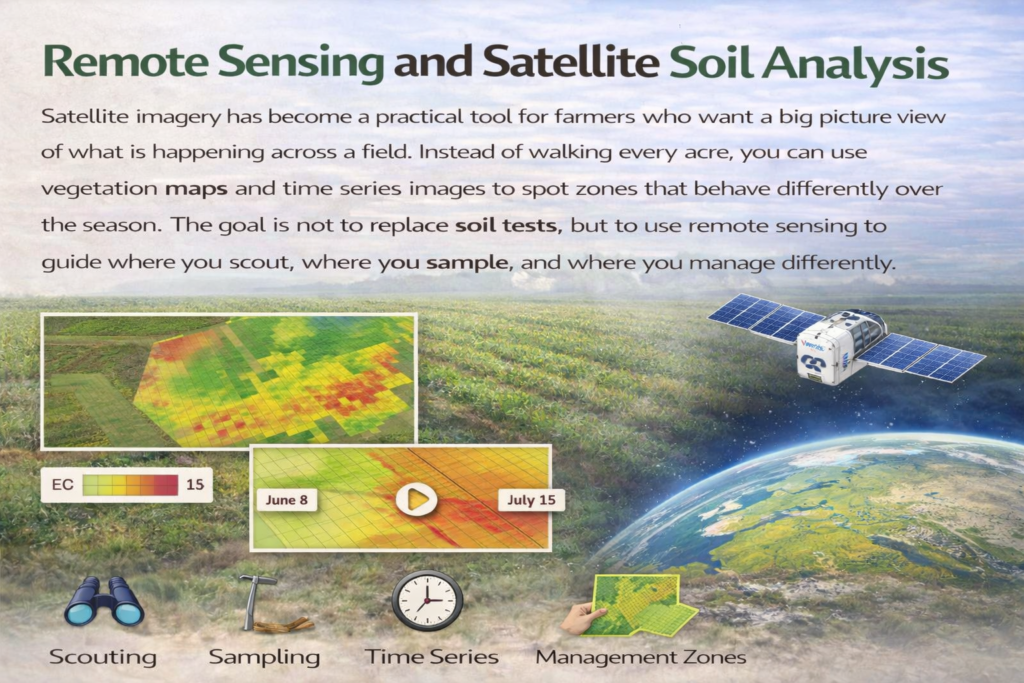
9. Remote Sensing and Satellite Soil Analysis
Satellite imagery has become a practical tool for farmers who want a big picture view of what is happening across a field. Instead of walking every acre, you can use vegetation maps and time series images to spot zones that behave differently over the season. The goal is not to replace soil tests, but to use remote sensing to guide where you scout, where you sample, and where you manage differently.
NASA explains that satellite observations are used to monitor crops and agricultural production and that these data can be turned into useful maps and tools for producers around the world.
What farmers can learn from satellite maps
Most farm focused satellite tools rely on vegetation indices, especially NDVI, which tracks crop greenness. The USGS notes that NDVI is widely used to quantify vegetation greenness and assess changes in plant health.
When a zone stays consistently weaker on NDVI maps, it often points to a soil related constraint such as compaction, poor drainage, low organic matter, or salinity risk. That is your clue to investigate and sample more strategically.
Why it is popular in precision farming
Remote sensing is widely used in precision agriculture workflows because it helps identify in field variability and supports planning and management decisions. Ohio State University Extension describes remote sensed imagery as useful in analytical processes for field planning and farm management where spatial and temporal quality are important.
Farmers commonly use satellite insights for:
- Field wide zone identification and scouting priorities
- Fewer random soil samples, more targeted sampling by zone
- Supporting yield mapping discussions by comparing yield patterns with season long imagery
South Dakota State University Extension also highlights that NDVI has many farm uses, including monitoring crop health, detecting drought stress, and supporting precision agriculture practices.
How to use it the right way
The most reliable approach is a simple pairing:
- Use satellite maps to locate consistent high and low performing zones
- Pull separate composite soil samples from each zone
- Use lab results to confirm the cause and set fertilizer or lime plans
That is why this method complements traditional testing rather than replacing it. Satellites show you patterns, while soil tests explain the chemistry and biology behind those patterns.
References
- South Dakota State University Extension, Digital Farming Free Satellite Imagery and NDVI Maps (PDF)
- NASA Science, Agriculture and satellite data for crop monitoring
- USGS Landsat Missions, Landsat Normalized Difference Vegetation Index NDVI explanation and use
- Ohio State University Extension Ohioline, Remote Sensing in Precision Agriculture
10. Professional Agronomic Field Assessment
Sometimes the best tool is a trained set of eyes plus a shovel. A professional agronomic field assessment brings together hands on observation and farm data to explain why one part of a field thrives while another struggles. For long term planning, this can be one of the Best Soil Testing Methods because it connects what you see in the crop with what is happening in the soil and how the field has performed over time.
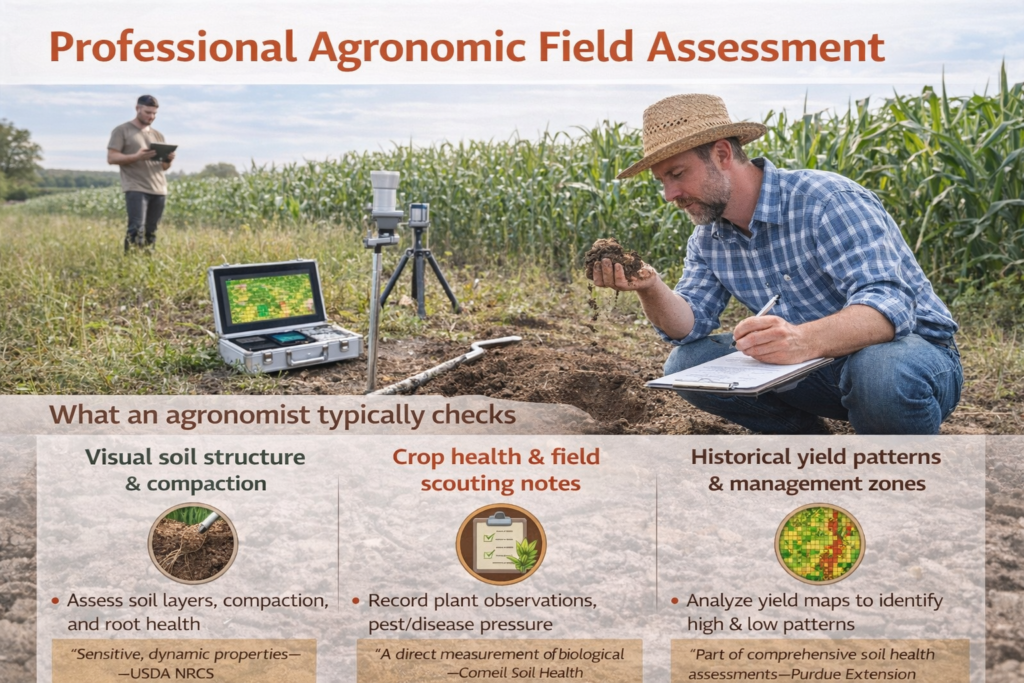
What an agronomist typically checks
- Visual soil structure and compaction
An agronomist may dig a small pit or use a spade to evaluate aggregation, layering, crusting, rooting depth, and signs of compaction. Tools like Visual Soil Assessment are designed specifically for quick, practical evaluation of soil condition and plant performance using simple field observations. - Crop health and field scouting notes
Crop scouting is a structured process, not a quick glance. It includes checking plant population, leaf color, disease and insect pressure, weed competition, and nutrient deficiency symptoms. Extension programs teach scouting fundamentals and provide standardized reporting tools to document what is happening across the field. - Historical yield patterns and management zones
A strong assessment often includes yield history because yield maps can reveal consistent high and low performance areas that may relate to soil constraints. NDSU Extension notes that yield monitor data and yield maps can help predict yield potential and even reflect soil nutrient variability that can guide future crop management.
Why this approach works for long term decisions
A professional assessment helps you avoid treating every acre the same. Instead, you can separate the field into zones and manage them differently. Illinois Extension describes zone sampling approaches that integrate yield maps and other data to create sampling zones with common characteristics, which makes fertilizer and lime plans more precise.
Practical tip
Use a professional assessment to decide where to take separate soil samples. Remote maps and yield history show patterns, but an agronomist can confirm the cause by looking at soil structure and crop symptoms in person.
References
- Penn State Extension, Agronomy Scout School Crop Scouting Fundamentals
- USDA NRCS, Soil Health Assessment
- USDA NRCS, Cropland In Field Soil Health Assessment Guide, Technical Note 470 10 PDF
- FAO, Visual Soil Assessment overview
- FAO, Visual Soil Assessment Field Guide PDF
Choosing the Right Soil Testing Method for Your Farm
There is no single test that fits every farm. The Best Soil Testing Methods are the ones that match your acreage, your crops, and the way you manage your fields. A small vegetable grower may need quick pH checks and a simple soil test kit, while a large grain farm may benefit more from lab reports, zone sampling, and precision tools that map variability across hundreds of acres.
Here are the main factors that usually decide what makes sense
Farm size
On smaller farms, one or two composite samples and a lab report can cover most decisions. On larger farms, fields often vary too much for one average result, so it helps to sample by management zones and use mapping tools to guide where you pull samples.
Crop type and yield goals
Different crops have different nutrient demands and pH preferences. High value crops often justify more frequent testing and more detailed lab panels. Broadacre crops can still benefit greatly, especially when fertilizer prices are high, but the testing plan should fit the economics of the crop.
Budget and input costs
Soil testing is usually cheaper than unnecessary fertilizer or lime. A practical approach is to spend more on lab testing when you are making big decisions, and use simpler tools for routine monitoring during the season.
Technology access and comfort
If you already use yield monitors, variable rate equipment, or satellite imagery, it is easier to add EC maps or zone sampling. If you prefer a low tech workflow, consistent sampling plus a reliable lab report can still deliver excellent results.
A farmer practical tip
Many experienced farmers get the clearest picture by combining methods. For example, they use lab testing for nutrient planning, quick field tools for in season checks, and zone based sampling when a field has clear high and low performing areas. That mix helps you manage soil like a system instead of relying on a single number.
Summary Table: 10 Best Soil Testing Methods for Farmers
| Method | What it tells you | Best for | Tools needed | Limitations | Best time to use |
|---|---|---|---|---|---|
| 1. Laboratory Soil Testing | Full nutrient profile, pH, lime need, sometimes OM and micronutrients | Fertilizer and lime planning | Lab, sample bag, soil probe | Needs good sampling, takes time | Pre season, every 2 to 3 years |
| 2. At Home Soil Test Kit | Basic pH and rough NPK | Quick screening | Soil test kit | Less accurate than labs | Pre planting, spot checks |
| 3. Digital Soil Tester Devices | Instant moisture, temperature, sometimes pH | In season monitoring | Soil tester meter | Needs calibration, limited nutrient info | During season, irrigation decisions |
| 4. Soil pH Testing | pH status, acidity risk | Lime decisions, nutrient availability | pH kit or meter | pH alone does not show nutrient levels | Pre season and mid season checks |
| 5. Nutrient Strip Testing | Real crop response to nutrient rates | Fine tuning nitrogen or other nutrients | Fertilizer spreader, strip plan, yield monitor optional | Needs careful setup, weather can affect results | Growing season, confirm at harvest |
| 6. Soil Sampling and Composite Testing | Representative field average or zone average | Making lab results reliable | Soil probe, clean bucket | Poor sampling ruins accuracy | Any time you send samples |
| 7. EC Testing | Salinity and texture variability patterns | Management zones, variable rate planning | EC sensor or service | Needs interpretation, not a nutrient test | Pre season mapping, zone sampling |
| 8. Biological Soil Testing | Microbial activity, respiration, soil function trends | Regenerative and soil health tracking | Soil health lab panel | Better for trends than one time decisions | Same season each year for comparison |
| 9. Remote Sensing and Satellite Analysis | Field variability patterns via NDVI | Targeted scouting and zone sampling | Satellite tools, farm platforms | Shows patterns, not causes | In season, compare across years |
| 10. Professional Agronomic Assessment | Field diagnosis plus data interpretation | Long term plans and problem solving | Agronomist, shovel, maps | Depends on expertise and records | Pre season and problem areas |
Final Thoughts
Picking the Best Soil Testing Methods is not about chasing fancy tools, it is about making fewer guesses with your money and your land. When you understand what your soil can actually supply, you can stop overcorrecting, target the real problems, and build a plan that holds up season after season. The payoff shows up in stronger stands, steadier yields, and fewer surprises when weather turns unpredictable.
If you want a simple path, start with a solid lab test, then add quick field checks where they help most. Keep notes, compare results over time, and treat soil like the long term asset it is. If you found this helpful, share it with another farmer and tell me in the comments what crop you grow and what kind of soil challenges you are dealing with.
FAQs for Best Soil Testing Methods
1: What soil test gives the most reliable results on a farm?
A certified laboratory analysis is usually the most trustworthy option. The key is sampling quality. When you pull cores at a consistent depth, avoid odd spots, and mix a proper composite sample, the lab report becomes a solid foundation for lime and fertilizer decisions.
2: When should I test my soil again?
For most farms, testing every two to three years is a practical routine. If you are growing higher value crops, applying manure regularly, switching fields, or seeing unexplained yield differences, annual testing can help you stay ahead, especially for pH and the major nutrients.
3: Is an at home soil test kit enough for nutrient planning?
A home kit is helpful for fast checks, mainly for basic pH and general nutrient screening. But for real nutrient planning, lab tests are the safer choice because they provide deeper detail and more consistent accuracy when you are deciding rates and amendments.
4: Do digital soil tester devices actually help farmers?
They can be very useful during the season. A digital soil tester helps you track moisture and temperature quickly and sometimes pH, which can support irrigation timing and problem diagnosis. For fertilizer and liming plans, though, lab testing remains the main decision tool.
5: How do I choose the best testing approach for my fields?
Start with lab testing as your baseline, then build around your farm’s needs. Smaller operations often do well with a lab test plus occasional kit or meter checks. Larger, variable fields usually benefit from zone sampling, EC mapping, remote sensing, and an agronomist’s field assessment to fine tune inputs by area.

Thesis Link : https://saulibrary.edu.bd/daatj/public/uploads/BAU200601_19-Pp_5.pdf
- Best Backpack for Work, Travel, College, and Everyday Use - May 24, 2026
- Best Soil Test Kits for Lawns and Gardens - May 16, 2026
- Best Farm Loans in USA – How to Get Approved Fast in 2026 - April 29, 2026


[…] Best Soil Testing Methods-Improve Soil Health & Crop Yield […]