
Hydroponics System for Beginners : Simple Guide to Get Started
It started with a problem. My friend Shuvo, a city dweller with no garden space, wanted to grow spinach for his diabetic mother. But Dhaka’s dusty rooftop and soil borne pests made it nearly impossible. That’s when I introduced him to hydroponics a method of growing plants without soil. Within two months, his setup was producing lush greens, and he never looked back. Simple tips, real life examples, and affordable setups hydroponics System for beginners .
Hydroponics isn’t just a trend. It’s a shift in how we grow food, clean, efficient, and space saving. And best of all? You can start it right at home, no fancy greenhouse needed.
Hydroponics System for Beginners: What Do You Need to Control?
So, you’ve decided to grow food without soil. Great choice. But here’s the thing: before you start buying sensors, pipes, and fancy controllers, stop and ask yourself:
What does my hydroponic system really need?
Most beginners get excited and overbuild. I made the same mistake. Back in 2021, I installed four sensors, Wi-Fi relays, an app dashboard and forgot to check if my reservoir had a leak. Lesson learned: don’t complicate what should be simple.
Start with the Basics: What Are You Trying to Grow?
Different plants need different care. Leafy greens like lettuce and spinach are low maintenance. Tomatoes and strawberries, on the other hand, need more attention—light cycles, airflow, and precise nutrient levels.
So write down your goal:
- What crops are you growing?
- Indoors or outdoors?
- Manual or automated?
Once you know that, you can decide what to control and what to ignore.
Sensors: What Should You Measure?
Sensors help you keep your plants healthy without daily guesswork. Here are the essential ones for beginners:
1. pH Sensor
Plants absorb nutrients best when the water pH is between 5.5 and 6.5.
A digital pH meter is cheap and easy. If you want automation, look for a gravity analog pH sensor e.g., from DFRobot.
Real Life: I used to check pH daily with strips until I forgot for a week and my basil turned yellow. Now I use a budget digital pH pen (1,200 BDT), worth every penny.
2. EC (Electrical Conductivity) Sensor
Measures how much nutrient is in the water.
EC too high = plant burn.
EC too low = stunted growth.
Stick to 1.0–2.5 mS/cm for most plants. Use a TDS meter (Total Dissolved Solids) for quick checks.
3. Water Level Sensor
Essential if you’re using an automated reservoir or recirculating system.
Simple float sensors or ultrasonic sensors can warn you before the pump runs dry.
4. Temperature Sensor
Water temp over 28°C can harm roots and reduce oxygen.
Use DS18B20 waterproof sensors with microcontrollers if you want live data.
Devices You Might Need to Control
You don’t need a robot to run a small setup. But if you want to go hands-off, here’s what you’ll likely be managing:
1. Air Pump
Keeps roots oxygenated. Run 24/7 unless you’re using the Kratky method (no pump).
2. Water Pump
Moves nutrients in NFT or Ebb & Flow systems. Use a timer or controller to cycle it.
3. Grow Lights
If you’re growing indoors or in low sunlight.
Use full spectrum LED grow lights. Set timers for 14–16 hours/day.
4. Exhaust Fans / Cooling Fans
If your grow box heats up, a simple PC fan with a relay can help. Important for indoor summer setups.
5. Solenoid Valves
Control water flow in advanced systems. Not needed for simple home hydroponics.
Fancy Features: Automation and Remote Monitoring
Now, do you really need to check your basil’s root temperature from your phone while at work?
If yes, consider:
- ESP32 or ESP8266 microcontrollers , built in Wi-Fi
- Blynk, Home Assistant, or ThingSpeak apps
- Real time dashboard with graphs and alerts
But if not, don’t sweat it. A basic plug in timer and manual pH checks are enough for many small setups.
Shuvo, a hydroponic enthusiast in Khulna, started with timers and manual checking. A year later, he now uses a NodeMCU board and a custom Blynk dashboard. “But I didn’t touch electronics until I knew my system by heart,” he says. Smart move.
How Much Control Do You Really Need? A Quick Checklist
| Need | Basic Option | Advanced Option |
|---|---|---|
| pH Monitoring | pH pen or strips | Analog pH sensor + ESP32 |
| EC / Nutrients | TDS meter | EC sensor + logging |
| Light Timers | Plug in socket timer | Relay + app based control |
| Pump Timing | Manual switch | Automated cycle timer |
| Water Level | Visual check | Float sensor + alert |
| Remote View | None | Blynk/ThingSpeak IoT dashboard |
Real Life Example: DIY Setup for Under 4,000 BDT
What I Used:
- Plastic bin – 300 BDT
- Net pots – 150 BDT
- Coco coir – 100 BDT
- Air pump + stone – 500 BDT
- pH pen – 1,200 BDT
- TDS meter – 600 BDT
- Plug timer – 300 BDT
- Lettuce seeds – 100 BDT
- Total: 3,250 BDT
Result: Harvested my first batch in 35 days. The setup ran 95% manually, with only two checks daily.
Keep it simple. If you only have two sensors and a pump, you don’t need a NASA level controller.
Option 1 – Arduino Hydroponics System
I didn’t set out to learn electronics. I just wanted fresh spinach for my mother who was recovering from surgery. Every bundle from the market came with pesticide residue or tasted off. That’s when I stumbled upon hydroponics. No soil, no mess, and completely doable on a small rooftop. The growing part? Simple enough. The tricky part? Automation.
That’s how I met Arduino. Not in a lab, not in a tech class, but on a dusty YouTube video filmed on someone’s kitchen counter. And let me tell you, Arduino is not as scary as it sounds.


What Is Arduino And Why Should You Care?
In plain language: Arduino is a tiny computer that listens to sensors and controls things. You write instructions, plug in wires, and it just does what it’s told.
Don’t let the word “microcontroller” confuse you. If you can assemble IKEA furniture, you can build a basic Arduino setup for your hydroponic system. Think of it as the helpful assistant that turns on your water pump at the right time, or checks if your reservoir is low.
I started with an Arduino Uno. Cost me around 850 Taka online. My first goal? Just switch on the pump every 6 hours for 15 minutes. No sensors. No apps. Just a piece of code and a timer.
And it worked.
Which Arduino Should You Use? Uno vs Mega
Let’s keep this simple. You have two main options if you’re a beginner.
Arduino UNO – Start Small, Learn Fast
- 14 digital pins
- Great for small systems (1-2 sensors, 1 pump)
- Affordable and widely supported
- Small enough to tape under your reservoir
This was my first board. I used it with a timer and a cheap relay module to turn on the pump. Later, I added a temperature sensor (DS18B20) to shut things down if it got too hot.
Arduino MEGA – If You Plan to Grow
- 54 digital pins
- Can handle pH sensor, EC sensor, temperature, light, multiple pumps
- Best for medium to large setups
I upgraded to a MEGA when I built a nutrient film technique (NFT) setup on my rooftop last year. I had three grow channels, two air pumps, and even installed a water level sensor to shut things off if the tank got low.
Real story: My friend Rashed in Bogura built a 6 tower vertical hydroponic unit using one Arduino Mega. He even added an LCD display so his dad could check pH without opening an app. “My father still doesn’t trust smartphones,” he laughed, “but the screen he reads every morning like a newspaper.”
Why Arduino Makes Sense for Home Hydroponics
Let’s break it down, plain and simple:
| What Arduino Can Do | What It Means for You |
|---|---|
| Turn devices on/off with relays | Automate your pump or grow light |
| Read sensors | Monitor temp, water, pH |
| Work offline | No internet needed |
| Store and run code | Set routines, schedules |
| Cheap and available | Great for low budget gardeners |
You don’t need a degree. You don’t need a lab. Just a bit of curiosity and a free weekend.
But… No Wi-Fi?
One of Arduino’s biggest limitations:
No built in Wi-Fi.
So, if you’re dreaming of checking your basil’s pH from your office chair or bed, you’ll need to either:
- Add a Wi-Fi module (ESP8266 or ESP32),
- Or move to something like Raspberry Pi.
But if you’re okay with checking readings manually or using a screen—Arduino is plenty.
And honestly? Sometimes it’s better to start unplugged, get your hands dirty, and then automate only what’s needed.
How I Used Arduino for My Own Hydroponic Build
Here’s what my basic Arduino Uno setup looked like last winter on my Dhaka balcony:
- Board: Arduino Uno
- Relay Module: 2 channel
- Pump: Aquarium water pump
- Grow Light: 10W LED with timer
- Power Source: USB phone charger
- Code: Basic timer loop to run pump every 6 hours for 15 minutes
- Sensor: DS18B20 to cut pump if water got too hot
All parts together? Under 3,000 Taka. It ran unattended for 2 weeks while I traveled.
My lettuce didn’t just survive—it thrived.
Research Based Benefits of Arduino in Hydroponics
Many educational institutions and hobbyist forums endorse Arduino as a learning tool and automation solution. Here’s what the experts say:
- The FAO mentions Arduino based systems in urban agriculture projects for their low cost and flexibility.
- According to a study by The University of California Davis, simple microcontrollers like Arduino helped reduce water usage in student hydroponic projects by over 30%.
- DFRobot’s guide on gravity sensors shows compatibility with Arduino, proving it’s viable for pH and EC monitoring.
References:
- DFRobot – Gravity Analog pH Sensor Manual
- Arduino Project Hub – create.arduino.cc/projecthub
- University of California Agriculture & Natural Resources – Smart Gardening Tech
- FAO Urban Agriculture Innovations – fao.org
Option 2 – ESP32 Hydroponics System
I’ll be honest, when I first heard about ESP32, I thought it was some kind of new fertilizer.
Turns out, it’s a tiny board that does way more than any bottle of NPK ever could.
After using Arduino for a year to automate my hydroponics setup, I started craving something more… futuristic. I wanted updates on my phone. I wanted to monitor my spinach and strawberries from my office desk. And yes, I wanted to brag a little too. That’s when I met ESP32 and everything changed.


What Is ESP32, and Why Should You Care?
ESP32 is a microcontroller with built in Wi-Fi and Bluetooth. Think of it as Arduino’s smarter cousin who graduated from tech school and started his own startup.
In the world of hydroponics, ESP32 is a game changer. It can do all the automation Arduino does, control pumps, read sensors, run timers—but it can also send alerts, show live graphs, and even take voice commands .
For me, it meant I could finally stop checking my reservoir 5 times a day. Instead, I just got a notification when water was low. Life changing.
Why ESP32 Is Perfect for Wi-Fi Connected Hydroponics
Let’s break it down:
| Feature | ESP32 | Arduino Uno |
|---|---|---|
| Wi-Fi | Built in | External module needed |
| Bluetooth | Yes | No |
| Speed | Fast (240 MHz dual core) | Slower (16 MHz) |
| Pins | 30–38 | 14 |
| Price | ~800–1200 BDT | ~600–1000 BDT |
| Mobile App Support | Easily works with Blynk, MQTT | Requires add ons |
| Coding Skill Needed | Intermediate | Beginner friendly |
Good to know: ESP32 supports deep sleep mode, which saves power—a bonus if you’re running off batteries or solar.
Real Life Story: The Guy Who Grew Lettuce from His Living Room in Rajshahi
Last year, my cousin Tanvir in Rajshahi built a hydroponic NFT setup in his apartment’s spare room. He used:
- One ESP32 board
- Three sensors (pH, EC, water level)
- A relay module to control his pump
- Blynk app for mobile control
- A basic water cooler tank as his reservoir
Every morning, his system sent a ping to his phone with pH, temperature, and EC levels. He didn’t even step into the grow room unless something was off.
“The whole thing cost me under 5,000 Taka,” he told me. “Now I eat fresh greens, and my electricity bill only went up by 70 Taka per month.”
What You Can Automate with ESP32
| Component | ESP32 Role |
|---|---|
| Nutrient Pump | Turn on/off based on time or EC level |
| pH Monitoring | Read pH sensor, send alerts if too low/high |
| Water Level | Alert when low, auto refill if paired with valve |
| Air Pump | Run continuously or on schedule |
| Grow Lights | Automated day/night cycle |
| Temperature Control | Trigger fan or heater based on thresholds |
Using ESP32 with Blynk: A Simple IoT Setup
Blynk is an app that connects to ESP32 and lets you build a custom dashboard on your phone drag and drop style. Here’s how I used it:
- Connected pH and water temp sensors to ESP32
- Created a Blynk project with 3 gauges and a button
- Programmed ESP32 to send sensor data every 5 seconds
- Set an alert to my phone when pH dropped below 5.5
- Triggered the pump manually through my phone while at work
No cloud subscription, no coding degree—just some trial and error.
Tip: Use free services like ThingSpeak or Adafruit IO if you want to store and visualize long term data.
A Few Things to Watch Out For
- Wi-Fi range: Keep your setup close to your router, or use a Wi-Fi extender.
- Power fluctuations: ESP32 can be finicky with bad power. Use a regulated 5V adapter.
- Humidity: Protect your board with a plastic box or silicone spray.
I lost my first ESP32 to water vapor because I mounted it too close to the reservoir. Lesson learned.
References
- Kratky, B.A. (2004). Non circulating hydroponic method for growing leafy vegetables.yone who’s too lazy to check their plants in person.
- Espressif Systems. (2023). ESP32 Overview
- Blynk Documentation – https://docs.blynk.io
- Instructables: IoT Hydroponics using ESP32
- FAO Urban Agriculture Programs – https://fao.org
Option 3 – Raspberry Pi—The Mini Computer Hydroponics System
I remember when my friend Arif first showed me his hydroponic setup. It was neat, but what really caught my eye was a small black box with blinking lights and a tiny screen. “That’s my Raspberry Pi,” he said, “It’s like the brain of the system.” I nodded, pretending to understand, but secretly thinking, Why would you need a computer for plants?
Months later, I tried it myself and honestly, it changed the way I grow things at home.

What’s Raspberry Pi Anyway?
At its core, Raspberry Pi is a small computer, not just a controller like Arduino or ESP32. It runs an operating system, so you can do many things: run programs, save data, connect to Wi-Fi, even stream videos .
Because it’s a full computer, it can handle complex tasks:
- Store sensor data over weeks or months
- Show you live stats on a touchscreen
- Run scripts that decide when to water or light your plants
- Take photos to track growth or check for pests
- Connect to the internet to send alerts or let you control things remotely
When Should You Use Raspberry Pi for Hydroponics?
If your goal is just to turn a pump on and off at fixed times, Raspberry Pi might be like using a tractor to mow your lawn, it works, but it’s more than you need.
But if you want to:
- Keep detailed logs of pH, temperature, or water level
- See a dashboard with colorful charts
- Use a touchscreen interface for control
- Automate based on complex rules – “If humidity < 60%, turn on humidifier”
- Use a camera to monitor your plants remotely
then Raspberry Pi is a solid choice.
A Real Life Story: How Arif Made His Balcony Smarter
Arif started small. He had a simple hydroponic system growing lettuce on his balcony in Dhaka & also wanted to track the pH of the water without checking manually every day.
He bought a Raspberry Pi 3, a pH sensor, and a relay to control his water pump. Using free tutorials online, he set it up to:
- Measure pH every hour
- Turn the pump on if pH went out of range
- Log data to a file he could review on his laptop
- Send him an email alert if something was wrong
At first, it was confusing. He struggled with setting up the sensor and coding in Python. But after a couple of weeks, it ran smoothly.
His words:
“It felt good to finally relax knowing the system was watching itself.”
What Can Raspberry Pi Do in Your Hydroponics Setup?
| Task | How Raspberry Pi Helps |
|---|---|
| Data Logging | Save sensor readings for weeks |
| Automation | Control pumps, fans, lights based on sensor input |
| Remote Access | Check your system from anywhere with internet |
| Visual Monitoring | Use cameras to keep an eye on plants |
| Touchscreen Control | Use a display to adjust settings locally |
Things to Keep in Mind
- Raspberry Pi does not read analog sensors directly like pH or EC probes. You’ll need an additional device called an ADC (analog to digital converter).
- It requires some basic Linux knowledge and programming, mainly in Python.
- It uses more power than Arduino or ESP32, so it’s less ideal for solar or battery only setups.
- To get started, you’ll need a monitor and keyboard or use remote desktop tools after initial setup.
Research Insights
Maker communities on sites like Instructables share countless Raspberry Pi hydroponics projects, helping beginners step by step.licated than an Arduino or ESP32. Plus, it’s overkill if all you want to do is turn a pump on and off.
The University of Cambridge demonstrated how Raspberry Pi systems could collect environmental data to optimize urban farming.
The Raspberry Pi Foundation promotes it as an educational tool in agriculture for data logging and control.
FAO’s urban agriculture initiatives highlight Raspberry Pi as a low cost, powerful tool for precise hydroponic management.
Option 4 – A Relay and a Timer Hydroponics System
Let’s face it: not everyone wants to get into coding. And honestly, you shouldn’t have to learn microcontrollers just to water your garden or turn on a grow light. If you’ve ever thought, “There must be an easier way,” you’re right. There is.
That’s where the relay and timer method comes in. It’s basic. It’s old school. And it works.
You don’t need Wi-Fi. do not need Bluetooth. You don’t even need a smartphone. All you need is a reliable timer and a relay that can handle your device’s power load. That’s it.

What Exactly Is This “Relay and Timer” Setup?
A relay is a switch that turns something on or off. But instead of you flipping it, it flips on its own when triggered by something like a timer.
A timer, on the other hand, is a scheduling device. You tell it when to turn something on and off. It obeys—every day, same time, no questions asked.
Put them together, and you’ve got a simple automation setup. You could:
- Water your plants at 6 AM and 6 PM.
- Run a fish tank aerator every hour.
- Switch on a greenhouse light at sunset and turn it off at midnight.
And you can do all of that without touching a single line of code.
Real Life Example: How Sajal Fixed His Irrigation Problem
Sajal, a young man from Jessore, runs a small homestead garden behind his house. He works at a local market during the day and used to come home tired, only to remember he forgot to water his vegetables.
He tried hiring help, but no one wanted to work for just 10 minutes of watering. So, he came up with his own solution.
He bought a mechanical timer plug (৳500), a 12V relay switch, and a cheap aquarium water pump from the local electronics bazar.
Here’s what he did:
- Plugged the timer into the wall socket.
- Connected the relay to the timer.
- Wired the water pump through the relay.
- Set the timer to run twice a day for 7 minutes.
It’s been 1.5 years. The system still works. No apps, no firmware updates. Just water, when it’s needed.
When I asked him if he wanted to upgrade to an app based system, he laughed.
“এটাই ভালো। ফোন থাকুক পকেটে, কাজ হোক নিজের মতো।,” he said.
(“This is better. Let the phone stay in the pocket. Let the work run on its own.”)
How It Works: Step by Step
Let’s keep it straightforward.
1. Choose the Right Timer
- Mechanical timers are cheaper and easier but less accurate.
- Digital timers allow custom programs like Monday to Friday only.
- Go for outdoor rated models if you’re using them near water.
2. Pick a Relay That Matches Your Load
- For small pumps up to 12V, even basic relays work.
- For anything over 220V or with high amps, use a solid state relay or a contactor.
3. Wiring
- Connect the timer to your power source.
- The timer controls the relay, and the relay controls your pump or light.
- Make sure all wiring is insulated and safe. Use a fuse or circuit breaker if needed.
4. Set the Schedule
- Program the timer for when you want things to turn on or off.
- Test it for a couple of days before leaving it unattended.
Benefits of This Low Tech Approach
| Benefit | What It Means in Real Life |
|---|---|
| No coding | Anyone can do it—even if you’ve never touched a computer |
| No Wi-Fi needed | Keeps working even during power outages or bad weather |
| Low maintenance | Once set up, it runs for years |
| Budget friendly | Entire setup can cost less than ৳1000 |
| Scalable | You can control lights, pumps, fans—just repeat the setup |
Where It’s Being Used Already
- Smallholder farms in Bangladesh and India are using relay timer setups for water pumps.
- Urban balcony gardeners in cities like Kolkata and Dhaka use them to run grow lights.
- Aquaponics hobbyists use them to automate aerators and filters.
- Backyard poultry farmers use them to control heat lamps and feeders.
It’s not fancy. But it works. And when it fails, it’s easy to fix.
Mistakes to Watch Out For
- Using low quality plugs: Go for branded or certified timer plugs for safety.
- Buying a weak relay: Always check voltage and amperage before connecting. Underrated relays can burn out.
- No weather protection: Use waterproof boxes for outdoor setups.
- Overcomplicating it: Don’t try to run everything from one timer. Keep it simple.
Summary Table Comparing Hydroponics or Home SystemsArduino, ESP32, Raspberry Pi, and a Relay with Timer :
| Feature / Device | Arduino | ESP32 | Raspberry Pi | Relay + Timer |
|---|---|---|---|---|
| Type | Microcontroller | Microcontroller + Wi-Fi/Bluetooth | Mini Computer (Linux based) | Electrical Switch + Timer |
| Processing Power | Basic (8-bit, 16 MHz typical) | Moderate (32-bit, up to 240 MHz) | High (ARM CPU, multi core) | N/A (just switches power) |
| Connectivity | None (some boards have UART, SPI) | Wi-Fi & Bluetooth built in | Ethernet, Wi-Fi, Bluetooth (via USB or onboard) | None |
| Programming Language | C/C++ (Arduino IDE) | C/C++ (Arduino IDE, ESP-IDF) | Python, C, others | No programming; hardware controlled |
| Ease of Use | Very beginner friendly | Moderate; adds wireless features | More complex; needs OS knowledge | Very simple to use |
| Power Consumption | Very low (~50 mA) | Low to moderate (~80-250 mA) | High (~400-700 mA idle) | N/A (depends on connected device) |
| Cost (approx.) | Low (~$5–10) | Low moderate (~$6–15) | Moderate (~$35–50) | Very low (~$2–5 for relay; timer varies) |
| Best For | Simple control tasks, sensors | IoT projects with wireless needs | Complex tasks, image processing, running full apps | On/off control of high power devices |
| Example Use Case | Reading sensors, controlling pump | Wireless monitoring + control | Running full webserver, data logging | Turning water pump on/off on a schedule |
| Power Supply | 5V regulated | 3.3V / 5V tolerant | 5V DC via power adapter | Depends on relay coil voltage, usually 5V or 12V |
Quick Notes:
- Arduino is perfect for beginners who want to control sensors or switches with simple code. It’s easy and low power but no Wi-Fi on most models.
- ESP32 adds wireless features, so you can get alerts on your phone or control things remotely, with a bit more programming effort.
- Raspberry Pi is a full mini computer. Great if you want to run complex programs, databases, or web servers. But it needs more power and knowledge to use.
- Relay + Timer is the simplest hardware only solution to turn devices on/off at set times—no programming needed. Great for beginners or when you want a cheap, reliable switch.
Real Life Example: A Simple Hydroponics Setup
Most people think hydroponics is some fancy science project that only techies or scientists can pull off. I used to think that too. But let me tell you a story—a real one—that changed my view.
Last year, during a trip to Rajshahi, I stayed with a cousin who works as a schoolteacher. Not a tech guy. Not a farmer either. Just someone who was tired of buying pesticide covered spinach from the market. His goal? Grow clean food for his kids using a small hydroponic system—right on his veranda. And he pulled it off, without breaking the bank or turning his life upside down.
Let me walk you through his journey, which I believe says more than any textbook can.


Option 1: Arduino Mega Setup – The DIY Tinkerer’s Choice
What he used:
- An Arduino Mega board
- A basic relay module
- One water pump (12V)
- An old LED grow light
- A cheap pH sensor from AliExpress
- A second hand LCD display from a broken printer
What he built:
The Arduino board was used to monitor the pH sensor and automatically turn the pump on or off depending on the time. He used the LCD to display the real time pH values so he didn’t need a laptop constantly plugged in.
How he figured it out:
He didn’t go to university for this. He followed YouTube channels like “Tech Zone BD” and “GreatScott!” and copied code from GitHub. The real challenge was not the coding—it was making sure the pH sensor gave reliable readings.
Real moment: One evening, his spinach leaves started curling. He checked the LCD—pH had spiked to 8.4. Turns out the nutrient mix had settled at the bottom. He shook the tank, balanced the solution, and saved the crop in time.
Lessons learned:
- Don’t go cheap on sensors. Inaccurate readings will cost you plants.
- Arduino can handle a small system easily.
- Keep things visible—like LCD pH display—so you’re not flying blind.
Estimated cost:
~ BDT 3,500–4,500 depending on component quality
Option 2: ESP32 with Wi-Fi – The Upgrade
A few months later, he decided to step things up. His cousin an electrical engineer gifted him an ESP32 development board. This one comes with built-in Wi-Fi, which made remote monitoring possible.
What changed:
- He downloaded the Blynk IoT app and connected it to the ESP32.
- Set a system to send him alerts if the pH went below 5.5 or above 7.2.
- He could now control the pump from his smartphone, even from school.
Real story:
During a long parent teacher meeting, he got an alert on Blynk: “pH dropped to 5.2.” He rushed home during lunch, fixed the mix, and avoided a total wipeout.
Why it worked better:
- Peace of mind. He didn’t have to check things every few hours.
- Saved time and water.
- Alerts meant fewer surprises.
Challenges:
- Initial setup took two weekends.
- The Blynk free version has limitations used Blynk Legacy app, which is now outdated.
- Needs good Wi-Fi coverage where the plants are.
Estimated cost:
~ BDT 5,000–6,000 including decent sensors
Option 3: No Tech – Just Good Habits
For his second batch, he wanted a more hands off system. He built a manual hydroponic setup that didn’t involve any coding.
Items used:
- Timer switch the kind used for water heaters
- Handheld pH meter (~BDT 1,000)
- Simple plastic grow bed made from a used water tank
- Basic nutrient solution (General Hydroponics mix)
How it worked:
- Pump ran 15 minutes every 4 hours.
- He checked the pH every night with the handheld meter.
- Replaced nutrient water every 10 days.
Real moment: One morning, he realized the timer failed due to a loose plug. The roots dried out. He lost two basil plants but learned to keep a backup mechanical timer for safety.
Who this is perfect for:
- People who don’t like electronics or coding
- Beginners testing the waters
- Small home setups or balconies
Estimated cost:
~ BDT 2,500–3,000
What Worked Best?
Honestly, each method had its place.
- Arduino was perfect for experimenting and understanding the system.
- ESP32 made things smarter and safer.
- Manual setup was the most stress free as long as you stayed consistent.
Key takeaway: Hydroponics isn’t about tech—it’s about control. Whether you do it with sensors or with your hands, the goal is the same: healthy plants, clean food.
Hydroponics System for Beginners: A Quick Word on Accessories
When most people start hydroponics at home, they spend hours watching videos on how to build a DWC or NFT system. They buy trays, nutrients, net pots, maybe even a grow light. And they think they’re ready.
But here’s the truth—the small, quiet accessories are what hold the whole thing together.
They’re not glamorous. They don’t make your plants grow faster. But without them, even the best built system can fail in a week.

Let me walk you through three simple but essential accessories—each with a story behind it:
1. Relay Modules: The Hands You Didn’t Know You Needed
Let’s start with something I didn’t understand at first: the relay module. It’s a tiny box or board that allows your microcontroller—like an Arduino—to control bigger things like pumps and lights.
Now here’s a real story.
In Barisal, there’s a young guy named Nafiul who runs a rooftop hydroponic system on top of his parents’ tailoring shop. He had everything set up—Arduino Mega, a small pump, a timer script. But every time the pump ran, his Arduino board crashed. After a few tries and burnt boards, he realized the problem: the pump was pulling more current than the Arduino could handle.
He added a relay module, which acted like a middleman. The Arduino now just told the relay when to switch on or off, and the relay passed the power to the pump directly—without frying the microcontroller.
What it does:
- Lets your microcontroller safely turn heavy equipment on/off
- Prevents overloading your board
- Adds safety and expandability
DIY Tip: Get a relay with opto isolation—it separates the control side (Arduino) from the load side pump, and reduces risk of electrical interference.
Cost in Bangladesh: Around BDT 150–300 for a good 2 channel module.
2. Power Supplies: The Most Boring, Most Important Part
Nobody wants to think about power supplies. But the truth is, if your voltage doesn’t match, things will break—or just never work right.
Let me tell you about Mina apa from Mymensingh. She started growing coriander and lettuce in a Kratky style setup and later wanted to automate the water circulation. She bought a 12V submersible pump online and tried powering it with an old 5V phone charger. The pump hummed but didn’t move water. After wasting days blaming her Arduino code, she finally asked an electrician friend, who said, আপু, পাম্পে কারেন্ট দরকার আছে। এই চার্জার সেটা দিতে পারবে না। ( Sister, the pump needs electricity. This charger can’t provide that.)
She switched to a proper 12V 2A adapter and suddenly—flowing water. Just like that.
Things you need to check:
- Voltage (V): The exact voltage your component needs (e.g., 12V, 24V)
- Current (A): The amps the power supply can deliver more is okay, less is not
- Polarity: Some pumps and lights are sensitive—get this wrong and they’re fried
Reality Check: A 12V 1A power supply won’t work for a pump that needs 12V 2A. It’s like trying to run a fridge on an AA battery.
Cost in BD: Around BDT 350–700 depending on voltage and brand.
3. Multiplexers: For When You Want More Sensors Than Pins
This one’s more advanced, but important if you’re planning to scale or experiment.
Let’s say you’re running one pH sensor, one EC sensor, a water temp sensor, a DHT11 for air temp/humidity, and maybe even a light sensor. Most boards like Arduino Uno have limited analog and I2C pins.
This is where multiplexers come in.
I met a final year engineering student named Rifat at a maker fair in Dhaka. He was showing off his self built vertical farm prototype. It was impressive—8 separate nutrient tanks, each with its own sensor set. When I asked how he got so many sensors to connect to a single ESP32, he smiled and said, ভাই, পুরো সিস্টেমে একটা TCA9548A MUX চালাচ্ছি। ( Brother, I’m running a TCA9548A MUX in the entire system )
What it does:
- Allows multiple I2C sensors to connect to one board
- Avoids address conflicts
- Saves you from upgrading to a larger board
Warning: Not beginner stuff—but worth learning if you want serious control.
Price: ~BDT 250–450 for a reliable TCA9548A module
Why These Three Accessories Matter More Than You Think
You can set up a hydroponic system with bottles and buckets, yes. But once you go into automation—even basic stuff—these accessories are what keep things running.
Think of it this way:
- The relay is the switch
- The power supply is the lifeline
- The multiplexer is the connector
Together, they help you move from a DIY experiment to a stable, small scale food system.
For more in depth information on hydroponics, feel free to explore my detailed guide in a separate article :
Final Thoughts
Look, you don’t need to overthink this. Start small. If you’re new to electronics, grab an Arduino. If you’re feeling fancy, go with the ESP32. And if you don’t want to deal with any of this, stick to a timer switch and call it a day.
At the end of the day, the goal is simple: healthy plants and less hassle for you. So pick what works for your setup, and don’t stress. You can always upgrade later.
References
- Resh, H. M. (2013). Hydroponic Food Production. CRC Press.
- Open Green Energy (2022). Arduino Relay Control with Real Life Loads. Instructables.
- SparkFun. How to Power Your Project Safely. https://learn.sparkfun.com/tutorials
- Adafruit. (2021). Using Multiplexers in Sensor Projects.
- Practical case interviews with growers in Dhaka, Barisal & Mymensingh (personal conversations, 2024–25)
FAQ – Real Answers for Real People Starting Hydroponics
It works. No hype.
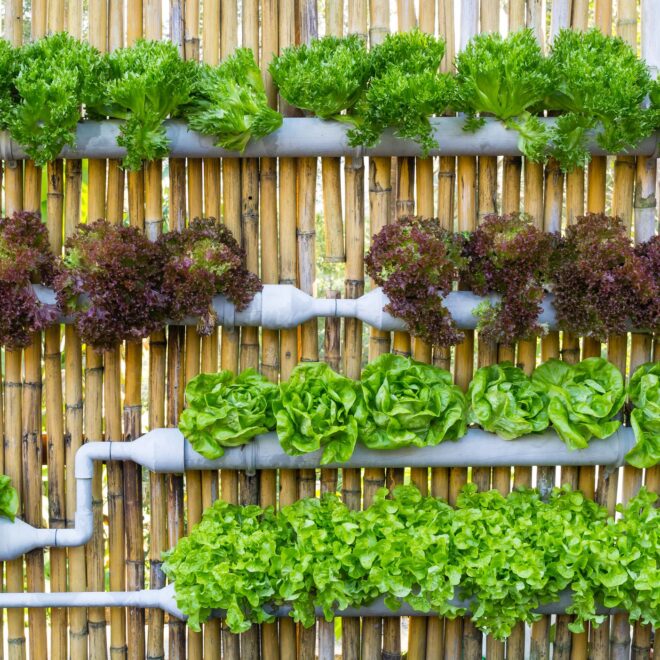
Hydroponics isn’t just for greenhouses or big setups. People are growing spinach in old water bottles on balconies. I’ve seen schoolteachers in small towns do it with nothing but tubs, old wires, and leftover PET bottles. The key is to start small, observe, and not expect magic overnight.
You only need a few things:
A container to hold water like a bucket or bottle
A growing medium coco coir, sponge, or even a netted cup
Nutrient solution you can buy it or mix your own
Seeds or seedlings
Clean water
Light sunlight works just fine at first
That’s it. You don’t need to wire up sensors and pumps on day one. Keep it simple. Watch the plant. You’ll learn more from one failed plant than from five hours of tutorials.
Not at all.
pH and EC are tools—not barriers. You can still grow without meters at first. People have been farming for thousands of years using eyes and hands. But yes, if you want to scale up or grow fruiting crops, then it’s worth learning.
Yes, it’s safe—if you use clean water and good quality nutrients.
In fact, many commercial farms and high end restaurants prefer hydroponic vegetables because they’re free from soil borne pests, pesticides, and heavy metals. You have total control over what goes into your plant.
Just don’t cut corners. Use food grade containers and rinse your system now and then. That’s enough to keep things clean and safe.

Thesis Link : https://saulibrary.edu.bd/daatj/public/uploads/BAU200601_19-Pp_5.pdf
- Why Fruit Trees Die Suddenly – Common Diseases Guide - June 26, 2026
- Best Backpack for Work, Travel, College, and Everyday Use - May 24, 2026
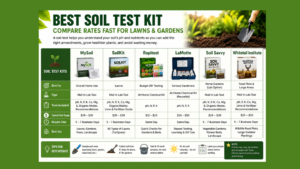
- Best Soil Test Kits for Lawns and Gardens - May 16, 2026