Growing Chamomile in Pots: A Complete Guide
Have you ever sipped a warm, calming cup of chamomile tea and thought, “Wow, this is like a hug in a mug”? Or maybe you’ve used some fancy chamomile infused lotion and felt like royalty? Either way, chamomile is magical. But what if I told you that this magic could grow right on your balcony or windowsill? Yep, even if you’re someone whose gardening history involves more plant funerals than success stories, growing chamomile in pots is totally doable!
Let’s break it down without complicated gardening jargon, without scaring you with Latin plant names, and with just a sprinkle of humor to keep it fun. Ready? Let’s grow!
Why Chamomile Deserves a Spot in Your Life and Home
Let’s not overcomplicate it: chamomile is one of those plants you don’t fully appreciate until you need it. It doesn’t shout for attention. No glossy labels or hype. Just soft flowers, a calming scent, and centuries of quiet healing.
Some things in life feel like a warm blanket. Chamomile is one of them.
1. Chamomile and Stress: A Cup That Listens
Most people I know who drink chamomile tea don’t do it for the taste. Let’s be honest—it’s mild, maybe even boring to some. But when you’re sitting on the edge of your bed at midnight, thoughts racing, that mildness becomes a blessing. It doesn’t demand your attention. It just… helps.
I remember my father during his factory days. He’d come home exhausted, feet swollen, head spinning. My mother always had chamomile tea waiting. Not green tea. Not coffee. Chamomile. It became his way of letting the day go. No therapy. No meditation app. Just hot water and flowers.
What the research says:
- Apigenin, found in chamomile, binds to GABA receptors in the brain. These are the same receptors targeted by anti-anxiety meds like Xanax but apigenin does it gently.
- A study published in Phytomedicine (Amsterdam et al., 2016) found that 500mg of chamomile extract daily significantly reduced anxiety symptoms in patients with Generalized Anxiety Disorder (GAD).
This isn’t folklore. It’s been put to the test and it works.
2. Chamomile and Digestion: Like a Grandmother’s Remedy
There’s something almost nostalgic about drinking chamomile when your stomach’s off. It reminds me of the time I got food poisoning at a roadside eatery during a long bus ride. My grandmother didn’t even wait for me to finish my sentence. She brought out her small glass jar of dried chamomile flowers, brewed a cup, and said, “Drink this, and lie down.”
I did. And within an hour, the cramps faded.
What the research says:
- Chamomile has antispasmodic effects meaning it relaxes the smooth muscles of the digestive tract.
- It reduces bloating, flatulence, acid reflux, and even menstrual cramps.
- A study in the Journal of Ethnopharmacology (Srivastava et al., 2010) confirmed its role in soothing gastrointestinal distress, especially when caused by stress or inflammation.
Some hospitals in Germany still use chamomile infusions after surgeries to help prevent gas and bloating. It’s gentle enough for children, yet powerful enough for adults.
3. For Skin That’s Been Through It
Skin irritation isn’t just a cosmetic issue it messes with your confidence. I’ve struggled with eczema since childhood, and most store bought creams just made things worse. Once, during a flare up in college, I skipped classes for days. A roommate, who happened to study herbal medicine, gave me a chamomile salve she’d made. I was skeptical, but desperate.
After a few days, the redness eased. The itching calmed. No steroids. No chemicals. Just flowers.
What the research says:
- Chamomile contains alpha bisabolol, chamazulene, and flavonoids—all known for their anti-inflammatory and antibacterial properties.
- A 2011 clinical trial compared 0.5% chamomile cream to 0.25% hydrocortisone in treating eczema. The chamomile group saw similar improvement without the side effects (Subramaniyan & Sivaraman, 2011).
Whether it’s diaper rash, acne, or sunburn chamomile gives the skin space to breathe and recover.
4. In the Garden: Quiet Beauty, Serious Benefits
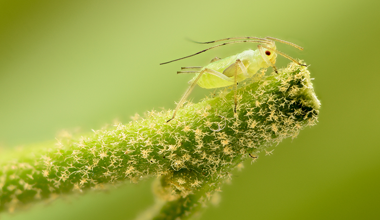
We planted chamomile in our backyard not because we needed more tea, but because we wanted fewer aphids. That’s right chamomile is a natural pest repellent.
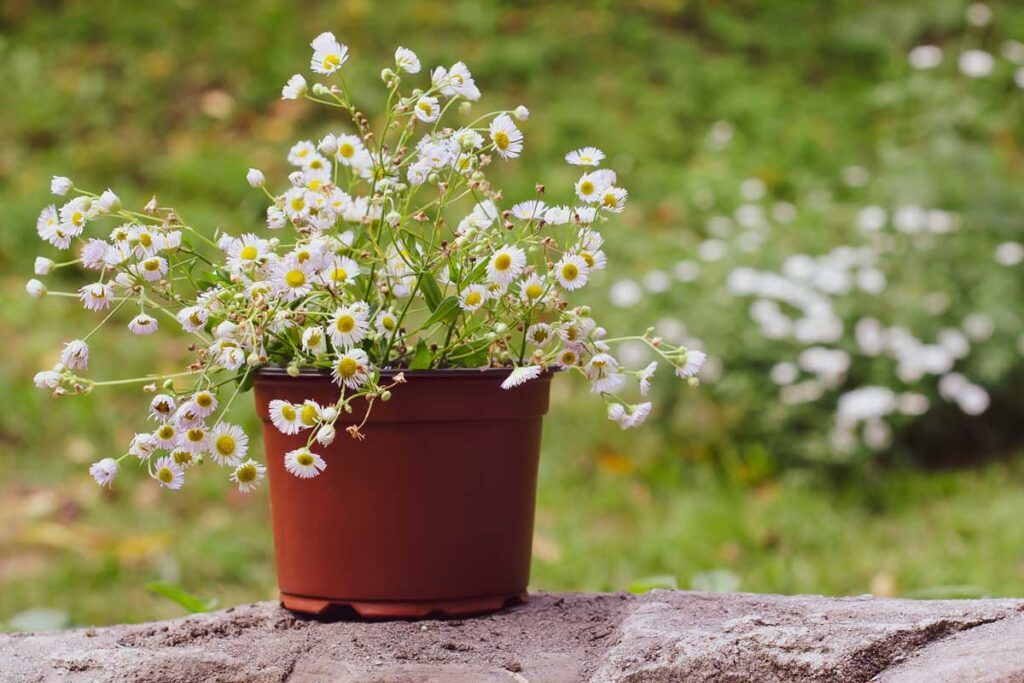
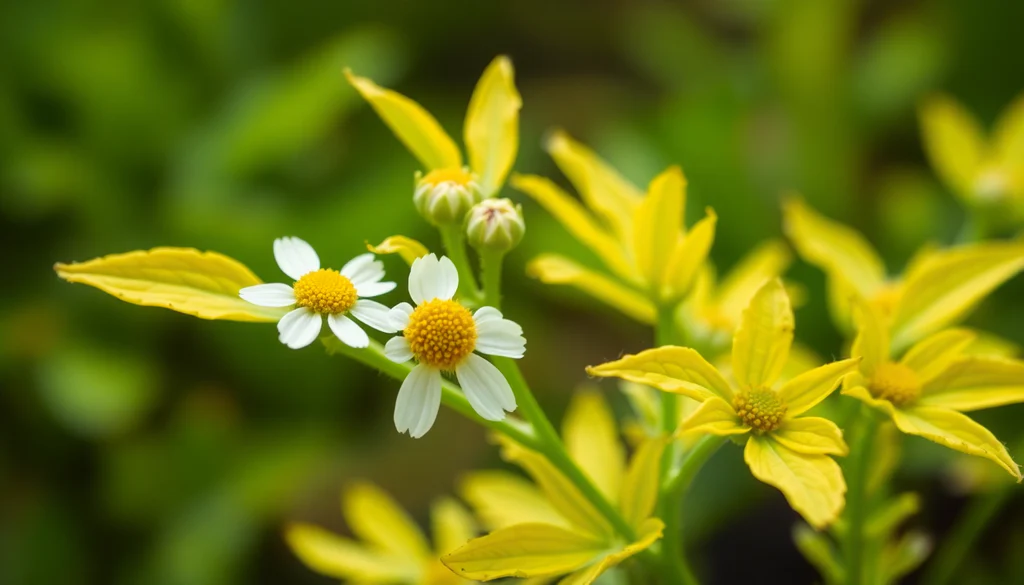
But there’s more. When it bloomed, our little garden felt… peaceful. The tiny white flowers with yellow centers looked like smiling faces. And the smell? Like sweet apples and fresh air after rain.
Growing facts:
- German chamomile (Matricaria chamomilla) is the one you want for tea.
- Roman chamomile (Chamaemelum nobile) is more for lawns or ground cover.
- It grows well in full sun, loamy soil, and needs little water once established.
- Acts as a companion plant—boosting health and flavor in neighboring herbs.
It’s low maintenance and quietly helpful. Kind of like the plant version of a good friend.
5. Sleep: The Softest Kind of Help
I’ve always had trouble sleeping before big events exams, presentations, travel. I’d try warm milk, counting sheep, even those old cassette tapes with rain sounds. Chamomile? That was the only thing that didn’t just knock me out but made me feel ready to rest.
What the research says:
- Chamomile helps regulate circadian rhythm and reduces sleep latency the time it takes to fall asleep.
- A 2016 study in the Journal of Advanced Nursing found that new mothers who drank chamomile tea for just two weeks had better sleep and less depression than those who didn’t.
It won’t force you to sleep. It invites you to.
6. More Than Tea: Other Ways to Use Chamomile at Home
You don’t have to drink it to use it. Here are a few ways I’ve personally tried and recommend:
- Eye compress: Steep two tea bags, let them cool, and place over closed eyes to reduce puffiness.
- Facial steam: Add chamomile to boiling water, cover your head with a towel, and let your pores thank you.
- Hair rinse: Brew strong chamomile tea and pour over your hair after shampooing. Adds shine and soothes scalp.
- Bath soak: Add a handful of flowers or a few tea bags to your bath for relaxation and skin soothing.
It’s not a trend. It’s a toolkit.
Why Growing Chamomile in Pots?
Let me tell you a little secret: you don’t need acres of land or a picture perfect cottage garden to grow chamomile. You don’t even need a yard. All you need is a pot, some sun, and a little love.
Chamomile is one of the easiest herbs to grow in containers, and honestly, pots might even be better than garden beds in many cases.
Here’s why I believe every apartment dweller, small space gardener, or control loving plant parent should consider giving chamomile a cozy pot of its own.
1. Portability: Chase the Sun, Avoid the Storm
Plants don’t get to move around in nature but when they live in pots, they do.
That’s the beauty of container gardening. You’re not stuck with one spot. Got a bright balcony in the morning and a shady fire escape by afternoon? You can follow the sun and shield your plant from rain, wind, or intense heat.
What the research says:
According to the University of Illinois Extension, one of the key benefits of growing herbs like chamomile in pots is the ability to manage microclimates. Pots can be shifted easily to optimize sunlight, protect from heavy rain, or catch more air circulation on hot days.
Real life moment:
During the 2020 lockdown, I had three chamomile pots lined along my apartment’s window ledge. One morning, a freak hailstorm blew in. I literally picked them up one by one, moved them inside, and they were safe, unlike my neighbor’s basil that got shredded in the wind.
2. Space Friendly: Tiny Corners, Big Possibilities
Let’s be honest. Most of us don’t have spacious gardens. Some don’t even have balconies. But even a sunny kitchen windowsill can be enough to grow a small pot of chamomile.
You don’t need to go big. You just need a 6–8 inch pot, decent soil, and regular light.
What the research says:
The Royal Horticultural Society (RHS) lists German chamomile (Matricaria chamomilla) as an excellent herb for pots, especially for urban gardeners with limited space. It thrives in small containers and doesn’t require deep soil.
Chamomile roots stay relatively shallow, so it’s very happy in confined areas—perfect for city folks, students, or even RV travelers.
Real life story:
My cousin Mina, who lives in a Dhaka apartment on the 9th floor, has zero outdoor space. She grows chamomile on her window grill in recycled yogurt tubs. Not only does it survive—it thrives. She dries the flowers and makes tea for her kids when they’re feeling sick.
3. Total Control: Soil, Water, Sun—You’re the Boss
Growing chamomile in a garden bed means sharing the soil with whatever’s already there—rocks, weeds, bugs, and all. In a pot? You choose your soil mix & monitor the drainage. You control the environment completely.
What the research says:
Studies from the University of Maryland Extension suggest that container grown herbs experience fewer pest and disease issues, as long as drainage and airflow are managed properly.
Chamomile especially prefers well drained, slightly sandy soil with neutral to slightly acidic pH (around 6.0–7.0). Pots let you dial this in without testing the entire backyard.
You also avoid problems like:
- Overwatering from nearby plants
- Soilborne fungal diseases
- Invasive weeds
My experience:
I once tried to grow chamomile in my mom’s backyard right next to the roses. Disaster. The soil was too heavy, held too much water, and the chamomile roots turned mushy. In a pot with sandy loam and a clay saucer underneath? It’s now my happiest, most fragrant plant.
Bonus Benefits of Growing Chamomile in Pots
- Harvesting is easier. No bending or stooping, just pluck flowers at eye level.
- Pots reduce competition. Chamomile doesn’t have to fight neighboring roots for nutrients.
- It’s prettier. A terra cotta pot with blooming chamomile adds charm to any windowsill or balcony.
- Helps with pest control. Move the pot away from aphid prone areas or near pest repelling herbs like basil or rosemary.
Growing Chamomile in Pots
Chamomile often gets typecast as the soft spoken herbal remedy or the polite guest in your tea cupboard. But behind those daisy like petals is a hardy, sun loving survivor that’s right at home in a pot. You don’t need sprawling land or garden expertise to grow it. If you have a pot, a bit of sunshine, and patience, you’ve got what it takes.
This guide is built on experience, real plant wins and fails and research from trusted horticultural resources.
Why Grow Chamomile in Pots?
If you’re anything like me a person balancing work, meals, and a bit of chaos—then container gardening offers flexibility that’s hard to beat. I started with potted chamomile during lockdown, with nothing but a broken clay pot and a seed packet I’d forgotten in a kitchen drawer. Turns out, that’s all I needed.
Pots are perfect when:
- You rent and can’t dig up the yard
- You only have a balcony or windowsill
- You want control over soil, water, and sun
- You’re avoiding pests, heavy clay, or back breaking weeding
1. Portability: Follow the Sun
Chamomile needs 4–6 hours of sunlight. With a pot, you can move your plant as light conditions change with the seasons or time of day.
Research Insight: University of Illinois Extension notes that container herbs thrive when repositioned throughout the year to maximize sun and air flow.
2. Space Saving: Grow Where You Are
In a high rise flat in Dhaka, my cousin Minara lined three small plastic pots on her kitchen grill. No yard, no grow light. Just patience and a south facing window. Within a month, her chamomile seedlings were thriving.
Note: German chamomile (Matricaria chamomilla) is the best variety for small containers and herbal tea.
3. Clean Slate for Soil & Pests
With pots, you start fresh. No root-knot nematodes. No mystery clay. Just your mix, your rules.
According to the Royal Horticultural Society (RHS), chamomile thrives in loose, well drained soil with modest fertility , conditions that are easy to create in containers.
Picking the Right Pot for Your Chamomile
When I first got into growing herbs, chamomile was one of my top picks. It looked cheerful, smelled lovely, and had that old world herbal charm. I figured I’d just plant it in one of those pretty ceramic pots I had lying around from an old succulent project. It was shallow, maybe five inches deep. Big mistake.

Within two weeks, my chamomile was drooping. Not the happy, lazy kind of droop either—it was clearly struggling. The soil was compacted, and when I popped the plant out to check, the roots were curling up like tangled thread. That was my first wake up call: the pot you pick makes a big difference.
Depth Matters More Than You Think
Chamomile might seem dainty, but it’s not delicate. It’s resilient, if you give it what it needs. And one of the first things it needs is space for its roots.
For both German and Roman chamomile, a pot that’s 6 to 8 inches deep is ideal. That gives the roots enough depth to spread down without hitting a wall. You don’t need anything fancy—just depth and decent width. I now use an old clay pot that’s about 8 inches deep and 10 inches across. It doesn’t look like much, but it works. The roots can breathe, and the plant rewards me with flowers almost non stop from late spring through early fall.
If you’re planning to grow more than one chamomile in the same container, go bigger—10 to 12 inches wide, at least. But don’t cram them in. Each plant should have at least 4 to 6 inches of space between them, or they’ll fight for nutrients and sunlight like kids sharing a single toy.
Drainage: The One Thing You Can’t Ignore
If you’ve ever drowned a plant before, chamomile will teach you how not to do it again. It hates wet feet.
The second pot I used, the successful one was made of terracotta and had two holes at the bottom. I added a thin layer of gravel before the soil, just to be safe. The difference was night and day. Chamomile likes its soil moist, but not soggy. If water can’t drain quickly, the roots rot.
In fact, researchers from Iowa State University Extension recommend using containers with multiple drainage holes to reduce the risk of root rot in container herbs like chamomile.
What Type of Pot Works Best?
From personal experience:
- Terracotta pots: Great for airflow; they help prevent overwatering but dry out quicker.
- Plastic pots: Retain moisture longer—useful if you’re forgetful or live in a hot, dry climate.
- Wooden planters: They’re charming, but can rot if not sealed properly.
I once even used a rusted old kettle I found at my grandmother’s house—drilled two holes in the bottom and gave it a new life. That chamomile grew like crazy. Go figure.
Summary Table: Picking the Right Pot for Chamomile
| Feature | Recommendation |
|---|---|
| Depth | 6–8 inches minimum |
| Width (for grouping) | 10–12 inches; 4–6 inches between plants |
| Material | Terracotta, plastic, ceramic with drainage |
| Drainage | Absolutely essential at least one hole; gravel optional |
| Extra Tip | Avoid pots with no holes, no matter how pretty they look |
Real Talk: What I Wish I Knew Earlier
I used to think pots were just for aesthetics. I had a whole shelf of mismatched containers. But once I started taking things seriously, I realized that growing chamomile is like cooking, you need the right tools, or you’ll mess up the recipe.
Now, every spring, I plant a fresh batch in a big clay container outside my kitchen window. I pluck flowers daily for tea, and every time I do, I think about that first plant that didn’t make it because I didn’t give it room to breathe. I never made that mistake again.
Growing Chamomile in Pots:Drainage Holes Are a Must
Chamomile doesn’t like to sit in soggy soil, and neither should you! When choosing a pot, make sure it has drainage holes on the bottom. Without these holes, the water will pool at the bottom, which could lead to root rot. Not cool, right? So always, always, always ensure there’s proper drainage.
The Best Soil for Your Chamomile Plant
Back when I first started growing herbs, chamomile was the one I assumed would be easiest. I mean, it looks soft and wild and happy in open fields. So I thought it would grow just fine in the soil from my backyard. Spoiler: it didn’t.
The leaves stayed pale. The flowers didn’t come. Eventually, it wilted. That’s when I learned the hard truth: chamomile is low maintenance, but not no-maintenance. And soil? That’s where you need to pay attention.
Good Soil Is Loose, Drains Well, and Doesn’t Suffocate the Roots
Chamomile doesn’t need rich, dark, complicated soil. But it does need light, well draining soil—something that doesn’t trap water or turn into mud after a rain.
If the soil is too heavy or sticky, the roots can’t breathe. That’s what happened to me the first time. I used regular garden soil in a pot dense and packed and I didn’t mix in anything to help it drain. The plant just sat there, sad and stunted. I now know chamomile likes soil with a bit of space in it, like loam or a light potting mix.
What research says: According to the University of Wisconsin Extension, chamomile prefers a sandy loam with a pH between 5.6 and 7.0. It struggles in compacted or overly moist soils.
Reference: University of Wisconsin Extension – Growing Herbs in Containers (2022)
My Go-To Soil Mix for Chamomile
After some trial and error, I started mixing my own soil. It’s nothing fancy just practical. Here’s what works well for me:
- 1 part organic potting soil – This forms the base and holds a little moisture.
- 1 part coarse sand – This helps with drainage. You can also use perlite or vermiculite if you have it.
- 1 part compost – This feeds the plant and gives the soil life.
This combination is fluffy but firm enough to support root growth, and it doesn’t get soggy. Since switching to this mix, my chamomile plants are fuller and bloom more consistently.
Real life tip: I once used leftover succulent soil which is sandy and gritty mixed with worm compost from my garden bin. That chamomile plant not only survived, it flowered for weeks. Sometimes, what’s lying around is all you need, if you mix it right.
Adjusting for Your Environment
Soil behaves differently depending on your climate. I live in a humid region, so I lean more on sand and perlite to keep things dry. But if you’re somewhere dry and windy, your soil might need more compost or even a bit of coconut coir to hold moisture in.
Also, avoid using straight compost or manure. Too much nitrogen leads to lush green leaves and almost no flowers. That’s something I learned one summer when I got greedy with the worm tea. Gorgeous foliage, but not a single bloom.
According to a 2021 Michigan State University bulletin on herbs, chamomile grows best in “moderately fertile soil.” Too much nitrogen delays flowering.
Reference: Michigan State University Extension , Growing Herbs in the Garden
Soil Checklist
| What to Look For | Why It Matters |
|---|---|
| Light and Crumbly Texture | Keeps roots from suffocating |
| Well Draining | Prevents root rot |
| Moderate Fertility | Encourages blooms over leaves |
| pH of 5.6 to 7.0 | Ideal for nutrient absorption |
| Compost (but not too much) | Adds life and organic nutrition |
Growing Chamomile in Pots:Planting Chamomile Seeds in Your Pot
I’ll never forget the first time I planted chamomile. It was during the lockdown, and everything outside felt uncertain. I had this old, chipped terracotta pot on the balcony, and a packet of chamomile seeds that I had ordered online on a whim. I had no idea what I was doing. But a few weeks later, when the first tiny green shoots broke through the soil, it felt like a little win in a chaotic world.


That’s the thing about chamomile, it doesn’t ask for much, and in return, it gives so much. If you’ve never grown anything before, this is a great place to start. Let’s break it down, step by step.
Step 1: Fill Your Pot – But Not All the Way
First things first: get your pot ready. I used a simple 8 inch clay pot. Nothing fancy. The key is drainage, make sure your pot has a hole at the bottom. Chamomile hates soggy feet.
I mixed:
- 50% organic potting mix
- 30% coco peat
- 20% perlite or coarse sand
This mix drains well but holds enough moisture for the seeds. I filled the pot almost to the top, but left about an inch of space. That space helps when watering so the soil doesn’t overflow and make a mess.
Research Insight:
Chamomile thrives in light, slightly acidic to neutral soil (pH 5.6–7.5). The Royal Horticultural Society suggests well drained, sandy soil to prevent root rot in pots.
Step 2: Scatter the Seeds – Gently Does It
Chamomile seeds are as small as pinheads almost like dust. When I first opened the packet, I thought, “Is this enough?” Trust me, it is.
Don’t bury the seeds.
Instead, just sprinkle them lightly across the surface of the soil. Then, press them down very gently with your hand or a flat board.
Why?
Chamomile seeds need light to germinate. If you cover them with soil, they might not sprout at all. They’re sensitive like that.
Real Tip:
The first time I planted them, I accidentally sneezed right after scattering the seeds, half of them blew out of the pot. Don’t do that. Try to do this in a place with no wind or fan running!
Spacing:
Try to give each seed about ½ inch space. You can thin them out later, but a little breathing room helps each one grow stronger.
Seed Science:
According to Oregon State University Extension, Chamomile (Matricaria chamomilla) needs direct exposure to light for effective germination, and prefers temperatures around 68°F–72°F (20–22°C).
Step 3: Water Softly – Think Mist, Not Monsoon
Now, water but go easy. Those tiny seeds can float or sink if you pour too hard. I personally use a spray bottle and mist the soil until it’s evenly damp.
You want the soil to feel like a wrung out sponge—moist, but not dripping wet.
After watering, I keep the pot near a window that gets morning light, but not direct afternoon sun. You don’t want to scorch the soil.
Germination Timeline:
Expect to see baby seedlings in 7 to 10 days. Sometimes it can take up to 14, depending on temperature and light. Patience really is a gardener’s best tool.
Watering Tip from Real Gardeners:
In the book “The Cook’s Herb Garden” by Jekka McVicar, it’s suggested to use a clear plastic dome or bag over the pot to trap humidity and help the seeds sprout. Just make sure to vent it daily to avoid mold.
Real Story: How My Chamomile Grew with Me
There’s something quiet and personal about growing chamomile. It’s not showy like roses or dramatic like tulips. But its presence is steady, comforting.
When my plant was just starting to bloom, I’d sit on the balcony with my morning tea and just watch it sway gently in the breeze. By late summer, I was harvesting my own flowers, drying them, and using them to make tea at night. It became a ritual—one that grounded me in a difficult time.
Growing chamomile reminded me that small things can still bring peace.
Growing Chamomile in Pots:Taking Care of Your Chamomile Plant
I remember planting chamomile during a particularly slow summer in my backyard. I had only a few terracotta pots and no big gardening plans. But one thing led to another, and by mid July, I had a soft, fragrant bush full of daisy like flowers. Taking care of chamomile didn’t feel like a chore, it felt calming, like the plant itself was teaching me to slow down.
If you’ve already sown your chamomile seeds, the next part is about gentle attention, not high maintenance hustle. Chamomile is resilient, but a little care goes a long way in keeping it healthy and happy.
Light: Chamomile’s Best Friend
Chamomile needs light, and quite a bit of it but not the kind that scorches.
How much light does it need?
Aim for 4 to 6 hours of sunlight a day. If you’re growing indoors, a south facing window is ideal. Outdoors, pick a spot that catches early morning or late afternoon sun, those rays are warm but forgiving.
Real Grower’s Tip
During one hot week in June, my chamomile started drooping mid day. I realized the intense sun was drying it out. So I moved the pot under a bamboo screen during peak hours. The plant perked up within two days.
What Experts Say
According to University of Illinois Extension, herbs like chamomile thrive in full sun but may require filtered light in very hot climates to prevent leaf scorching.
Watering: Keep the Balance
Watering chamomile is about balance, not routine. These plants don’t like their roots soaking, but they don’t enjoy drying out either.
How to water chamomile in pots:
- Check the top inch of the soil with your finger.
- If it feels dry, water gently until it begins to drain from the bottom.
- Avoid getting the foliage wet too often—this can invite mildew.
My Experience
During a rainy stretch, I forgot to move my chamomile under shelter. The constant wetness caused yellow leaves and a bit of root rot. I had to repot it with fresh, dry soil and trim off the mushy roots. After that, I made a habit of checking the forecast before watering.
Research Insight
The Royal Horticultural Society notes that chamomile prefers well draining soil and moderate watering. Waterlogging is one of the top reasons potted chamomile fails.
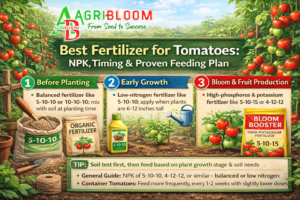
Fertilizer: A Little Goes a Long Way
Chamomile isn’t greedy. In fact, overfeeding it can lead to more leaves and fewer flowers.
Fertilizing tips:
- Use a diluted organic liquid fertilizer once every 4–6 weeks.
- Avoid nitrogen heavy formulas too much leaf growth, not enough blooms.
- Compost tea or fish emulsion are gentle and effective.
My Learning Moment
Once, I got carried away and used a full strength synthetic fertilizer meant for tomatoes. My chamomile grew bushy, but not a single flower appeared for a month. After switching to compost tea, the flowers returned and so did the bees.
Research Reference
The University of Maryland Extension recommends minimal feeding for herbs, emphasizing that excess nitrogen reduces essential oil production and flowering.
Pruning and Caring for Your Chamomile Plant

Chamomile doesn’t need constant grooming, but some light pruning will keep it healthy and productive.
What to prune and when:
- Pinch off the growing tips once the plant gets about 5–6 inches tall.
- Remove yellow or wilted leaves to prevent fungal issues.
- Deadhead flowers cut off old blooms to encourage new ones.
Real World Tip
Every Sunday morning, I take five minutes to walk around my potted herbs with a cup of tea. I snip off anything yellow or dead, and that small routine keeps my plants neat and thriving. With chamomile, I find that removing old flowers leads to twice the bloom the next week.
Botanical Guidance
According to Missouri Botanical Garden, regular deadheading and trimming encourage compact, bushy growth and improve flowering in potted herbs like chamomile.
Pinch Back the Tips
If your chamomile plant starts growing a little leggy or out of control, just pinch back the growing tips. This encourages it to produce more branches and become bushier. Think of it as a little “haircut” for your plant.
Remove Dead or Yellowing Leaves
Just like you wouldn’t want to walk around with wilted hair, your chamomile doesn’t need to hang on to dead or yellow leaves. Remove any leaves that look like they’re past their prime. This will help the plant focus its energy on fresh growth and keep it looking tidy.
Harvesting Your Chamomile Flowers
There’s a certain quiet joy in harvesting chamomile. No rush, no noise, just the soft scent of apples and daisies rising from the leaves. I still remember the first time I picked a handful of blooms from my clay pot near the kitchen door. I wasn’t sure if I was doing it right, but I trusted my senses. The flowers smelled sweet, the petals were fresh, and it felt like the plant was ready to give. That evening, I brewed my first cup of homegrown chamomile tea. It tasted nothing like the store bought kind. It was gentler. Softer. Real.

If you’re at this stage, you’ve done well. Now it’s time to gather the reward. But there’s a right way and a better time to do it.
When Should You Harvest Chamomile?
This isn’t one of those “any time you feel like it” jobs. There’s a window when the flowers are at their best aromatic, flavorful, and packed with medicinal compounds.
Look for:
- Fully open flower heads petals spread out, not drooping
- Bright white petals and golden yellow centers
- No brown spots, no curling edges
Best time of day:
- Morning, just after the dew has dried, but before the sun gets too strong
Real Life Note
I used to harvest mine in the afternoon, after work. But I noticed the flowers felt warm and slightly limp, almost like they’d given away their aroma to the midday sun. So I switched to morning harvesting around 8 or 9 AM. That little change made a big difference in scent and color. The blooms felt alive.
Research Backed Tip
According to the University of Massachusetts Amherst Extension, harvesting in the early part of the day helps preserve essential oils, particularly chamazulene and apigenin, the active ingredients in chamomile known for their calming and anti-inflammatory effects.
How to Harvest Chamomile
You don’t need fancy tools just a pair of clean scissors or garden snips. The trick is in the gentle handling.
Step by step:
- Hold the stem just below the flower head.
- Snip the flower cleanly, leaving a bit of stem (½ to 1 inch) if you like.
- Drop it into a dry, clean basket avoid plastic bags, which trap moisture and cause the flowers to sweat.
Don’t strip the plant:
Take only a handful of flowers at a time, and leave plenty of buds and green behind. Chamomile is generous, but only if you treat it kindly.
My Experience
One summer, I got a little too eager and harvested nearly every bloom off the plant in one go. It stopped flowering for two weeks. Lesson learned: never take more than 30–40% at once. Think of it like grazing, not clear cutting.
Supporting Research
The National Center for Complementary and Integrative Health (NCCIH) notes that optimal levels of active compounds in chamomile are reached when the flower heads are fully open, but before the petals begin to wilt or droop.
After the Harvest: What to Do Next
If you’re not using the flowers fresh, drying is the next step.
How to dry chamomile properly:
- Spread flowers on a mesh screen or cotton cloth in a shady, well ventilated spot
- Avoid direct sunlight—it destroys essential oils
- Stir them once or twice a day
- Drying time: 3 to 7 days, depending on humidity
Storage tip:
Once completely dry (flowers feel papery, centers snap in half), store them in an airtight glass jar in a dark, cool place. Avoid plastic—it leaches oils over time and may collect condensation.
What I Do:
I keep my dried chamomile in an old glass honey jar, labeled with the harvest date. I only open it when I really need to relax. The smell still hits me every time , sweet and warm, like the plant remembers the sunlight.
Drying Reference
The Herb Society of America recommends drying flowers in a dark, airy place to protect the volatile oils that give chamomile its soothing power.
Storing Your Chamomile Flowers
After the last flower has been snipped and the plant is back to soaking up sun, you’re left with a handful of delicate, golden centered blossoms. And here’s the truth: how you store those flowers determines whether they stay fresh and flavorful or lose their charm in just a few weeks.
I learned that the hard way.
The first time I grew chamomile, I picked a small bowl of blooms, laid them on paper towels in the corner of my kitchen, and forgot about them. A few days later, they had turned brown and smelled a little sour. I was heartbroken but I learned. Since then, I’ve found a routine that works beautifully and keeps the blooms fragrant and powerful for months.
Let’s walk through this together from drying to long term storage.
Drying Chamomile Flowers the Right Way
Letting Nature Do Its Quiet Work
Drying chamomile doesn’t need special tools or high tech gadgets. In fact, sometimes the simpler the method, the better the outcome.
Here’s What I Do:
- After harvesting, I gently shake the flowers to remove any hidden insects or garden dust.
- Then, I lay them out in a single layer on an old bamboo tray or clean cotton cloth.
- I place the tray in a spot with good air circulation, away from sunlight. For me, that’s a shelf in our storeroom with the window cracked just slightly.
- I stir the flowers gently every morning, checking for moisture or mold.
They usually take 6 to 9 days to dry fully, depending on the weather.
True Experience
Once, I made the mistake of drying chamomile on a metal tray during the rainy season. The bottom flowers turned soggy and molded in two days. Lesson learned: always use breathable material like cloth or mesh.
In Depth Research
According to the University of Vermont Extension, slow air drying in a shaded, ventilated space preserves the essential oils like bisabolol and matricin which give chamomile its calming qualities.
How to Store Dried Chamomile Properly
Keep It Dry,Dark & Happy.
Once your flowers are completely dry they should crumble between your fingers, not bend, it’s time to tuck them away.
Storage Steps:
- Use airtight glass jars—old jam jars work great.
- Label them with the harvest date. Trust me, you’ll thank yourself six months from now.
- Store in a dark, cool cupboard or a spice drawer.
- Do not refrigerate—the moisture risk is too high.
I’ve found that old honey jars with screw top lids are the perfect size. I’ve got three, one labeled “April harvest,” another “July batch,” and one that I mixed with dried mint leaves for a winter blend.
Shelf Life
Stored properly, your chamomile flowers will stay fresh for up to a year. But honestly? They’re best within 6 months the flavor starts to fade after that.
Storage Best Practices
The Herb Society of America recommends storing herbs in dark glass containers or in a cabinet that protects them from light and heat, both of which degrade essential oil content.
What Can You Use Dried Chamomile For?
Once they’re dry and stored, your chamomile flowers are ready for just about anything.
Common Uses:
- Herbal Tea: 1–2 teaspoons steeped for 5–6 minutes in hot (not boiling) water
- Bath Soak: Tie some in a muslin cloth and drop it in your tub
- Skincare: Infuse into olive oil and use it in homemade balms or lotions
- Sleep Sachets: Mix with dried lavender and tuck under your pillow
My Favorite
Once a month, I take a bit of dried chamomile and mint and brew a small pot of tea before bed. It’s part of my wind down routine, and it’s better than any store bought herbal blend I’ve ever tried.
Common Issues and How to Handle Them
Let me tell you something I’ve learned after years of trial and error: chamomile is forgiving, but only up to a point. It has its own quiet way of letting you know when something’s wrong—usually with yellow leaves, floppy stems, or a few unwanted guests crawling on it.
This isn’t a textbook list. This is a reflection of real problems I’ve faced growing chamomile on balconies, windowsills, and even once on a clay roof under the scorching sun in Jashore.
Let’s go through some of the most common issues you might run into when growing chamomile in pots—along with gentle, simple fixes that actually work.
1. Leggy Growth
What it is:
Stretched stems, sparse leaves, and flowers reaching for the sky like they’re lost. This usually happens when your chamomile is begging for sunlight.
Why it happens:
Chamomile is a sun loving herb. When it doesn’t get enough direct light, it starts stretching out unnaturally, looking tall and thin but fragile.
Fix it:
- Move your plant to a spot with 5–6 hours of full sun—preferably morning sunlight.
- If indoors, place it near a south facing window or under a small LED grow light.
- Once relocated, pinch off the top tips to help the plant branch out and become bushier.
Real Life Moment:
In my second year of container gardening, I placed a pot of chamomile under a bamboo shade, thinking partial sunlight would be ideal. It grew like a tower and collapsed under its own weight. I moved it near the veranda wall, and within 12 days, I saw side shoots. That one mistake taught me more than any gardening book ever could.
Verified Tip:
According to the University of Maryland Extension, lack of direct sunlight is a key cause of “leggy” herb growth. They recommend rotating potted herbs every few days to promote even exposure.
2. Pests: Aphids, Spider Mites & Other Creepy Friends
What to watch for:
- Sticky or curling leaves
- Tiny green, black, or red bugs
- Fine webbing under leaves
- Leaves turning pale or deformed
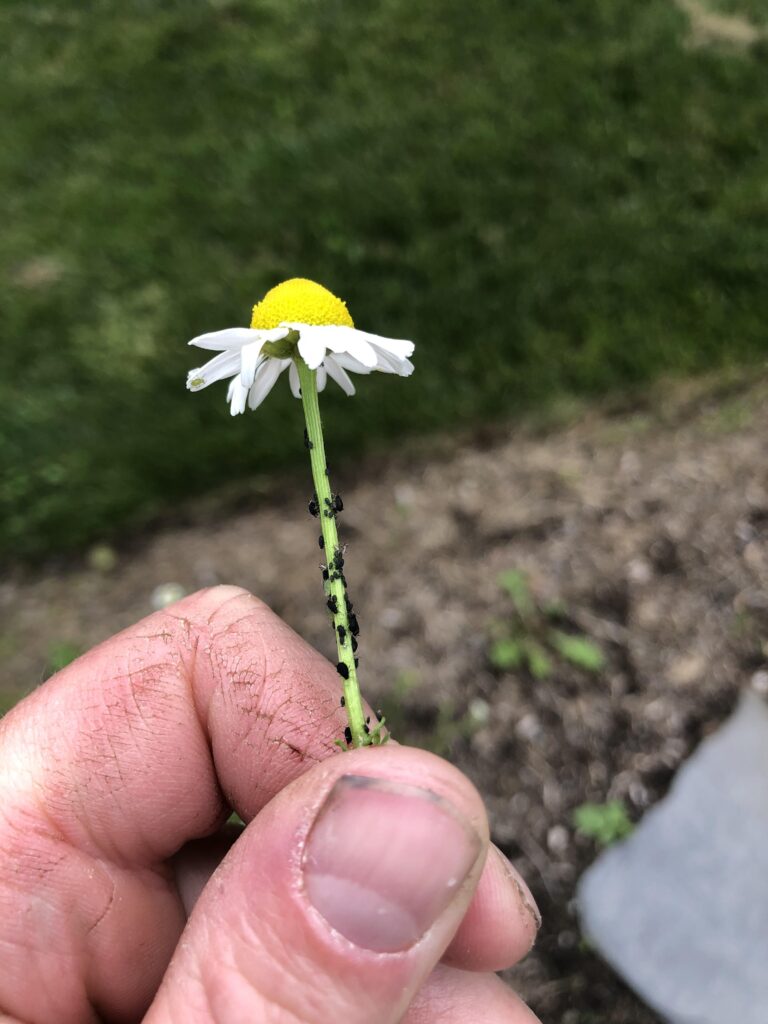
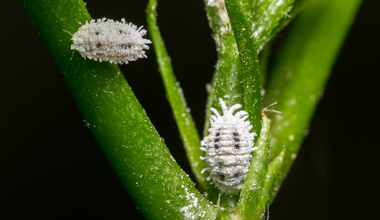
These pests show up out of nowhere—especially during warm, dry spells. Aphids love the juicy stems, and spider mites sneak in with almost invisible webs.
Fix it:
- Mix neem oil (1 tsp) with a few drops of dish soap and 1 liter of water. Spray lightly every 2–3 days.
- For milder infestations, use a soap and water spray .
- Increase airflow and avoid overcrowding other plants nearby.
Story from My Balcony:
One year during March, I brought my chamomile pot indoors during a nor’wester. Within days, I noticed ants crawling around it. Turned out they were “farming” aphids. I sprayed with a mild neem oil mix every alternate day and placed a fan nearby for airflow. Took about a week, but the bugs disappeared.
What Experts Say:
The Royal Horticultural Society lists neem oil as an effective organic control for common pests on soft herbs like chamomile. It disrupts pest feeding and reproduction without harming beneficial insects.
3. Yellowing Leaves
What it looks like:
Leaves start fading from green to yellow, especially at the bottom. The plant may look tired or slightly wilted even though you’ve been watering it.
Why it happens:
Most often? Overwatering. Chamomile doesn’t like to sit in soggy soil. Roots start to suffocate, and rot sets in silently.
Fix it:
- Wait until the top inch of soil feels dry before watering again.
- Make sure your pot has at least one good drainage hole.
- If the roots smell sour or feel mushy, repot immediately using fresh, dry soil and remove damaged roots.
When I Almost Killed It:
During the monsoon, I kept watering out of habit—thinking rainwater wouldn’t be enough. One morning, the leaves had turned completely yellow and soft. I tipped the pot and was hit with a sour smell. I repotted the plant in a sandy mix and cut down watering to every four days. Slowly, it bounced back.
In Depth Resource:
The University of Illinois Extension notes that overwatering is the number one killer of container herbs. They recommend using lightweight potting mix and monitoring soil moisture with your fingers—not a fixed calendar.
Quick Summary: Troubleshooting Table
| Symptom | Likely Cause | What to Do |
|---|---|---|
| Tall, floppy stems | Not enough light | Move to sunny spot, pinch tops |
| Sticky or curled leaves | Aphids or mites | Neem oil spray, improve ventilation |
| Yellow lower leaves | Overwatering | Let soil dry, check for drainage, repot if needed |
| No flowers | Too much fertilizer | Cut back nitrogen, give more sun |
| Mold or mildew | Stale air or moisture | Improve airflow, prune crowded leaves |
Summary Table: Growing Chamomile in Pots
| Aspect | Details |
|---|---|
| Best Pot Size | 6–8 inches deep with good drainage holes |
| Ideal Soil | Well draining mix – garden soil + compost + sand or coco peat |
| Sunlight Needed | 4–6 hours daily; prefers morning or indirect afternoon sun |
| Watering Frequency | When top 1 inch of soil feels dry; usually every 2–3 days |
| Fertilizer | Monthly, diluted organic fertilizer or compost tea; low in nitrogen |
| Time to Flower | 6–10 weeks from sowing (for German chamomile) |
| Harvest Time | When flowers are fully open; best harvested in the morning |
| Common Pests | Aphids, spider mites – treat with neem oil or mild soap spray |
| Problems to Watch | Leggy growth (low light), yellow leaves (overwatering), mold (poor airflow) |
| Best Growing Season | Spring and fall in temperate zones; winter in tropical climates |
| Indoor Tips | Use a south facing window or LED grow light; ensure airflow |
Final Thoughts
Growing chamomile in pots isn’t just about flowers or tea. It’s about creating a moment of calm in your everyday space. Whether it’s a sunny balcony or a tiny windowsill, that little pot can become your own patch of peace. So plant a few seeds, wait patiently, and let chamomile remind you that even small things can bloom beautifully.
References
- University of Maryland Extension – Growing Herbs at Home
URL: https://extension.umd.edu/resource/growing herbs home garden - University of Illinois Extension – Container Herb Gardening
URL: https://web.extension.illinois.edu/herbs/containers.cfm - Royal Horticultural Society (RHS) – Managing Pests Organically
URL: https://www.rhs.org.uk/prevention protection/pests - Oregon State University Extension – Watering Herbs in Containers
URL: https://extension.oregonstate.edu (search: “watering herbs in pots”) - Colorado State University Extension – Growing Herbs Indoors
URL: https://extension.colostate.edu/docs/pubs/garden/07202.pdf - National Center for Biotechnology Information (NCBI) – Chamomile: A Herbal Medicine of the Past with Bright Future
URL: https://www.ncbi.nlm.nih.gov/pmc/articles/PMC2995283/ - The Herb Society of America – Chamomile Guide
URL: https://www.herbsociety.org (search: “Chamomile”)
Frequently Asked Questions About Growing Chamomile in Pots
Absolutely. Chamomile adapts beautifully to container life as long as you give it the right soil, proper drainage, and plenty of sunlight. A pot that’s at least 6–8 inches deep with a drainage hole is ideal. Many home gardeners, including myself, find chamomile easier to manage in pots than in crowded garden beds.
Chamomile thrives in 4 to 6 hours of full or partial sunlight daily. Morning sunlight is best. If you’re growing it indoors, place it near a south facing window or supplement with a grow light during the darker months. Without enough light, it will become leggy and weak.
Use a well draining, loose potting mix. I personally mix equal parts garden soil, compost, and coarse sand or coco peat. Avoid heavy clay based soils. Chamomile prefers soil that’s slightly sandy and not too rich in nutrients—too much fertility leads to more leaves and fewer flowers.
Chamomile likes its soil to stay slightly moist, but not soggy. Stick your finger about an inch into the soil—if it feels dry, water it. During summer, I water mine every 2–3 days depending on heat and humidity. Always check before watering. Overwatering causes yellowing leaves and root rot.
Chamomile is not a heavy feeder. If you must, feed it with a diluted, organic fertilizer once a month. Too much nitrogen can result in fewer blooms. A weak compost tea or liquid seaweed extract works well. I’ve had great success just adding compost to the soil once at planting and letting nature do the rest.

Thesis Link : https://saulibrary.edu.bd/daatj/public/uploads/BAU200601_19-Pp_5.pdf
- Why Fruit Trees Die Suddenly – Common Diseases Guide - June 26, 2026
- Best Backpack for Work, Travel, College, and Everyday Use - May 24, 2026
- Best Soil Test Kits for Lawns and Gardens - May 16, 2026