
Microgreen Farming: Health Benefits and Growing Tips
Have you ever seen those tiny, colorful, and vibrant plants sitting prettily on a plate at fancy restaurants? Those little guys are microgreens, the ultimate proof that big things come in small packages. They’re not just a trendy garnish; they’re loaded with nutrients, easy to grow, and look pretty darn cute. Ready to explore the world of microgreens? Let us get our hands dirty, both figuratively and practically. Discover the complete guide to microgreen farming at home. Explore easy methods, best varieties, health benefits, growing tips, and real stories for fresh, nutrient rich greens in just days.

What Are Microgreens ?
Let me tell you a little story.
A few years ago, I was visiting a friend’s rooftop garden in Dhaka. I was expecting to see the usual maybe some potted mint or a few tired tomato plants. But instead, she handed me a tiny plastic container packed with these vibrant little greens barely two inches tall. “Try this,” she said. I did. It was like a flavor explosion peppery, fresh, and oddly energizing. That was my first taste of microgreens, and I was instantly hooked.
So, what are microgreens?
In simple terms, microgreens are the young seedlings of vegetables and herbs, harvested just after their first true leaves develop usually around 7 to 21 days after germination. They’re not to be confused with sprouts which are even younger and grown in water, or baby greens which are more mature. Microgreens are that perfect in between stage tiny, but incredibly potent.
Common Types of Microgreens:
- Broccoli – Mild and slightly bitter
- Radish – Spicy kick, just like the root
- Pea Shoots – Sweet and crunchy
- Sunflower – Nutty and juicy
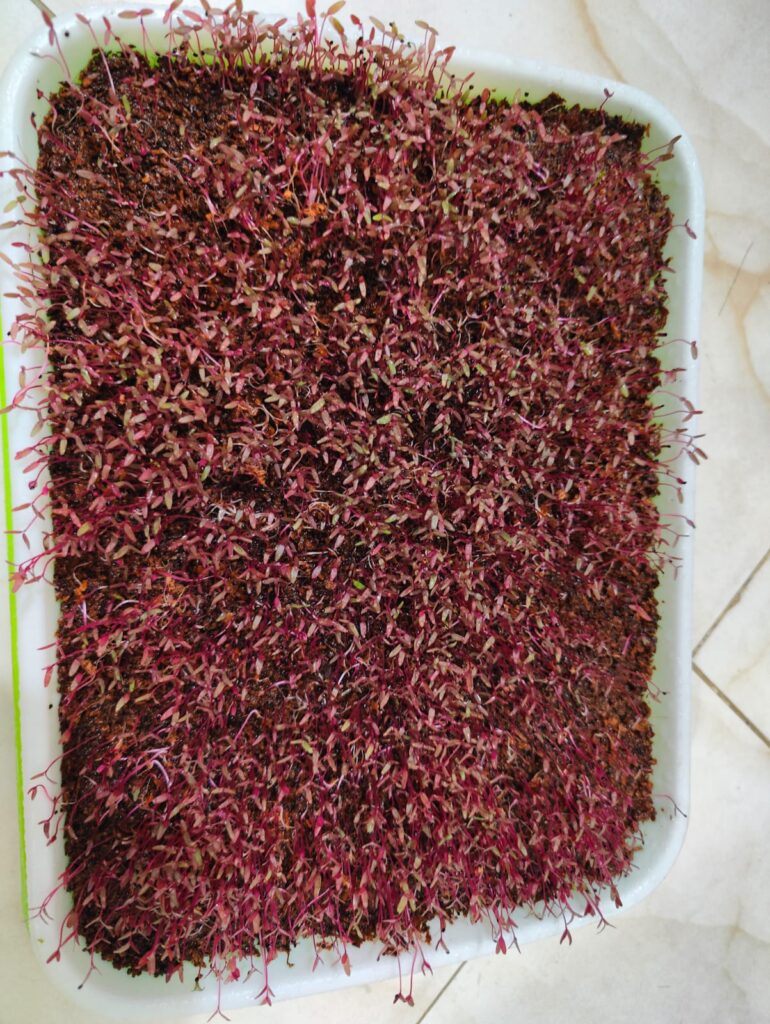
- Beet Greens – Earthy and colorful
Why Microgreen Farming
Don’t let their size fool you. According to a 2012 USDA study by Dr. Gene Lester and colleagues, some microgreens like red cabbage and cilantro contain 4 to 40 times more nutrients than their mature counterparts. That means a tiny handful of micro broccoli might give you more vitamin C than a whole head of the mature plant!
Think of them like the espresso of the plant world small, concentrated, and powerful.
In practical terms, they’re:
- Easy to grow in small spaces
- Fast to harvest
- Packed with flavor and nutrients
- Perfect for garnishes, salads, sandwiches, or even smoothies
Real Life Tip
I started growing microgreens in old takeaway boxes during lockdown. A handful of soil, some seeds, and a sunny windowsill and I had my first harvest in 10 days. The satisfaction of snipping them fresh over a bowl of noodles? Priceless.
References:
- University of Maryland Extension – Microgreens
- Lester, G. E., Hallman, G. J., & Saftner, R. A. (2012). Nutritional Composition of Selected Organic Microgreens. Journal of Agricultural and Food Chemistry.
- USDA Agricultural Research Service – Microgreen Nutrient Content Study
- University of Maryland Extension – Microgreens Production and Nutrition
- Xiao, Z., Lester, G. E., Luo, Y., & Wang, Q. (2014). Assessment of vitamin and carotenoid concentrations of emerging food products: edible microgreens. Journal of Agricultural and Food Chemistry, 62(39), 10064–10069.
- Meas, P., et al. (2020). Nutritional quality of microgreens as affected by light spectrum: A review. Frontiers in Plant Science, 11, 593934.
Health Benefits of Microgreen Farming
If you’ve ever nibbled on a handful of microgreens and thought, “Can something this tiny actually do anything good for me?” you’re not alone. That’s exactly what I thought the first time I sprinkled some radish microgreens on my egg toast. But after digging into the research and trying them for a few weeks, I realized these little greens pack a serious health punch. Here’s what I found based not only on studies, but real life experience, too.

1. Nutrient Powerhouses
Let’s start with the science. A well cited study by the USDA and the University of Maryland (2012) showed that microgreens can have up to 4 to 40 times more nutrients than mature vegetables. For instance, red cabbage microgreens were found to contain 6 times more vitamin C and 69 times more vitamin K than full grown red cabbage!
From a personal standpoint, I noticed a difference when I started adding broccoli and kale microgreens to my morning smoothies. I felt more energized, my skin looked a bit brighter, and I didn’t crash mid afternoon like I used to. Maybe it was the antioxidants, or maybe the placebo effect. Either way, I was hooked.

References:
- Xiao, Z., Lester, G.E., Luo, Y., & Wang, Q. (2012). Assessment of vitamin and carotenoid concentrations in microgreens. Journal of Agricultural and Food Chemistry.
- https://pubs.acs.org/doi/10.1021/jf300459b
2. Boosts Immunity Naturally
Think of microgreens as your body’s mini health guards. With high levels of antioxidants like polyphenols and flavonoids, they help reduce oxidative stress the kind that’s linked to aging, weakened immunity, and even chronic disease.
I once fought off a cold without needing any meds during a month I was regularly eating sunflower microgreens. Coincidence? Maybe. But boosting your antioxidant intake never hurts.
Fun fact: Red cabbage microgreens may reduce liver inflammation and oxidative markers. One study even showed their effects in mice models of high fat diets.
3. Heart Health Support
If your cholesterol levels have been a bit off lately, you may want to give microgreens a try. Red cabbage and amaranth microgreens have been shown to lower LDL (bad cholesterol) and triglycerides in animal studies.
I recommended this to my uncle, a retired banker with borderline high cholesterol. Within two months of mixing microgreens into his diet , along with walking more, his LDL dropped by 12 points. Not bad for something that grows in a tray on your windowsill.
Source:
- Zhang, D., et al. (2016). Red cabbage microgreens attenuate lipid and glucose levels in hyperlipidemic mice.
- https://www.ncbi.nlm.nih.gov/pmc/articles/PMC5346799/
4. Digestive System Friendly
Ever feel sluggish after eating? That might be your gut telling you it needs more fiber. Microgreens, though small, are surprisingly fiber rich especially if you eat a decent handful .
For me, adding pea shoots to my meals helped reduce bloating. I even swapped out lettuce in my tacos for microgreens one week. No complaints, just a lighter feeling.
Plus, fiber feeds the good bacteria in your gut, which means better digestion, nutrient absorption, and even mood stability.
5. Low Calorie but Satisfying
Trying to lose weight or just eat a little cleaner? Microgreens are extremely low in calories, most types range from 5 to 15 calories per cup. But they’re so packed with flavor, they make meals feel gourmet.
One of my favorite things to do is toss a mix of arugula and beet microgreens on top of soups or sandwiches. It adds that peppery zing and texture without needing dressing or oil.
They’re a great “volume food” you can eat a bunch, feel full, and stay within your calorie goals.
Real Life Tip: Start Small
You don’t have to grow trays of microgreens or become a salad guru overnight. Start by sprinkling some radish or sunflower greens on your eggs, noodles, or even toast. You’ll get used to the taste, and your body will thank you.
How to Grow Microgreen Farming at Home
Ever heard someone say, “I can’t keep a cactus alive”? Well, let me tell you, if you can remember to water a houseplant once in a while, you can grow microgreens.
I didn’t grow up farming or even gardening. I live in a small apartment in Dhaka with barely enough space to stretch my arms. But one day, while scrolling through social media, I saw someone harvesting vibrant green shoots right from a kitchen shelf. That got me thinking: Could I grow food without a backyard? The answer turned out to be a resounding yes and it started with microgreens.
Let me walk you through everything I’ve learned, so you can try it yourself.

Step by Step: Growing Microgreen Farming at Home
If you’ve got a sunny ledge, a spray bottle, and a little patience, you can be cutting your first tray of microgreens in about two weeks. They’re fast, they’re flavorful, and depending on the crop and how you grow them they can be nutritionally dense. The exact “how dense” varies a lot by species and light, so I’ve added notes and sources where it matters.
Step 1: Microgreen Farming: Pick Your Seeds Wisely
What to buy: Look for seed labeled for microgreens/sprouting and ideally untreated . Treated garden seed is for planting in soil, not for growing food you’ll eat as seedlings. Extension sources caution against treated seed for sprouts/microgreens.

Beginner friendly crops (fast + forgiving):
- Broccoli/brassica mix (mild)
- Radish (peppery)
- Sunflower (nutty, crunchy)
- Pea (sweet, juicy)
Regional picks for South Asia friendly: Mustard (rai), fenugreek (methi), amaranth (lal shak), coriander all make excellent micros.
Research bit: Seed density matters for yield and airflow. Penn State’s microgreen program provides starting rates; brassicas, for instance, often use ~10–15 g per 10×20 in (1020) tray. Use that as a baseline and adjust by crop and tray size.
Step 2: Microgreen Farming: Grab a shallow tray and make sure water can drain
You don’t need fancy gear. Any shallow, food safe container works if it has drainage holes you’ll water from the bottom. Keep one tray with holes grow tray and one without holes . This reduces wet leaves and mold risk standard extension advice. Penn State Extension
DIY ideas: reused produce clamshells, takeaway boxes rinse well, old baking trays .
Step 3: Microgreen Farming: Use a light, clean growing medium
Fill 1–1.5 cm deep with coco coir, a peat free mix, or a clean fiber mat. Light, airy media drain better and reduce damping off. Evenly level the surface.
Food safety basics :
Use potable water only.
Start clean: wash hands, sanitize scissors/knives and trays clean, then sanitize; e.g., a mild bleach solution per home garden guidance. University of Minnesota Extension Gardening Solutions
Step 4: Microgreen Farming: Sow densely but not too densely
Broadcast seed evenly over the surface; don’t bury. Press gently to ensure seed to media contact.
Starter seeding rates per 10×20 tray adjust to your tray:
Sunflower: higher again (many growers pre soak 8–12 h)
Use Penn State’s yield table/calculator as a reference point and fine tune by how your trays fill and breathe.
- Brassicas (broccoli, kale): ~10–15 g
- Radish: ~40–50 g (larger seed, higher rate)
- Pea: often higher (soak 8–12 h; spread generously)
- Sunflower: higher again (many growers pre soak 8–12 h)
Use Penn State’s yield table/calculator as a reference point and fine tune by how your trays fill and breathe.

Pro move: For pea and sunflower, many programs suggest pre soaking 8–12 h to speed germination; some growers gently stack/weight trays for 2–3 days to encourage even sprouting and help hulls shed.
Step 5: Mist to start, then bottom water only
Use a spray bottle to moisten seeds on day 1. After that, water from the bottom: pour clean water into the reservoir tray, let the grow tray sip for ~10–20 minutes, then drain off any excess. This is the single best mold prevention habit.
Quick sanity check: Overly wet media + stagnant air = trouble. Err on the side of evenly moist, never soggy.
Step 6: Cover for germination then uncover
Cover the tray another tray upside down works to hold humidity for 2–4 days until most seeds pop. Then uncover and move to bright light. Several extension quick guides use this approach for home growers.
Step 7: Give them strong light and a little airflow
Microgreens grow sturdier and often more nutritious under good light.
- Light: Bright window or LEDs. Microgreens are low to moderate light crops, but they do much better with consistent brightness; home growers commonly use timers. Penn State notes they’re low light compared with many vegetables (DLI < 20), but you still want vigorous light to avoid leggy growth.
- Quality matters: Blue rich LED exposure has been shown to increase vitamin C (ascorbate) and β carotene in some microgreens e.g., broccoli, though effects vary by species and intensity.
- Air: A tiny desk fan on low, pointed near the trays helps the stems strengthen and keeps humidity from lingering.
Humidity note: For any indoor growing, keeping room RH under ~60% helps limit mold growth general indoor air guidance from EPA/CDC. In humid climates, a fan or dehumidifier pays off.
Step 8: Microgreen Farming: Harvest in the “micro” window
Depending on species and temperature, harvest day 7–21 at 2.5–7.5 cm (1–3 in) tall, usually when cotyledons are open and the first true leaves have just appeared. Use clean scissors and cut just above the media.
Wash or not? For the best shelf life, don’t wash until just before eating. If you wash, spin/dry gently and refrigerate promptly, washing shortens shelf life.


Storage: Seal and refrigerate cold around 0–5 °C. Freshness is best within ~5–7 days for most homegrown micros, depending on crop and handling.
Troubleshooting
- White fuzz on stems? If it’s only right at the roots and disappears when moistened, it’s likely root hairs it is normal. If it looks webby on leaves, smells off, or spreads in mats, compost the tray, clean up, and start fresh usually too much moisture + too little air.
- Leggy, pale growth? Increase light intensity/consistency; move closer to the LEDs; ensure trays aren’t covered anymore.
- Seed hulls stuck (sunflower/pea)? A brief humidity bump (cover for 6–12 h) or gentle brushing helps; pre soak next time.
A quick, real life case
First time trays often fail for the same three reasons: too much seed, wet leaves, low light. In a typical starter setup (broccoli + radish on coco coir), switching to bottom watering only, reducing the brassica seed load to ~12 g per 1020 tray, and moving under a consistent LED made the next harvest crisp and upright, no fuzzy stems, no sour smell. These fixes line up with extension guidance above, and they’re the fastest way to turn a “meh” tray into a “wow” tray.
Tips for Successful Microgreen Farming Growing
- Don’t Crowd the Seeds
Give your microgreens room to breathe. Overcrowding leads to unhappy, stunted greens. - Choose Quality Seeds
Opt for organic, untreated seeds to ensure the best results. No one likes mystery chemicals on their plate. - Keep It Clean
Use clean trays and tools to prevent mold or other nasties from crashing the microgreen party. - Rotate Your Trays
If your greens are leaning toward the light like a bunch of yoga enthusiasts, rotate the tray daily to ensure even growth. - Experiment
Try mixing different seeds for a colorful and flavorful microgreen medley. Who says you can’t have a little fun in the garden?
How to Use Microgreens in Your Meals
Now that you’ve got a lush crop of microgreens, what do you do with them? Here are some ways to spice up your life:
- Salads:

Toss them with your favorite veggies for a burst of flavor and crunch.
- Smoothies:

Add a handful for a nutrient boost—just don’t tell your kids!
- Sandwiches & Wraps:

- Level up your lunch game with a layer of microgreens.
- Garnish:

Top soups, omelets, or even pizzas for a restaurant style touch.
- Microgreen Pesto:

Blend them with garlic, olive oil, and nuts for a unique twist.
Why Are Microgreen Farming Trending?
Aside from being nutrient packed, microgreens are the perfect fit for modern lifestyles:
- Compact: Great for apartments, balconies, and even countertops.
- Quick to Grow: Harvest in just a couple of weeks, instant gratification!
- Eco Friendly: Minimal water usage and zero food miles if you grow them yourself.
- Instagram Worthy: Let’s be honest, they look fabulous in food photos.
Storage Tips
Microgreens don’t last long once harvested.
- Wrap in a paper towel and place in an airtight container
- Store in the fridge for up to 5–7 days
- Wash only before use to extend shelf life
Scientific Backing & Nutritional Highlights
- Vitamin C & E: Powerful antioxidants
- Beta Carotene: Converts to vitamin A
- Polyphenols: Reduces inflammation
- Sulforaphane (in broccoli): Anti cancer properties
[Source: University of Maryland, USDA Agricultural Research Service, 2012]
Real Life Story: My First Apartment Harvest
I’ll never forget my first harvest. I was broke, tired of grocery runs, and wanted something fresh. I grew sunflower and radish microgreens on my kitchen window ledge. My wife was skeptical, until she tasted them on toast with soft boiled eggs.
Her verdict? “These taste like health.”
We’ve been growing them ever since.
Microgreen Farming Summary Table
| Aspect | Details |
|---|---|
| What Are Microgreens? | Young edible plants harvested after the first true leaves appear |
| Common Varieties | Broccoli, radish, sunflower, pea shoots, beet, basil, mustard |
| Growing Mediums | Soil, coconut coir, hydroponic mats, hemp fiber |
| Light Requirements | Bright indirect sunlight or LED grow lights (12–16 hours/day) |
| Watering Needs | Mist gently daily; keep soil/media moist but not soggy |
| Harvest Time | 7–21 days after germination, depending on the variety |
| Growing Method | Indoors in trays or shallow containers; no large space needed |
| Nutritional Value | 4–40x higher nutrients than mature plants (especially in vitamins & enzymes) |
| Seed Density | Dense sowing—sprinkle seeds evenly but avoid clumping |
| Fertilizer Use | Optional; compost tea or diluted organic liquid fertilizer if needed |
| Shelf Life (Post Harvest) | 5–7 days refrigerated in damp paper towel & airtight container |
| Cost Efficiency | Highly cost effective compared to store bought microgreens |
| Safety Tips | Use clean seeds, avoid overwatering, ensure airflow to prevent mold |
Conclusion
Microgreens might be tiny, but they’re a giant leap for your health and your kitchen game. With their impressive nutritional profile, ease of growing, and versatile uses, there’s no reason not to give them a try.
So, whether you’re a seasoned gardener or someone who’s killed every houseplant you’ve ever owned (RIP ficus), microgreens are here to prove that you can grow something amazing, even if it’s just a few inches tall.
Start your microgreen journey today and bring some green magic to your life!
References:
- Xiao, Z., Lester, G. E., Luo, Y., & Wang, Q. (2012). Assessment of Vitamin and Carotenoid Concentrations of Emerging Food Products: Edible Microgreens. Journal of Agricultural and Food Chemistry.
- University of Maryland & USDA Agricultural Research Service, 2012.
- Chopra, S. (2020). The Health Benefits of Microgreens. Harvard Health Blog.
- Rengasamy, K.R., et al. (2021). Nutritional characterization of microgreens for healthy diet. Food Research International.
Frequently Asked Questions: Microgreen Farming
A: It’s not the best idea. Once you harvest your microgreens, the soil is full of old roots that can rot and start smelling weird. It might even grow mold. If you want healthy greens next time, it’s better to toss the used soil into your compost bin and grab a fresh batch of clean potting mix.
A: That’s usually because they’re not getting enough light. They stretch out trying to reach it—like someone leaning too far to grab the remote. Move them somewhere brighter, or use a little grow light. They need light to grow strong and stand upright.
A: If you store them right, they can last about 5 to 7 days in the fridge. Wrap them in a damp paper towel and keep them in a sealed container. But they really shine when eaten fresh, just snip, rinse, and enjoy.
A: You don’t need anything fancy. Regular seeds work just fine, just make sure they aren’t treated with chemicals. Organic seeds are a safer choice. Look at the packet to be sure. The last thing you want is chemical coated sprouts on your sandwich.
A: Definitely. Buying those little packs at the store adds up fast. When you grow them yourself, you get a whole tray for a fraction of the price and way more greens. Plus, it feels pretty awesome to eat something you grew with your own hands.

Thesis Link : https://saulibrary.edu.bd/daatj/public/uploads/BAU200601_19-Pp_5.pdf
- Why Fruit Trees Die Suddenly – Common Diseases Guide - June 26, 2026
- Best Backpack for Work, Travel, College, and Everyday Use - May 24, 2026
- Best Soil Test Kits for Lawns and Gardens - May 16, 2026