


10 Best Irrigation Systems for Efficient Water Use in Gardens & Farms
Water has become one of the most valuable inputs in gardening and farming. Whether you’re managing a backyard vegetable patch or running rows of crops, the goal is the same: use less water, but grow better plants. Yet a surprising amount of irrigation water never reaches plant roots. Across many landscapes, a large share of outdoor watering is lost to evaporation, runoff, or simply watering the wrong place at the wrong time often estimated at up to 50% waste when systems are poorly designed or scheduled. Discover the 10 best irrigation systems for efficient water use. Learn how to save water, reduce waste, and grow healthier plants in gardens and farms.
That’s exactly why this guide exists. In the sections ahead, we’ll walk through the 10 Best Irrigation Systems for Efficient Water Use, focusing on real world options you can actually apply from low cost solutions like soaker hoses to smarter setups like weather based controllers. This isn’t a one size fits all list. Home gardeners and commercial growers don’t always need the same tools, so each system will be explained with practical use cases, clear pros and cons, and simple decision tips.
Why water efficient irrigation matters
If you’ve ever watched water pooling at the end of a sloped lawn or seen sprinklers spraying into the wind, you’ve seen the problem in action. Traditional methods especially flooding or fixed schedules often deliver water faster than the soil can absorb, or at times when heat and wind pull moisture away before plants can use it.
Modern irrigation systems for efficient water use aim to solve those problems in three ways:

- Precision: water goes to the root zone, not the pavement
- Timing: watering matches plant demand and weather conditions
- Control: flow and distribution are balanced so the soil absorbs water instead of shedding it
Agricultural research and practical field experience both support this direction. For example, organizations like the USDA point out that pressurized systems, sprinklers and drip are generally more efficient than older gravity fed flood methods because they give better control over how and where water is applied.
So if your goal is healthier plants, fewer disease issues, lower water costs, and less wasted effort, choosing the right system is one of the fastest upgrades you can make. Now let’s get into the 10 Best Irrigation Systems for Efficient Water Use and find what fits your garden or you farm best.
1. Drip Irrigation Systems
If you’ve ever watered a bed with a hose and watched half of it run down the path, you already understand why drip irrigation feels like a “smart upgrade.” Drip systems use flexible tubing and small emitters to deliver water slowly and directly to the root zone the only place plants can actually use it. Because the water isn’t sprayed into the air, you lose far less to wind, evaporation, and overspray. When designed and maintained properly, drip can reduce water use dramatically compared to overhead watering, while still producing strong, consistent plant growth.

A real life story: “The garden that stopped drinking so much”
A friend of mine, a home gardener with a small rooftop setup used to water his containers every afternoon. In summer, the topsoil dried out fast, leaves drooped, and he kept increasing watering time. His bill rose, and his tomatoes still cracked.
He switched to a simple drip kit just a small mainline, a few adjustable emitters, and a cheap timer. The first week, he noticed something surprising: the plants looked better even though the system was using less water. The soil stayed evenly moist instead of swinging between “dusty dry” and “soaked.” A month later, he wasn’t just saving water he was saving effort. No daily dragging hoses. Fewer weeds. Less stress on the plants. That’s the quiet superpower of drip: consistency without waste.
What makes drip irrigation so effective?
Drip irrigation applies water at a controlled rate, allowing soil to absorb moisture slowly. This reduces:

- Runoff – water flowing away before it can soak in
- Evaporation – water disappearing into hot air
- Unwanted watering – like wetting paths, weeds, and empty spaces
Instead of watering everything, it waters exactly what matters.
Key Benefits of Drip Irrigation

1) High water efficiency
Drip is widely considered one of the most efficient irrigation methods because water goes straight to the roots instead of drifting away in the air. In practical terms, many gardeners notice they can cut watering time while maintaining or improving plant health.
Best for: vegetable beds, orchards, raised beds, greenhouse crops, container gardens, hedgerows.
2) Healthier plants, fewer weeds
Since only the plant’s root zone is watered, the surrounding soil stays drier meaning weed seeds have a harder time germinating. Also, keeping foliage dry helps reduce fungal issues in many crops.
You’ll often see improvements like:
- steadier growth, less heat stress
- fewer leaf spots and mildew in sensitive plants
- stronger root development due to deep, steady moisture
3) Scales from small gardens to commercial farms
Drip isn’t just for backyard gardens. It scales beautifully:
- Home gardeners: easy kits, adjustable emitters, patio setups
- Commercial farmers: drip tape along rows, orchard lines, pressure compensating emitters for slopes
You can also run drip lines on the surface or install subsurface drip to push efficiency even further .
Practical Setup Tips of Drip Irrigation
Start simple if you’re a home gardener
A beginner friendly drip setup usually includes:

- 1/2″ main tubing
- 1/4″ feeder lines
- emitters , fixed flow or adjustable
- pressure regulator
- filter
- timer
Pro tip: Add emitters gradually. Start with fewer lines, then expand as you learn your plants’ needs.
If you’re a grower or farmer, design matters more than brand
In commercial use, drip success comes down to:
- correct spacing for crop type
- consistent pressure across the field
- filtration matched to water source
- routine flushing and inspection
Even the “best drip irrigation system” can fail if filtration is ignored or if pressure varies too much along the run.
Maintenance that actually saves you later
Think of maintenance as insurance:
- flush lines periodically
- check for clogged emitters , especially with well/pond water
- inspect for leaks near connectors
- replace damaged sections before they become a bigger problem
When drip might NOT be the best fit
Drip irrigation is excellent, but it’s not perfect for every situation.
It may not be ideal if:

- you can’t monitor the system at all
- you need to water large lawns
- your water is extremely dirty and filtration is difficult
References
- USDA – Natural Resources Conservation Service (NRCS)
Topic: Drip irrigation efficiency and water conservation - FAO (Food and Agriculture Organization of the United Nations)
Topic: Micro irrigation and drip systems - University of California Agriculture & Natural Resources (UC ANR)
Topic: Drip irrigation design, efficiency, and maintenance
- Texas A&M AgriLife Extension
Topic: Drip irrigation water savings and crop health - Penn State Extension – Irrigation Systems
Topic: Drip vs sprinkler efficiency
2. Soaker Hoses
Soaker hoses are one of those tools that look too simple to be effective until you use one properly. They’re basically porous hoses, often made from recycled rubber that weep water slowly along their length, letting moisture soak into the soil instead of spraying into the air. That “quiet seep” is exactly why many gardeners consider them a best irrigation system choice for beds, borders, and row plantings.

A real life story – the bed that stopped wasting water
A small orchard grower I met , he had a few dozen fruit trees, not a huge commercial setup used to water with a hose and spray nozzle. He’d finish watering and still see dusty dry patches around some trees while other spots stayed soggy. He switched to soaker hoses laid around the drip line of each tree, ran the water low, and covered the hoses with mulch. Within a few weeks, the soil stayed evenly moist and he stopped getting those “wet here, dry there” problems.
That matches the advice in a practical guide from the Saving Water Partnership, a consortium of water utilities : soaker hoses work best when you lay them only in planted areas, keep runs manageable, and use low pressure so the hose seeps instead of sprays.
Why soaker hoses are water wise
Soaker hoses help because they avoid the big three waste problems:

- Wind drift – water blown away
- Overspray – watering paths and empty spaces
- Fast runoff – water applied too quickly to soak in
Instead of watering “everything,” they quietly water the soil where roots are which is exactly what you want in water efficient gardening.
Key benefits of Soaker Hoses

1) Easy and low cost
No digging, no emitters, no complicated fittings. You attach it to a tap, snake it through the bed, and you’re basically done. For beginners, it’s one of the fastest ways to start using irrigation systems for efficient water without installing a full drip network.
2) Even, gentle watering that encourages deeper roots
Because water comes out slowly, your soil gets time to absorb it. That means fewer puddles, less runoff, and a deeper moisture zone great for vegetables, flowers, hedges, and orchard rows.
3) Flexible layout
Soaker hoses can loop around plants, run straight down a row, or zig zag across a bed. They’re especially useful when your garden layout changes season to season.
Setup tips the pros keep repeating
Keep the run length reasonable
The Saving Water Partnership recommends a maximum effective length of 100 feet for a soaker hose run longer than that, and you risk uneven output.

Use low pressure
Their guide also suggests adding a pressure regulator (10–12 psi) so the hose doesn’t start spraying or dumping water at one end while barely trickling at the other.
Lay it on level ground when possible
Soaker hoses distribute water most evenly on level beds. On slopes, water tends to favor the lower end, which reduces efficiency.
Cover with mulch for a serious efficiency boost
Here’s the underrated upgrade: mulch. Utah State University Extension notes that mulching around trees, shrubs, and flower beds can lead to a ten fold reduction in evaporative soil water loss which means your irrigation water stays available longer instead of disappearing into hot air.
The same soaker hose guide recommends covering the hose with 2–3 inches of mulch to retain moisture and protect the hose from sun damage , but not burying it in soil.
Quick “do this, not that” checklist
- Don’t run one super long line across the whole yard .
- Turn the faucet on just enough so the whole hose seeps.
- Use a timer + regulator for consistency and to prevent overwatering.
- Cover with mulch to keep moisture in the root zone.
References
- Saving Water Partnership — Soaker hose guide (max effective length 100 ft, level ground guidance).
- Utah State University Extension — Mulch reduces evaporative water loss , ten fold reduction statement.
- Optional backup source City of Spokane — Soaker hose how to
3. Smart Irrigation Controllers
Most sprinklers don’t waste water because the heads are bad. They waste water because the schedule is bad.

If you’ve ever seen a lawn being watered during a steady drizzle or watched your system run on a cool, cloudy day in October like it’s the middle of July, you already understand the problem: old school timer boxes don’t know what’s happening outside. They just follow orders.
A smart irrigation controller fixes that. It doesn’t replace your sprinklers or drip lines , it replaces the guesswork behind them. Think of it as the brain that tells your existing irrigation system when to water, how long to water, and when to skip it.
What makes a controller “smart,” exactly?
Traditional controllers are clock based: Monday, Wednesday, Friday at 6:00 AM for 20 minutes, forever, no matter what.

Smart controllers work differently. Depending on the model, they adjust watering using:
- Local weather data and forecasts – rain, heat, wind, humidity
- Seasonal changes – plants need less in cooler months
- Soil moisture sensors – some systems use in ground readings
- Zone details you provide – spray vs. drip, sun vs. shade, soil type, slope
So instead of watering “because the calendar says so,” they water because conditions actually require it.
A real world example: when a schedule change becomes a water saving habit
EPA WaterSense shares a case where the Granite Park office complex cut irrigation water use by about 40% after installing a WaterSense labeled weather based controller , along with other upgrades.
That’s not magic. It’s just what happens when irrigation stops running blindly and starts responding to reality.
And for homeowners, the savings can be surprisingly big. EPA WaterSense reports that replacing a standard clock based controller with a WaterSense labeled irrigation controller can save an average home up to 15,000 gallons of water per year, figures vary by controller type and setup.
For soil moisture based controllers specifically, WaterSense notes outdoor water use can drop by around 30% versus clock based controllers.
The benefits of Smart Irrigation Controllers

1) It prevents unnecessary watering
If it rained yesterday, the controller can reduce or skip the next cycle. If a heat wave is coming, it may water more intelligently sometimes by splitting runtimes into shorter cycles to reduce runoff.
2) You can control it anywhere
Most smart controllers connect to Wi-Fi and come with an app, which is more useful than it sounds:
- You can pause watering when storms roll in
- You can start a quick cycle after fertilizing
- You can check whether a zone actually ran while you were away
Some models also flag issues like abnormal flow or zones that aren’t responding early clues for leaks or broken valves.
3) Every zone gets treated like its own little ecosystem
A smart controller shines when your yard isn’t “one size fits all.” Lawn in full sun? Drip line on shrubs? Shady side yard that stays damp? Smart scheduling can treat those as separate realities instead of forcing them into the same runtime.
Why WaterSense matters
You’ll see a lot of “smart” labels in irrigation marketing. The one that matters most for performance and credibility is EPA WaterSense.

WaterSense labeled controllers are independently certified to meet efficiency and performance criteria, and EPA highlights their potential to reduce overwatering and save substantial amounts of water.
That’s also why many utilities and municipalities encourage them , ften with rebates.
The part most people skip and why their “smart” system underperforms
Here’s the truth: a smart controller can only be as smart as the information it’s given.
If you want the results WaterSense talks about, spend an extra 20 minutes doing the setup properly:
- Identify sprinkler type per zone – spray, rotor, drip
- Note sun exposure – full sun vs. partial shade
- Choose soil type – sand drains fast; clay holds water
- Account for slope – runoff risk is real
- Match plant needs – lawn ≠ flower bed ≠ shrubs
Then do one more step that separates “installed” from “working well”:
A quick calibration trick that saves a ton of water
The first week after setup, watch one cycle like you’re inspecting a contractor’s work.
When a zone runs for 10 minutes:
- Is water pooling on the surface? – too fast / too long for the soil
- Is the ground still dusty an hour later? – too little / poor coverage
- Are sidewalks getting sprayed? – misaligned heads wasted water
Smart controllers prevent a lot of waste, but they can’t fix tilted spray heads, clogged nozzles, or a zone that’s overspraying your driveway. A five minute nozzle adjustment can sometimes save more water than any app setting.
Who benefits most from upgrading?
A smart controller is worth it if:
- You already have an automatic irrigation system with a basic timer
- Weather in your area swings between hot/rainy/dry spells
- You travel or forget to adjust seasonal schedules
- Your yard has multiple zones with different needs
And yes, most brands are built to replace common timer boxes without redesigning your whole irrigation layout.time, the smart controller will adjust itself. By using smart controllers with the other best irrigation systems like drip or efficient sprinklers, you create an extremely water efficient setup. Studies have found that these smart systems can reduce irrigation water use by 30–50% on average, all while keeping landscapes healthy.
References
- EPA WaterSense – WaterSense Labeled Controllers
Says replacing a standard clock based controller with a WaterSense labeled controller can save an average home up to 15,000 gallons/year. - EPA WaterSense fact sheet (PDF) – “Water Smart Solution for Large Landscapes”
Mentions studies showing WaterSense labeled irrigation controllers can save 7,600–15,000 gallons/year, and includes the Granite Park example , ~40% reduction after upgrades including a WaterSense labeled weather based controller. - EPA WaterSense case study (PDF) – Granite Park Office Complex
Confirms the Granite Park complex reduced irrigation water use by about 40% after irrigation upgrades/improved operation. - EPA WaterSense mini report (PDF) – Soil Moisture Based Controllers
States replacing a clock based controller with a WaterSense labeled soil moisture based controller can reduce outdoor water use by 30%.
4. Sprinkler Systems That Don’t Waste Water
A few summers ago, a homeowner I’ll call Rahim , kept wondering why his lawn still looked tired despite the sprinklers running like clockwork. One morning he stepped outside and noticed something, the driveway was soaking wet, the lawn near the curb had puddles, and a fine mist was drifting away in the breeze like fog.

The system wasn’t “broken.” It was doing exactly what older sprinklers often do when pressure is high and nozzles are outdated: spray too fast, mist too much, and water everything except the roots.
That’s where high efficiency sprinklers come in. You can keep the convenience of sprinklers for lawns and large areas, while cutting waste with smarter hardware and better setup.
Why traditional sprinklers waste so much water
Three things usually cause the “watering the sidewalk” problem:

- Too much pressure
Many irrigation systems run at pressures higher than what sprinkler nozzles are designed for, which can increase misting and waste. EPA WaterSense points out that excessive pressure is common and that pressure control can reduce waste. - Fast application
If water hits the soil faster than it can absorb, it runs off especially with clay soil, compacted lawns, or slopes. EPA recommends “cycle and soak” splitting runtimes into shorter intervals with breaks to keep more water on the landscape and reduce runoff. - Poor coverage and overspray
Mismatched arcs, tilted heads, clogged nozzles, or incorrect spacing can create dry spots , so people increase runtime and overspray .
The upgrades that actually make sprinklers efficient

1) Start with pressure control
One of the simplest, most dependable upgrades is using pressure regulating spray sprinkler bodies. EPA WaterSense labels spray sprinkler bodies that meet performance/efficiency criteria and help manage pressure related waste.
Why it matters: when pressure is too high, you get misting and uneven distribution. Pressure regulation helps the nozzle do its job the way it was intended.
2) Switch to slower, more uniform “rotating stream” style nozzles where appropriate
For turf zones that currently use quick spray patterns, many people upgrade to multi stream rotational nozzles . The U.S. Department of Energy notes these apply water in rotating trajectories, which can reduce misting/evaporation and avoid runoff by applying water more slowly so soil can absorb it.
In plain terms: less fog in the air, more water in the root zone.
3) Add a “don’t water if it rained” safeguard
Even the best sprinklers waste water if they run when they don’t need to. Two common add ons:
- Rain sensors : they interrupt scheduled irrigation after rain events.
- Soil moisture sensors / soil moisture based controllers: they can override irrigation when the soil already has enough moisture.
Pairing efficient heads with a smart schedule is where you start seeing “why didn’t I do this sooner?” results.
Installation details that separate “good” from “great”
High efficiency sprinklers aren’t just a product choice they’re a setup choice.
Look for these basics in the design:

- Head to head coverage: each sprinkler should reach the next .
- Matched precipitation rates within a zone: don’t mix spray style and rotor style coverage in one zone unless you really know what you’re doing.
- Correct arcs and alignment: water should land on soil and plants not concrete.
If you’re hiring someone, ask:
“How will you check pressure by zone, and how will you tune coverage after installation?”
A good installer expects that question.
Usage tips of Sprinkler Systems

Water at the right time
EPA WaterSense generally recommends watering early morning or evening to reduce evaporation losses during hot parts of the day.
Virginia Tech also recommends watering early morning when evaporation loss and wind impact are lowest.
And Clemson notes nighttime conditions often mean lower evaporative losses, cooler temps, lower wind, higher humidity, with watering ending before sunrise so foliage dries normally.
Use “cycle and soak” if you ever see runoff
If water runs down the curb before the zone finishes, split it. EPA explains cycle and soak: shorter intervals with breaks to let water soak in, reducing waste from runoff especially on clay soils or slopes.
Keep up with basic maintenance
A “high efficiency” system becomes a water waster when:
- nozzles clog
- heads tilt
- seals fail
- grass grows around heads
A quick monthly walk through during peak season prevents most of this.
A quick reality check you can do this week
Pick one zone. Run it for the normal time. Then check:
- Is pavement wet? Adjust arcs/aim.
- Is there mist drifting away? You may have pressure issues or need a different nozzle style.
- Are there puddles or runoff? Switch to cycle and soak and/or lower application rate.
That 15 minute check often saves more water than any fancy feature in the app.
References
- EPA WaterSense – Spray sprinkler bodies and pressure control
- EPA WaterSense , Cycle and soak to reduce runoff .
- DOE FEMP – Multi stream rotational sprinkler heads
- EPA WaterSense + Virginia Tech + Clemson – Best watering times to reduce evaporation and wind loss
- EPA – Rain sensor technical explanation
5. Bubbler Irrigation Systems: Deep Water for Trees
A few years back, my neighbor had a lemon tree that looked healthy from a distance green leaves, decent height but it barely produced fruit. He was watering it the same way he watered the lawn: quick sprinkler runs, a few times a week. The ground was always damp on top, yet the tree still struggled in hot months.

One weekend we pulled back the mulch and dug a small test hole near the drip line. The top few inches were moist… and below that? Dry as powder. The tree’s roots were living near the surface because that’s where the water stayed.
He switched that tree to a bubbler, ran it less often but long enough to soak deep, and built a simple soil basin around the root zone. The next season, the tree held fruit better and didn’t wilt the moment the temperature spiked.
That’s the “why” behind bubbler irrigation.
What is a bubbler system?
A bubbler is a small emitter placed near a tree or shrub that releases water in a gentle, steady stream more like a small pour than a drip. Instead of sprinkling water into the air, it delivers water right at the soil surface so it can soak straight down.

Think of it as:
- Drip emitters = slow sips
- Bubblers = a controlled pour
- Sprinklers = wide spray
Bubblers are popular for trees, large shrubs, and thirsty individual plants that do better with deep watering rather than frequent light watering.
Why bubblers are efficient
A bubbler earns its spot on the “efficient watering” list for one big reason: targeting.
You’re not watering the sidewalk. You’re not spraying the air. You’re putting water where the roots can use it especially useful when:

- you have a mix of lawn + trees
- you live in a windy or hot area where spray losses are high
- your trees need deeper moisture than turf typically does
Key benefits of bubbler irrigation

1) Deep root watering
Trees and big shrubs generally do best when water reaches deeper layers of soil. Bubblers help you wet the soil deeper so roots aren’t forced to live at the surface.
Deep roots usually mean:
- better drought tolerance
- less stress in heat waves
- steadier growth and fruit set for fruit trees
2) Less runoff
A bubbler can be extremely clean and efficient if the water is applied at a rate your soil can absorb. Add a small basin or berm ring and the water stays put long enough to sink in.
This is a big deal for:
- clay soil
- sloped yards
- newly planted trees where you want water concentrated near the root ball
3) Simple and sturdy
Compared to tiny drip emitters, many bubbler styles have larger openings and fewer “precision parts,” which can make them less fussy in real life yards where water isn’t perfectly filtered.
The mistakes that make bubblers waste water
Bubblers can be efficient or they can create a puddle and run down the driveway. The difference is setup.

Avoid these common problems:
- Gushing flow: if it looks like a mini fountain, it’s too high.
- Watering right against the trunk: you want to water the root zone, not keep the trunk wet.
- Too small a watering area for mature trees: as the tree grows, its active roots move outward your bubbler placement should adapt.
- Same runtime all year: trees don’t need the same schedule in cool season vs peak heat.
Usage tips that actually work in the yard

Build a simple basin
Make a ring with soil 2–4 inches high around the area you want to soak. It doesn’t need to be pretty just functional. Mulch on top helps hold moisture longer.
Place bubblers where roots are feeding
For young trees, that might be closer in. For established trees, place bubblers closer to the drip line , or use two bubblers spaced around the tree.
Set the flow so it “bubbles,” not blasts
You want a steady pour that soaks in. If water pools fast and threatens to spill over the basin, dial the flow down or split the watering into two shorter runs with a break.
How long should you run it?
There’s no universal number because soil and tree size change everything but here’s a practical way to do it without guessing:
- Run the bubbler.
- After watering, check moisture depth with a long screwdriver/soil probe.
- Aim to wet the soil deep, not just the top.
A rough target many gardeners use:
- Young trees: moisten roughly 12–18 inches deep
- Mature trees: closer to 18–24 inches
If you hit damp soil only in the top few inches, you’re basically doing “sprinkler style watering,” just in a smaller circle.
Water less often, but thoroughly
Bubblers are best when you water deeply and infrequently, then let the soil breathe a bit between cycles especially for trees that hate constantly wet roots.
Who should use bubblers?
Bubbler systems are a smart choice if you’re watering:
mixed landscapes where trees need different watering than turfciently to roots, you won’t need to water as often, which saves water in the long run and supports healthier plants.
- Fruit trees – mango, citrus, guava, apple anything that prefers deep soaking
- Newly planted trees – root ball needs focused water
- Large shrubs – hedges, ornamentals, flowering bushes
References
- Definition of bubbler irrigation + why basins are often used – water applied as a small stream; basins/furrows help control distribution
- Deep, infrequent watering + watering near the drip line + typical root zone depths + using a soil probe idea – excellent Extension guidance
- Deep and infrequent watering + focus watering near the drip line where feeder roots
- Do NOT concentrate water at the base/trunk; feeder roots are several feet from trunk; drip/trickle is efficient
- Basins placed at or beyond the dripline + using a rod/screwdriver to check how deep watering penetrated
6. Micro Irrigation and Micro Sprinklers
The first time I used micro sprays wasn’t in a fancy orchard it was in a messy backyard bed that refused to cooperate. Half the flowers were thriving, the other half looked like they were always negotiating with drought. Drip emitters felt too “pinpoint” and a normal sprinkler soaked the path, the fence, and anything except the roots.

A landscaper friend handed me a small bag of micro sprayers and said, “Stake these where the plants actually are, not where the sprinkler thinks they are.” That one sentence explains why micro irrigation has such a loyal following.
What “micro irrigation” really means
Micro irrigation is a family of low pressure systems that apply small quantities of water as drops, tiny streams, or miniature sprays along a distribution line. That definition isn’t marketing it’s how USDA NRCS describes microirrigation in its conservation practice standard.

It includes:
- Drip – slow drips at the soil
- Micro sprinklers / micro sprayers – small fan sprays, mini spinners, or short radius patterns
- Mini bubblers – a small controlled stream
Micro sprinklers are the sweet spot when drip feels too narrow but traditional sprinklers feel too broad.
Why micro sprinklers are efficient

1) You water the plants, not the neighborhood
Instead of throwing water 15–30 feet into the air, micro sprays cover a small radius right where your plants live. EPA notes microirrigation is low pressure/low flow and can reduce the likelihood of overwatering, and it typically uses 20–50% less water than conventional sprinkler systems.
2) You can match the pattern to the bed
Micro sprayers often come in different arcs—90°, 180°, 360° , so you can water only the area you need , no driveway overspray, no “wet mulch halo” in one spot and dust in another.
3) It’s gentle, especially for beds and young plants
Micro irrigation is widely used in orchards, nurseries, and greenhouses, and it’s well adapted for home gardens too.
Colorado State University also notes micro sprinkler irrigation for orchards is low pressure and can save water thanks to high application efficiency and uniformity when managed properly.
Where micro sprinklers shine
- Flower beds & groundcovers where one drip emitter per plant is tedious
- Orchards and fruit trees when you want broader wetting under the canopy
- Greenhouses / nursery benches where consistent coverage matters
- Irregular shapes – curved beds, narrow side yards, mixed planting zones
The “real life” problem micro sprays solve
Here’s the part people don’t say out loud: gardens change.
Plants grow, shade shifts, you add a new shrub, you remove a bush, and suddenly the old system is watering yesterday’s layout. Micro sprays let you move coverage without tearing up plumbing , just relocate a stake, swap a nozzle, or adjust the arc.
That’s why they’re common in orchards and high value planting areas: if the layout changes, you can adapt quickly without redesigning everything.
Practical setup tips of Micro Irrigation and Micro Sprinklers

Use filtration and plan for maintenance
Micro systems have small passages, and clogging is a real thing. Clemson Extension recommends proper filtration, flushing, and routine maintenance to prevent clogging in micro irrigation systems.
Keep the sprayer low and stable
Use stakes/risers so the micro spray hits the soil and plant root zone not the air above it. If it’s too high, you’ll see drift; too low and you may get blocked by foliage.
Don’t run them in the windiest, hottest hours
Even small sprays can lose water to drift and evaporation. Clemson notes sprinkler applications are more susceptible to drift/evaporation during the day, and estimates daytime losses can be 20–30% depending on conditions.
Early morning runs usually perform better for spray based systems for that reason.
Observe how evenly the soil is being watered
Run a zone for 5–10 minutes, then look:
- Is the soil evenly damp where roots actually are?
- Is the mulch floating or eroding?
- Are leaves constantly soaked?
Micro sprays are adjustable treat the first week as tuning, not a “set it and forget it” moment.
References
- Clemson HGIC – Time of day, drift/evaporation losses for sprinkler type watering
- USDA NRCS – Definition and standards for microirrigation
- EPA WaterSense – Microirrigation overview and water savings vs conventional sprinklers
- Colorado State University Extension – Micro irrigation for home gardens
- Colorado State University Extension – Micro sprinkler irrigation for orchards
- Colorado micro-sprinkler orchard PDF
- Clemson Extension – Micro irrigation maintenance to prevent clogging
7. Subsurface Irrigation : Watering You Can’t See and That’s the Point
There’s a very specific moment people have with underground drip: they turn the system on, walk outside… and think it’s broken.

No spray. No mist. No sprinklers clicking. Just quiet.
A homeowner Mina had that exact panic after converting a narrow, awkward lawn strip to subsurface drip. She stood there staring at dry grass, convinced nothing was happening until she pushed a long screwdriver into the soil. The top inch was dry, but a few inches down it came out cool and damp. That’s subsurface irrigation in one snapshot: the surface stays drier and the moisture lives where roots actually are. That “dry on top, wet below” behavior is one reason SDI can reduce weeds and some disease pressure.
What subsurface irrigation is
Subsurface drip irrigation (SDI) applies water below the soil surface through buried tubing “driplines/drip tape” so water drips directly into the root zone. University of Nebraska Lincoln Extension defines SDI exactly that way , water to the crop root zone using buried polyethylene tubing.

FAO describes subsurface irrigation as delivering water directly to the root zone via buried lines/porous materials and highlights reduced losses from evaporation/runoff and less weed growth.
You’ll also hear “subsurface irrigation” used loosely, but SDI is the most common version people mean in landscaping and agriculture.
Why SDI is so water efficient
The “efficiency” story isn’t just a marketing claim many of the losses that happen with overhead irrigation simply don’t happen underground:

- Less surface evaporation and wind loss because water isn’t sprayed into the air and the soil surface stays drier. Colorado State University Extension notes subsurface irrigation saves water by eliminating surface water evaporation.
- Less runoff and erosion because you’re not dumping water faster than the soil can absorb it and you’re not wetting large exposed surfaces. CSU Extension notes subsurface irrigation avoids surface ponding/runoff and related erosion issues common with surface methods.
- High potential application efficiency but only when designed, installed, and managed correctly Nebraska Extension stresses the word “potential” for a reason.
That last line matters: SDI can be incredibly efficient, but it’s also less forgiving than sprinklers if the design is poor.
Key benefits of Subsurface Irrigation

1) Drier surface = fewer weeds and sometimes fewer diseases
When the top layer of soil isn’t constantly wet, many weed seeds are less likely to germinate. CSU Extension specifically calls out reduced weeds and disease incidence with subsurface irrigation because the surface stays drier while water is delivered at the root zone.
2) Cleaner look, safer spaces
Because the system is buried, you don’t see hoses or heads, and there’s nothing to trip over. Nebraska Extension also notes a practical advantage of SDI being underground: equipment/operations can still enter the field even during irrigation in many cases.
3) Works well in hot, windy areas
CSU Extension notes SDI is especially suitable for arid/semi arid, hot, windy areas because water is applied below the surface and not exposed to wind and sun.
The “trust” problem: you can’t see the water, so you must verify it differently
With sprinklers, you can watch coverage. With SDI, you verify with soil checks:
- Use a soil probe, screwdriver, or moisture sensor in the first few weeks.
- Check near the root zone, not just at the surface.
- Make small runtime changes and re-check.
This is normal. Even university guidance emphasizes that SDI’s performance depends heavily on proper management.
Design and installation realities of Subsurface Irrigation

Depth isn’t “one number”
Depth depends on crop/roots, soil, and whether the system is seasonal or permanent. Kansas State University Extension notes some shallow subsurface systems under ~8 inches are retrieved/replaced annually, while multi year SDI is typically installed below tillage depth; for many row/perennial crops, driplines are often in the 12–18 inch range, with research examining depths even wider depending on conditions.
For turfgrass applications, the USGA warns that turf won’t grow more than about 6 inches from drip tubing without another irrigation source, and provides practical spacing guidance for teeing areas, parallel lines about every 12 inches.
Filtration + flushing are not optional
If you remember one “expert rule,” make it this: clogging is the enemy.
Kansas State’s SDI design publication states emitter clogging is the primary reason SDI systems fail and emphasizes careful design and maintenance.
USGA guidance also explicitly includes filtering, pressure regulation and flushing steps during installation/testing.
Manufacturers echo this: Netafim’s SDI operation/maintenance guide ties system longevity to water quality, proper operation, and regular maintenance, and notes SDI systems can operate for decades when maintained, while emphasizing filtration and appropriate component selection.
Pressure compensating dripline helps on slopes
On uneven terrain, pressure compensating lines help keep flow more uniform from start to end. Netafim describes choosing pressure compensating vs non compensating driplines depending on topography and design needs.
Usage tips that keep SDI efficient
- Start conservative, then tune: because you can’t see water, begin with shorter runtimes and increase based on soil moisture checks.
- Flush periodically: especially after installation, repairs, or if water quality is challenging. USGA’s install guide includes flushing and checking uniformity before closing everything up.
- Plan around cultivation/aeration: USGA cautions that major practices like deep tine aerification/tilling aren’t realistic after tubing is installed.
- Watch for pests: KSU notes rodents/insects can be more troublesome at shallow dripline depths.
When SDI may NOT be the best choice
Subsurface drip is powerful, but it’s not always the right tool if:
- you expect frequent deep digging/tilling/aerification
- rodents are a major issue in your area
- you don’t have filtration or can’t commit to maintenance
- the budget is tight
References
- FAO catalogue — subsurface irrigation reduces evaporation/runoff and weed pressure
- Colorado State University Extension — SDI saves water by eliminating surface evaporation; reduces weeds/disease; avoids runoff/erosion
- University of Nebraska Lincoln Extension (EC776) — definition of SDI; “potential” efficiency depends on design/management
- Kansas State University Extension (MF3408) — SDI depth considerations, shallow vs multi year, rodents/insects at shallow depths, filtration/clogging prevention
- Kansas State University Extension (MF2578) — clogging as primary failure driver; importance of design + maintenance
- USGA (PDF) — turf SDI installation notes: spacing guidance, filtration/regulator, flushing, limits on deep cultivation/aerification
- Netafim SDI operations/maintenance guide — longevity depends on water quality + maintenance; filtration + pressure compensating considerations
8. Rotary Nozzle Sprinklers
A friend of mine once “fixed” his brown lawn by doing what most people do: he ran the sprinklers longer. The lawn got greener… but so did the moss near the sidewalk, and the curb stayed wet long after the cycle ended. When we watched a zone together, the problem was obvious: the old fixed spray nozzles were dumping water so fast the soil couldn’t take it in. Half of it was running off, and the other half was turning into mist in the breeze.

He didn’t rip out the system. He just swapped the nozzles to rotary nozzles and suddenly the same yard started absorbing water instead of shedding it.
That’s the whole appeal of rotary nozzle sprinklers: they make sprinklers act more like “soak in” watering instead of “spray and pray.”
What rotary nozzles are ?
Rotary nozzle sprinklers , often called rotators or multi stream rotary nozzles screw onto many standard pop up spray bodies, but instead of a constant fan spray, they send out multiple rotating streams thicker “fingers” of water that sweep around the target area.

The U.S. Department of Energy’s Federal Energy Management Program describes them as multi stream rotational sprinkler heads that replace traditional fixed spray nozzles, with lower precipitation rates and better distribution uniformity and notes they can reduce misting/evaporation and runoff because water is applied more slowly.
Why they save water

1) Slower application = less runoff
Fixed sprays can apply water faster than many soils can absorb especially clay soils or slopes. Rotary nozzles apply water more slowly, giving the soil time to drink it in rather than letting it sheet off toward the driveway. DOE specifically links their rotating trajectories and slower application to avoiding runoff.
A concrete example: Hunter’s MP Rotator literature lists precipitation rates around 0.4 in/hr for standard MP Rotators with MP800 models around 0.8 in/hr .
That lower “inches per hour” rate is why your soil can absorb more of what you apply.
2) Less misting and better wind performance
Because the streams are heavier than a fine spray, you typically get less fog like mist meaning more water lands where you aimed it. DOE notes reduced evaporative losses because there is less misting.
3) Coverage tends to be more uniform
One reason people overwater is they’re chasing dry patches. DOE notes better distribution uniformity compared with traditional pop up nozzles.
Uniformity matters because it lets you water for plant needs not for “the one corner that always looks stressed.”
Is this a legit upgrade?
A bunch of water agencies treat rotary nozzles as a verified conservation step. For example:
- SoCal Water$mart promotes rotating nozzles and states they can use about 20% less water than conventional spray heads.
- LADWP lists a rotating nozzle rebate , up to a set amount per nozzle, with minimum quantities.
So it’s not just an irrigation industry trend utilities are putting money behind it.
How to use rotary nozzles correctly
Don’t mix rotary nozzles and fixed sprays in the same zone
Rotary nozzles and fixed sprays usually apply water at different precipitation rates. When you mix rates in one zone, one area gets too much while another gets too little, so you end up overwatering to compensate.
Expect longer run times
Because they apply water more slowly, you often need to run a zone longer to deliver the same depth of water. Hunter explicitly notes the “slower application rate” concept and shows precipitation rate differences meant to better match soil intake.
So yes: runtime can go up, but runoff and overspray losses can go down which is the whole point.
Match precipitation and arcs on purpose
If you’re trying to get truly even watering, the idea of “matched precipitation” same application rate across different arcs matters. Hunter’s own support docs explain how precipitation rate changes with arc/flow and why mismatches can flood corners.
Keep them clean
If a stream looks weak or missing, it may just need a quick cleaning. These nozzles are small and precise great for efficiency, but they still live in the real world.
The takeaway
Rotary nozzles are one of the easiest “high impact, low drama” upgrades in irrigation: swap the nozzles, adjust scheduling, and you often get better absorption, fewer puddles, and more consistent turf without ripping out the whole system.
References
- LADWP — rotating nozzle rebate listing
- DOE FEMP — Multi stream rotational sprinkler heads: lower precipitation rate, better uniformity, reduced misting/evaporation, less runoff, retrofit friendly
- Hunter Industries — MP Rotator precipitation rates (0.4 in/hr standard; 0.8 in/hr MP800) + design guidance on matching soil intake rates
- Hunter Industries support — precipitation rate and why mismatched arcs flood corners
- SoCal Water$mart — rotating nozzle benefits and claim of ~20% less water than conventional spray heads
9. Rainwater Harvesting Systems
Here’s a scene that plays out in a lot of homes: it rains hard for 30 minutes, water rushes off the roof, floods the driveway, and disappears into the drain. Then two sunny days later, you’re back to watering plants with paid tap water.

Rainwater harvesting flips that story. You catch the roof runoff, store it in a barrel or tank, and use it later for irrigation and other non potable needs. EPA describes rain barrels as a simple way to collect rainwater and reduce stormwater runoff from your property.
A true to life story
Imagine “Rina,” who keeps a small rooftop garden. In monsoon season, her plants are fine but as soon as dry weeks start, her water use spikes. She installs one barrel under a downspout and realizes something shocking: one decent rainstorm fills it faster than expected. Now she uses the stored water for the next few days especially for pots and flowerbeds and the garden stays happier without touching the tap as often.
That’s the practical value: saving water during dry spells by banking the wet days.
How it works
A basic system has three parts:
- Catchment – usually your roof + gutters
- Storage – rain barrel or cistern
- Use – spigot, hose, drip line, watering can, or pump
This “three part” setup is also how EPA explains rainwater harvesting in its guidance.
Why it’s worth doing

1) Saves treated water
Using rainwater for irrigation means you’re not using drinking quality water on plants. Nebraska Extension and NC State Extension both highlight rainwater harvesting as an alternative water source that can help conserve potable supplies and reduce demand.
2) Reduces stormwater runoff problems
Catching roof runoff can lower runoff volume and help reduce the “rush” of water moving off your property something extensions and EPA call out as a key stormwater benefit.
3) Rainwater is plant friendly
Rainwater is often valued for being soft and free from some tap water treatment byproducts. The Texas Water Development Board’s manual notes rainwater is valued for its purity/softness and that plants often thrive under irrigation with stored rainwater.
The quick math
A commonly used estimate is:
Gallons collected ≈ Roof area (sq ft) × Rainfall (inches) × 0.623
University of Arizona’s Water Wise program uses the same factor , 0.623 gallons per square foot per inch of rain.
Example:
If your roof is 1,000 sq ft and you get 1 inch of rain:
1,000 × 1 × 0.623 ≈ 623 gallons .
Real systems collect a bit less due to splash, leaks, first flush diversion, and roof material, so it’s smart to treat this as “potential,” not a guarantee.
What to include for a clean
Screens + covered storage
Debris screens keep leaves out. A tight lid or mesh keeps insects out and blocks sunlight (less algae). Purdue Extension recommends dark/covered barrels to reduce algae and mentions screens and first flush devices as common “cleaner water” steps.
First flush diverter
The first runoff from a roof can carry more dust, droppings, and debris. Oregon State Extension calls first flush diverters a “must have” for rain collection systems and explains they route the first flow away from the tank.
Purdue Extension similarly notes first flush diversion helps bypass water with higher concentrations of debris/bacteria/pollutants.
Overflow routing
A full barrel needs an overflow outlet/hose that directs extra water safely away. Many extension guides include overflow as a standard component.
Safety
Treat stored rainwater as non potable unless designed otherwise
Roof runoff can pick up contaminants depending on roof material and what’s on the roof. Penn State research notes some roofing materials can leach contaminants into runoff.
That’s why homeowner guides typically frame harvested rainwater for non potable uses like irrigation unless properly treated and installed to code.
Mosquito control matters
CDC recommends tightly covering water storage containers like rain barrels so mosquitoes can’t get in, and using mesh with holes smaller than an adult mosquito if there’s no lid.
Using rainwater with irrigation
- Watering cans + hose: easiest for home gardens.
- Gravity fed drip: works if the barrel is elevated .
- Pump fed drip/sprays: better for larger gardens or if you want consistent pressure , NC State notes pumps may be used depending on the design.
A great combo is rain barrel + drip irrigation: you’re using captured water and delivering it efficiently.
A simple “starter setup” that doesn’t overwhelm you
- Use it quickly after rains don’t let it sit for weeks.
- Install a rain barrel under one downspout .
- Add a debris screen + tight lid/mesh.
- Add an overflow hose to a safe drain area.
- If you want cleaner water, add a first flush diverter.
References
- EPA – Rain Barrels (Soak Up the Rain): explains rain barrels, installation basics, and how they help reduce stormwater runoff.
- University of Arizona Water Wise Harvest Rain: provides the roof catchment calculation using the 0.623 factor (1 inch of rain on 1 sq ft = 0.623 gallons).
- CDC – Mosquito Control at Home: recommends tightly covering rain barrels/cisterns and using wire mesh with holes smaller than an adult mosquito.
- Oregon State University Extension (EM 9101 PDF): explains what a first flush diverter does , routes the first runoff away; helps reduce smaller contaminants.
- Purdue Extension (PDF): recommends dark/covered barrels to reduce algae, plus screens and first flush diversion for cleaner stored water.
10. Mulch + Water – Wise Gardening
The first time I really believed in mulch wasn’t from a textbook. It was from a mistake.
A neighbor had a flowerbed that looked great in spring, then turned into a thirsty, cracked patch by early summer. He kept watering more, but the soil still dried out fast. One weekend he spread a thick layer of wood chips then accidentally left a small corner uncovered near the edge.

Two weeks later, that uncovered corner was the giveaway: the mulched area stayed cool and slightly damp under the surface, while the bare patch baked hard and grew weeds like it was getting paid. Same sun, same watering… totally different results.
That’s why mulch belongs in any “efficient irrigation” list. It doesn’t deliver water but it helps the water you already apply stay in the root zone longer.
What mulch actually does ?
Mulch is a protective layer , wood chips, shredded bark, compost, straw, leaf mold, etc. spread over soil. The big win is moisture retention: mulch shields soil from sun and wind, which slows evaporation.

Utah State University Extension reports that mulching around trees, shrubs, and flower beds can create a ten fold reduction in evaporative water loss from soil.
That “ten fold reduction” is why people often summarize it as “up to ~90% less evaporation” it’s the same idea explained in everyday terms.
Mulch also helps in other ways that indirectly reduce water demand:
- keeps soil temperatures more stable
- reduces crusting and compaction at the surface
- blocks light, so fewer weeds germinate
Why mulch makes drip/soaker/smart irrigation perform better
If you use drip lines or soaker hoses, mulch is like putting a lid on a pot: the water goes in, and less escapes.
You’ll often notice:
- the soil stays moist longer between cycles
- plants look less stressed on hot days
- you can reduce watering frequency once things are established
USU’s water wise landscaping guidance specifically ties mulch to reduced evaporation and better water availability to plants.
Water conserving gardening practices that pair perfectly with mulch

1) Hydrozoning: stop watering everything the same
A lot of yards waste water because one irrigation zone waters a mixed crowd: thirsty lawn, drought tolerant shrubs, shaded plants, sunny plants everyone gets the same schedule.
Hydrozoning fixes that by grouping plants with similar water needs so each area gets the right amount. That’s the definition used by Extension’s landscape water conservation resources.
Real life example: put your higher water flowers and veggies closer together and closer to a water source and keep low water natives or hardy shrubs in a separate area with less frequent irrigation.
2) Choose plants that want your climate
This isn’t about making your yard “dry and boring.” Xeriscaping is simply water, wise landscaping built around smart plant selection, soil improvement, efficient watering, and mulching. Colorado State University outlines xeriscaping principles as a practical, nature friendly approach that reduces water use and maintenance.
3) Water at the right time
Even with mulch, timing matters. Early morning watering usually reduces loss to heat and wind, and gives plants time to use moisture through the day.
Key benefits
Evaporation reduction
Mulch slows the “steam off” effect from bare soil. USU highlights major evaporation reductions with mulching in beds and around trees/shrubs.
Better soil over time
As organic mulch breaks down, it adds organic matter, improving soil structure and helping soil hold water. USU’s water wise landscape maintenance notes that organic mulches decompose and improve soil over time, while also recommending a 2–4 inch mulch layer.
Weed suppression
Mulch blocks light at the soil surface, which helps reduce weed germination meaning less competition for water and less time spent weeding.
Usage tips
Use the right depth: 2–4 inches for most gardens
University of Illinois Extension recommends 2 to 4 inches of mulch and warns that overly thick layers can mat down and reduce water/oxygen penetration.
Keep mulch away from trunks and stems
Don’t pile mulch against tree trunks “mulch volcano”. Pull it back so the base can breathe and stay dry this helps prevent rot and pest issues.
Match mulch type to the space
- Wood chips/shredded bark: great around trees, shrubs, perennial beds
- Straw: great for veggie gardens , easy to move and refresh
- Compost as a thin mulch: feeds soil, works well around heavy feeders but can break down fast
- Rock/gravel: useful in desert/succulent gardens; doesn’t improve soil, but can still reduce evaporation and protect soil surface
Refresh when it breaks down
Organic mulch isn’t forever. Top it up when it thins out. USU notes decomposing mulches will need replenishing.
The honest truth
Mulch is powerful, but too much can cause problems:
- soggy root zones
- fungal issues
- poor oxygen exchange
- rodents hiding in thick, matted layers
That’s why sticking to recommended depths matters.
References
- Colorado State University — Xeriscaping principles and water wise landscaping approach
- Utah State University Extension — “Water-Wise Landscaping: Mulch” , ten fold reduction in evaporative water loss; water wise benefits
- University of Illinois Extension — Proper mulching techniques , recommended 2–4 inch depth; avoid over mulching
- Extension Landscape Water Conservation — Hydrozoning definition , group plants with similar water needs
How to Choose the Best Irrigation System for Your Yard
A couple of years ago, a friend moved into a new house and did what most of us do: kept the existing sprinkler schedule. The lawn looked fine… but the flowerbed got hammered , the trees still looked thirsty, and the water bill climbed.
The “system” wasn’t the issue. The match was.
Picking the best irrigation setup is mostly about answering one question honestly:
What are you watering and how is it planted?
Everything else, climate, budget, automation just helps you refine the choice.
Below is a practical way to decide based on the efficient options we’ve discussed.
Step 1: Start with your space size and complexity
Small garden
If you’re watering a small area, the best choice is usually the simplest one you’ll actually maintain:
- Soaker hose for short rows or a single bed
- Basic drip/micro irrigation kit if you want more control , separate emitters per plant
Micro/drip systems apply water slowly under low pressure, which helps prevent runoff and puts water right where plants need it. Clorado State Extension describes drip/micro irrigation as low flow, low pressure water delivery applied much more slowly than sprinklers.
Medium to large yard
Once you have lawn + beds + trees, one “all purpose” setup usually wastes water. Consider a hybrid:
- Sprinklers or rotary nozzles for turf
- Drip/micro for beds and shrubs
- Bubblers/deep watering for trees
…and separate them into zones.
Step 2: Match the system to plant type
Lawns
Grass is a “broad coverage” plant. Sprinklers are usually the most practical, but efficiency depends on components and setup. EPA WaterSense notes that design, installation, and maintenance and using efficient technologies can reduce outdoor water use.
Vegetable beds and flowerbeds
Most vegetables and ornamentals do best when water goes to the root zone, not the leaves. Micro/drip systems are ideal here because they can be customized to different layouts and plant types.
Trees and shrubs
Trees typically prefer deep watering less often, and you want water in the root zone not sprayed everywhere. Bubblers or deep watering methods work well here.
Mixed plantings
If you have “everything everywhere,” don’t fight it organize it:
- group thirsty plants together
- group drought tolerant plants together
That’s hydrozoning, and it’s specifically defined as grouping plants with similar water needs so each irrigation zone can deliver the right amount.
Step 3: Let your climate choose the direction
Hot / dry / windy areas
Choose systems that reduce losses:
- Drip/micro
- Subsurface options
- Mulch + hydrozoning
These reduce evaporation and keep water where roots can use it.
Rainy areas with dry spells
You don’t need “more watering,” you need “smarter watering.” This is where controllers shine:
Replacing a standard clock based controller with a WaterSense labeled controller can save an average home up to 15,000 gallons per year, according to EPA WaterSense.
Step 4: Decide how much DIY and maintenance you’re willing to do
Be honest here this is where most systems fail.
Low effort
- Soaker hose + timer
- Simple drip kit for one bed
Medium effort
- Drip/micro zones with filters + periodic checking for clogs
, Utah State Extension has a very practical homeowner focused guide on DIY drip setup and using plant/soil details to reduce waste.
Higher effort / higher upfront cost
- In ground systems , sprinklers, subsurface
- Multi zone setups with valves + controller
Step 5: Automation and control
If you want “set it and forget it,” aim for:
- separate zones by plant type , lawn vs beds vs trees
- a smart controller or WaterSense labeled controller for weather/season adjustment
EPA WaterSense also emphasizes measuring/monitoring irrigation use and improving irrigation management to reduce costs and water waste.
A quick “choose it fast” cheat sheet
- Mostly lawn: efficient sprinklers/rotary nozzles + good scheduling
- Mostly beds/veggies: drip/micro irrigation
- Trees/shrubs focus: bubblers/deep watering + mulch
- Mixed yard: hybrid zones + hydrozoning
- You travel a lot: smart/WaterSense controller
- Tight budget: soaker hose or basic drip kit first, then upgrade later
The real “best” system
The best system is the one that:
- matches your plants
- matches your climate
- matches your lifestyle
…and gets maintained.
Summary Table: 10 Best Irrigation Systems for Efficient Water Use
| Sl. No. | Irrigation System | Best For | Water Efficiency | Key Advantage | Main Limitation |
|---|---|---|---|---|---|
| 1 | Drip Irrigation | Vegetables, orchards, containers | 100 % | Delivers water directly to roots | Needs filtration & monitoring |
| 2 | Soaker Hoses | Garden beds, rows, small orchards | 90 % | Very low cost & simple | Uneven output if too long |
| 3 | Smart Controllers | Any automated system | 100 % | Prevents overwatering automatically | Needs correct setup |
| 4 | High Efficiency Sprinklers | Lawns, large turf areas | 80 % | Covers large areas efficiently | Still some evaporation |
| 5 | Bubblers | Trees, large shrubs | 90 % | Deep root watering | Can waste water if flow too high |
| 6 | Micro Irrigation / Micro Sprays | Flower beds, orchards, greenhouses | 90 % | Flexible coverage | Needs filtration |
| 7 | Subsurface Drip (SDI) | Lawns, crops, hot/windy areas | 100 % | Almost no evaporation | Harder to troubleshoot |
| 8 | Rotary Nozzle Sprinklers | Lawns replacing spray heads | 90 % | Slower application, less runoff | Longer runtime needed |
| 9 | Rainwater Harvesting | Any garden with rainfall | 80 % | Uses free water | Storage limits supply |
| 10 | Mulch & Water-Wise Practices | Every landscape | 100 % | Makes all irrigation more effective | Needs maintenance |
Final Thoughts
The biggest mistake people make with irrigation isn’t choosing the wrong system it’s expecting one system to do everything.
The most water efficient landscapes almost always use a combination:
- drip or micro irrigation for beds
- sprinklers or rotary nozzles for turf
- bubblers for trees
- mulch and hydrozoning to support everything
Efficiency isn’t about technology alone. It’s about matching water delivery to plant needs, checking systems occasionally, and letting soil not the clock decide when watering is necessary.
If your plants look healthier and your water use is going down, you’ve chosen correctly even if your setup isn’t fancy.
Frequently Asked Questions about 10 Best Irrigation Systems for Efficient Water Use
1) Which irrigation setup saves the most water?
If you’re chasing maximum efficiency, it’s hard to beat drip irrigation and even better, subsurface drip. Both push water right into the root zone instead of throwing it into the air, so you lose less to wind, heat, and runoff. Want an easy bonus? Mulch. It’s like putting a lid on the soil so the moisture sticks around longer.
2) Are sprinkler systems always water wasters?
Not automatically. Sprinklers waste water when they’re outdated or poorly tuned like spraying the sidewalk, misting in the wind, or running too long. But with the right upgrades , think rotary nozzles, pressure regulation, and better scheduling, sprinklers can be surprisingly efficient especially for grass, which is one of the hardest things to water evenly without them.
3) Can I use drip irrigation for a lawn?
Most of the time, regular drip isn’t the best match for turf. Lawns need water spread evenly across a wide area, and drip is built for targeted root zones. That said, subsurface drip can work under turf some homeowners love it but it isn’t a “set it and forget it” project. It takes careful spacing, good filtration, and a little patience to dial in.
4) Do smart controllers actually reduce water use or is it just marketing?
They can save a lot, but only if they’re set up properly. EPA WaterSense has reported noticeable reductions compared to old clock timers especially when homeowners enter accurate zone details and keep sprinkler heads working correctly.

Thesis Link : https://saulibrary.edu.bd/daatj/public/uploads/BAU200601_19-Pp_5.pdf
- Best Backpack for Work, Travel, College, and Everyday Use - May 24, 2026
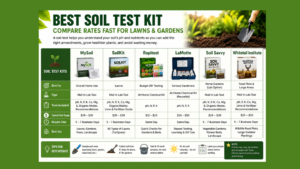
- Best Soil Test Kits for Lawns and Gardens - May 16, 2026
- Best Farm Loans in USA – How to Get Approved Fast in 2026 - April 29, 2026


магазин бытовой химии франшиза [url=http://oneprice.shop/]https://oneprice.shop/[/url]
https://google.cf/url?q=http://oneprice.shop
[…] Read more Allstate Car Insurance Review – Real 2026 Savings & Discounts 10 Best Irrigation Systems for Efficient Water Use […]