Vermiculture: How to Raise Worms & Make Super Compost
Let’s talk about worms. Yep, you heard me right worms. Those wiggly, squiggly little creatures you might normally associate with fishing bait, mud, and things best left under rocks. But hold on, worms, specifically in the practice of vermiculture, are so much more than slimy garden dwellers. They’re tiny eco warriors, tirelessly working to reduce waste and enrich soil. So, grab a spade and maybe a pinch of courage, and let’s dig into the fascinating world of vermiculture .
What is Vermiculture?

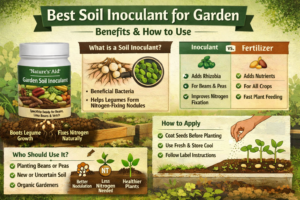
Vermiculture is all about raising worms especially red wigglers, to help break down organic kitchen and garden waste into a rich, soil boosting compost called worm castings. These castings are packed with nutrients and helpful microbes that give plants a natural boost.
Don’t let the term “worm poop” put you off. In the gardening world, it’s often called “black gold.” Why? Because it’s one of the best fertilizers nature has to offer.
Backed by science: A study in Environmental Science and Pollution Research (2020) showed that vermicompost can improve soil microbial life and nutrient uptake better than synthetic fertilizers.
Why Should You Care About Worms for Vermiculture?

“Why should I care about worms?” you might ask, cringing slightly. Well, here are some compelling reasons:
1. You Cut Down on Food Waste
Did you know that about one third of food globally ends up wasted? Worms help you recycle scraps like veggie peels, coffee grounds, and eggshells into something useful.
2. You Get Natural Fertilizer
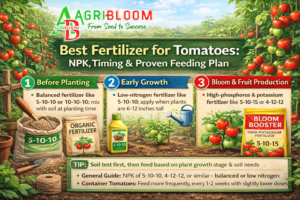
Unlike store bought fertilizer, worm castings offer nutrients in just the right balance: nitrogen, phosphorus, potassium, plus calcium and magnesium—all without chemicals.
Science check: The Journal of Plant Nutrition (2019) confirmed vermicompost improves soil NPK values and supports sustainable agriculture.
3. You Improve Soil Health
Worm castings help soil hold moisture better, improve its structure, and balance pH levels. That’s a win for plant roots.
4. It’s Safe for Kids, Pets, and Pollinators
No chemicals, no fumes. Just nature doing its thing.
5. It’s Inexpensive
Once your worms are set up, they feed on scraps you’d throw out anyway. It’s a budget friendly hobby with big results.
Setting Up Your Own Worm Farm
So, maybe you’re curious or at least a little intrigued about starting a worm farm. Great choice! Here’s a beginner friendly guide to kickstart your journey into vermiculture.
1. Vermiculture: Pick the Right Worms

Let’s get something straight: not all worms are made for life in a compost bin.
If you’ve ever dug around in your garden or gone fishing, you’ve probably seen big, wriggly nightcrawlers (Lumbricus terrestris). While they’re amazing at burrowing deep and aerating the soil, they’re terrible roommates in a worm bin. They prefer cold soil, need space to tunnel, and simply don’t handle kitchen waste well.
For vermiculture, the true stars are red wigglers, scientifically known as Eisenia fetida. These little guys may not win beauty contests, but they’re the MVPs of composting.
What Makes Red Wigglers Special?
- Surface Dwellers: Unlike nightcrawlers, red wigglers are epigeic, they live and feed in the top few inches of decaying organic matter. That’s exactly what your worm bin mimics.
- High Food Intake: According to Cornell Waste Management Institute, a pound of red wigglers can eat about half their weight in food scraps per day, meaning 1,000 worms roughly a pound can handle up to half a pound of waste daily.
- Rapid Reproduction: Under the right conditions, red wigglers can double their population every 60–90 days. Each worm lays a cocoon every 7–10 days, and each cocoon can hatch 2–4 baby worms. That means a thriving colony in no time.
- Hardy and Adaptable: They thrive in a wide temperature range (55°F–77°F / 13°C–25°C), tolerate variable moisture levels, and are less picky about conditions compared to other composting species.
Research Spotlight
A 2005 study published in the journal Bioresource Technology by Ndegwa and Thompson confirmed that red wigglers are the most efficient species for organic waste decomposition in small scale vermicomposting systems, especially household bins and urban gardens.
Another paper in Waste Management & Research (Domínguez & Edwards, 2011) found that E. fetida shows better tolerance to variable food types like acidic fruit peels or fibrous scraps compared to other worms used in experimental compost setups.
Real Life Example
When I first got started, I mistakenly added garden worms to my bin. They vanished within days, probably dug out or died off. Then I switched to red wigglers, ordered online from a local seller. Within a month, they had settled in, started reproducing, and visibly transformed my veggie scraps into fluffy black compost. Lesson learned: don’t bring a soil worm to a compost party.
Quick Summary
| Feature | Eisenia fetida (Red Wiggler) | Lumbricus terrestris (Nightcrawler) |
|---|---|---|
| Habitat | Surface layer (topsoil/organic waste) | Deep soil (burrows 6 ft or more) |
| Composting Ability | Excellent | Poor |
| Reproduction Rate | Fast (every 60–90 days) | Slow |
| Temperature Tolerance | 55°F–77°F (13°C–25°C) | Prefers cooler, stable temps |
| Best For | Indoor and outdoor worm bins | Soil aeration and fishing bait |
2. Vermiculture: Choose a Bin and Bedding
If you think worms aren’t picky tenants, think again. Give them the wrong environment, and they’ll either try to escape or simply stop eating and reproducing. So yes—setting up the right worm bin and bedding matters a lot. It’s like building a tiny, underground spa where your worms can thrive and turn food scraps into garden gold.

Choosing the Right Bin: Store Bought or DIY?
You have two solid options here:
- Commercial Worm Bins: These are designed for optimal airflow, drainage, and easy harvesting. Brands like the Worm Factory 360 or Can-O-Worms are popular and well reviewed. They often come with stackable trays, a spigot for draining liquid (worm tea), and lids that manage moisture.
- DIY Worm Bins: Budget friendly and surprisingly effective. You can use an old plastic tote, wooden crate, or even stacked buckets. Just make sure you add:
- Ventilation holes on the sides and lid for airflow.
- Drainage holes on the bottom to avoid water buildup.
- A catch tray underneath to collect excess moisture.
Research Insight: According to the University of Illinois Extension, lack of proper aeration is one of the top reasons worm bins fail. Poor air circulation leads to anaerobic no oxygen conditions, which cause odors and can kill worms.
Size Matters
- A 10 gallon bin is enough for a small household (1–2 people).
- A 20 gallon bin suits a family of four.
- Rule of thumb: One square foot of surface area per pound of food waste per week.
Real Life Tip: I started with a 14 gallon storage bin from the hardware store. Total cost? Under $10. With a few drilled holes and shredded paper, it was worm ready in less than 30 minutes.
Bedding: More Than Just Worm Furniture
Think of bedding as both the worms’ living space and starter food. It should be fluffy, moist, and rich in carbon.
Best Bedding Materials:
- Shredded newspaper black and white print only—no glossy pages
- Cardboard corrugated works great
- Coconut coir sustainable, easy to find
- Peat moss effective but less eco friendly than coir
- Decayed leaves
- A handful of garden soil adds beneficial microbes
Scientific Backing: A study published in the Journal of Environmental Management (Kale, 1998) found that bedding rich in carbon and microbes helps worms digest food faster and increases reproduction rates.
Moisture Level: Bedding should feel like a wrung out sponge—not soggy, but damp. Worms breathe through their skin, and without enough moisture, they’ll suffocate. Too much water, though, and you’ll have a smelly, anaerobic mess.
Pro Tip: Mix your bedding materials for the best balance. I like using 50% shredded newspaper, 25% coir, and 25% cardboard—easy to find, low cost, and composts beautifully.
Why Bedding Matters
- Absorbs excess moisture from food scraps.
- Controls odor by keeping the bin aerobic oxygen rich.
- Buffers pH—especially if you’re feeding acidic scraps like tomatoes or fruit.
- Supports microbial activity, which is essential for decomposition.
EPA Guidance: The U.S. Environmental Protection Agency confirms that bedding not only provides a habitat for worms but is also crucial in preventing pest issues and leachate excessive liquid runoff.
Real Life Story
When I first started, I only used newspaper. It worked for a while—but the bin smelled musty and soggy by the second month. I later added some dried leaves and coir, and that changed everything. The texture became fluffier, odor disappeared, and my worms doubled in number within weeks.
3. Vermiculture: Feed Your Worms Right

If you think worms will eat anything, think again. They’re not quite picky, but they do have some dietary preferences and ignoring them can turn your worm bin into a stinky mess instead of a rich compost factory.
Feeding worms the right way is part science, part intuition, and a whole lot of observation. Once you get the hang of it, you’ll be amazed how smoothly they convert scraps into fertile castings.
What Worms Love to Eat
Red wigglers (Eisenia fetida) thrive on organic, plant based scraps, especially those that are soft, moist, and easy to break down. These materials are rich in carbon and nitrogen, the two elements worms and the microbes in the bin need to thrive.
Top Worm Approved Foods:
- Fruit peels banana, apple, melon but not citrus
- Vegetable scraps carrot tops, lettuce leaves, potato peels
- Coffee grounds and paper filters
- Tea bags paper only, no plastic mesh
- Crushed eggshells provides calcium, helps balance pH
- Stale bread in small amounts
- Shredded paper napkins and paper towels unbleached, chemical free
Scientific Backing: A study published in Waste Management (2011) by Domínguez and Gómez Brandón confirmed that worms perform best on diverse, easily decomposable organic materials. Mixing different types of scraps improves decomposition speed and microbial activity.
What NOT to Feed Worms
While red wigglers are tough little recyclers, some foods disrupt the balance in your worm bin by attracting pests, introducing pathogens, or causing unpleasant odors.
Avoid Feeding:
- Meat, fish, and bones attracts flies and smells terrible
- Dairy -spoils quickly, clogs airflow
- Oily or fried foods -hard to decompose, goes rancid
- Citrus peels -highly acidic and contain limonene, toxic to worms
- Onions and garlic -strong antimicrobial properties, can irritate worms
- Processed foods and salty snacks -unnatural ingredients + salt = bad soil biology
Research Note: According to the Cornell Waste Management Institute, overloading bins with acidic or high fat foods slows decomposition and can lead to anaerobic (oxygen poor) conditions. That’s when bins start to smell and worms may try to escape.
Portion Control: How Much to Feed
Worms can eat about half their body weight per day. If you start with 1 pound of worms (roughly 1,000 red wigglers), begin by adding ½ pound of food scraps every 2–3 days.
Overfeeding is one of the most common beginner mistakes, it leads to foul smells and fruit fly invasions. Always feed gradually and check to see that old food is mostly consumed before adding more.
Extension Tip: The University of Illinois Extension recommends starting small and adjusting as you learn your bin’s appetite. Each worm colony has its own pace, influenced by temperature, moisture, and food type.
Bury the Food
Don’t just toss food scraps on top. Always bury them in the bedding to prevent odors and keep pests like flies or ants away.
- Pick a new spot each time.
- Dig about 2–3 inches deep.
- Cover with fresh bedding or castings.
This keeps your bin tidy and gives worms more access to food from all angles.
Real Life Story
When I first started vermiculture, I thought feeding more scraps = more compost. So I dumped in all my kitchen waste at once. Within a week, the bin reeked like sour soup. I had to start over. Lesson learned: feed less and observe more. Now, I rotate feeding spots like a clock left side on Monday, right side on Thursday. It keeps the bin balanced and my worms happy.
Bonus: Worm Bin Menu Ideas
Need inspiration for feeding your worms? Here’s a sample “meal plan”:
| Day | Scraps Added |
|---|---|
| Monday | Chopped spinach stems, banana peel |
| Wednesday | Coffee grounds + eggshell mix |
| Friday | Apple cores, carrot peels |
And yes, your worms would probably give it a Michelin star if they could.
4. Vermiculture: Keep the Bin Moist
Worms don’t drink water from a bottle, they breathe and absorb moisture through their skin. That means moisture isn’t just a “nice to have”, it’s essential to their survival. Too dry, and they can’t breathe. Too wet, and they might drown or develop fatal fungal infections.

So how do you strike the perfect balance?
Let’s break it down.
The Gold Standard: “Wrung Out Sponge”
If you remember nothing else, remember this: your worm bin should feel like a wrung out sponge. Not dripping wet. Not dusty dry. Just damp enough that if you squeezed a handful of bedding, you might get one or two drops of water, no more.
Why This Matters: According to a study published by Edwards & Bohlen in “Biology and Ecology of Earthworms” (1996), worms lose water quickly due to their permeable skin. Even a small drop in humidity can stress or kill them.
Signs Your Bin Is Too Dry
- Worms are sluggish or retreating to corners
- Food scraps dry out without being consumed
- Bedding is flaky or hard
Fix It With:
- Light misting with a spray bottle
- Adding moist bedding e.g., soaked shredded newspaper
- Covering with damp newspaper to retain humidity
Scientific Insight: A study by Jung et al. (2007) in the Journal of Environmental Management found that red wigglers thrive best at a moisture content between 70–85%.
Signs It’s Too Wet
- Foul, sour, or ammonia smell
- Presence of mold or maggots
- Worms trying to crawl out of the bin
- Bedding feels soggy or compacted
Fix It With:
- Add dry bedding shredded cardboard or coir
- Stir gently to increase aeration
- Drain excess liquid if necessary
Pro Tip: According to the University of Illinois Extension, poor drainage and ventilation are leading causes of worm bin failure due to excessive moisture build up.
Real Life Tip: The Paper Towel Test
Here’s what I do: I take a clean paper towel, press it into the top layer of bedding, and see if it comes up damp. If it’s dry, I mist the bin. If it’s wet and sticks, I add dry shredded newspaper. It’s low tech, but it works.
Moisture Control Tools
| Tool | Use |
|---|---|
| Spray Bottle | For light, even misting |
| Moisture Meter | Optional, but great for precision |
| Plastic Sheet Cover | Helps retain humidity (optional) |
| Bedding Materials | Adjust balance: dry = absorbent, moist = hydrating |
Environmental Note: If your home is dry in winter , worm bins tend to dry out faster. During rainy seasons, excess water might collect even in a sealed bin, always monitor.
Bonus Tip: Worm Tea ≠ Leachate
If your bin starts producing dark liquid called leachate, that’s a sign it’s too wet. Leachate isn’t the same as “worm tea” which is brewed from castings. Always address moisture if leachate appears.
Reference: Oregon State University Extension recommends placing a drainage tray or second bin underneath to collect and assess excess moisture levels.
5. Vermiculture: Harvesting the Worm Castings

After a few months of non stop munching, your worm crew will have transformed all that kitchen waste into rich, dark compost , also known as worm castings. This is the good stuff your plants have been waiting for. When the bedding starts to look more like earthy, crumbly soil than scraps, it’s a sign that your little composting champions are ready to share the harvest. So roll up your sleeves, get in there, and gather up that plant boosting goodness!. To separate the worms from their “precious poop,” simply push the castings to one side of the bin and add fresh bedding to the other side. The worms will migrate to the new bedding over a week or so, allowing you to scoop up their castings without too much fuss.
Congratulations. You’ve just become a certified “worm poop” collector.
The Benefits of Worm Castings for Plants

So, you might be wondering, are worm castings really worth all the hype? Do plants actually care about what our wriggly friends are leaving behind? The answer is a resounding yes. Worm castings are like gourmet food for your plants, packed with nutrients that help them grow stronger, healthier, and greener. Think of them as a supercharged soil booster a little sprinkle can make a world of difference. Your plants will thank you, trust me” Oh, they totally are. Here’s why:
- Nutrient Rich: Worm castings contain more nutrients than typical compost, including beneficial microbes that help plants absorb nutrients better. Think of worm castings as a potent pick me up for your plants. It’s like handing them a nutrient packed green juice that leaves them energized and ready to thrive! With all the minerals, enzymes, and beneficial microbes packed into those little castings, your plants will feel the difference, healthier roots, vibrant leaves, and a natural glow. Just a sprinkle goes a long way in transforming your soil into a plant paradise
- Improved Soil Structure: Castings help soil retain moisture while also improving drainage, creating the ideal environment for roots. Think of it as making your soil feel like it’s at a 5 star resort.
- Disease Resistance: Worm castings contain compounds that can help plants resist disease and pests. They basically strengthen plant immunity, reducing the need for pesticides. Your plants get tough, naturally .
Fun Facts About Vermiculture
- Worms don’t have eyes, but they can sense light and prefer the dark. Night owls, much?
- They have five hearts, so you could say they’re “all heart.”
- A single red wiggler can produce up to 1,500 baby worms in a year. That’s a lot of family reunions.
- Worms breathe through their skin. If their environment dries out, they can’t breathe. Moisture is life .
Common Myths About Vermiculture
Myth #1: Worm Farms Smell Terrible.
False! A properly maintained worm bin smells earthy, not stinky. If it smells bad, something is wrong, usually too much food or too much moisture.
Myth #2: Worms Will Escape and Take Over Your House.
Nope. Worms are homebodies; they’ll stay in their cozy bin as long as conditions are right.
Myth #3: You Can Only Compost Outside.
Not true. Worm bins can work indoors as well. Many people keep small bins under the kitchen sink. Just imagine, tiny little compost heroes working away right beneath you .
Summary Table for Vermiculture:
| Aspect | Details |
|---|---|
| Definition | Vermiculture is the process of breeding and raising earthworms to produce nutrient rich compost called vermicompost. |
| Purpose | To recycle organic waste into high quality organic fertilizer and improve soil health. |
| Key Worm Species | Eisenia fetida (Red Wigglers), Lumbricus rubellus, Perionyx excavatus. |
| Ideal Conditions | Temperature: 15–25°C (59–77°F), Moisture: 60–80%, pH: 6.5–7.5. |
| Feeding Material | Fruit and vegetable scraps, paper, dry leaves, plant waste (avoid meat, dairy, oily foods). |
| Vermicompost Benefits | Improves soil structure, enhances nutrient availability, boosts plant growth, increases water retention. |
| By-products | Vermicompost, worm tea (liquid fertilizer), earthworms for soil improvement. |
| Applications | Organic farming, home gardening, soil restoration, waste management. |
Final Thoughts
Vermiculture may seem odd at first—after all, worms are not your typical pet—but it’s incredibly rewarding. You’re helping to reduce waste, enriching your soil, and giving back to the planet, one worm at a time. Plus, once you get over the “ick” factor, you might find these little critters oddly endearing.
So, next time you see a worm, give it a nod of respect. It might just be the start of a beautiful, wriggly friendship.
References
- Edwards, C.A. & Bohlen, P.J. (1996). Biology and Ecology of Earthworms.
- Domínguez, J. & Gómez-Brandón, M. (2011). Waste Management.
- Ndegwa, P. & Thompson, S. (2005). Bioresource Technology.
- EPA. (2023). Vermicomposting Guidelines.
- Cornell Waste Management Institute
- Rodale Institute. (2022). Benefits of Worm Castings.
- Oregon State University Extension
- University of Illinois Extension
FAQs for Vermiculture
Yes. As long as it’s well ventilated and not overfed, it won’t smell or attract pests.
One pound (about 1,000 worms) is great for a small household.
A little is okay, but too much can lower pH and harm worms.
Reduce feeding, stir bedding, and check for excess moisture.
That’s leachate. It’s different from brewed worm tea and should be diluted heavily or avoided.

Thesis Link : https://saulibrary.edu.bd/daatj/public/uploads/BAU200601_19-Pp_5.pdf
- Best Backpack for Work, Travel, College, and Everyday Use - May 24, 2026
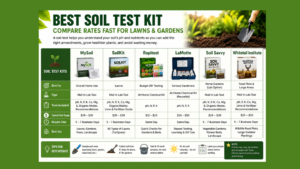
- Best Soil Test Kits for Lawns and Gardens - May 16, 2026
- Best Farm Loans in USA – How to Get Approved Fast in 2026 - April 29, 2026